👋 Welcome to Performance in the router
In this course, we'll troubleshoot some preexisting performance issues in a GraphQL API using the GraphOS Router.
We'll begin with a simulated production environment, with several subgraphs and a running GraphOS router. Right away, we'll see that our graph is receiving too much traffic, and performance is suffering. As we explore different ways to improve latency, we'll use observability tools that let us monitor our changes as we make them.
Prerequisites
Install Docker and Docker Compose
To run the containers for this course, you'll need to have both Docker and Docker Compose installed on your computer. After installing, make sure that Docker is running.
Clone the repository
In the directory of your choice with your preferred terminal, clone the app's starter repository:
git clone https://github.com/apollographql-education/odyssey-router-performance.git
Sign up for an Apollo GraphOS account
Don't have an account yet? Create one now and you're all set with the Free plan! Jump to the next step.
If you already have an existing account in an organization on a different plan, you must have Graph Admin or Org Admin role to create graphs and follow along with the course.
Create your graph
Even though we'll run everything in our "production" setup locally, we still need to create a graph in GraphOS Studio. This will give us the credentials we need to connect our router to Enterprise features.
Open a new browser window and go to GraphOS Studio.
If you have a brand new organization, you can create a new graph by clicking on Connect a GraphQL API.
studio.apollographql.com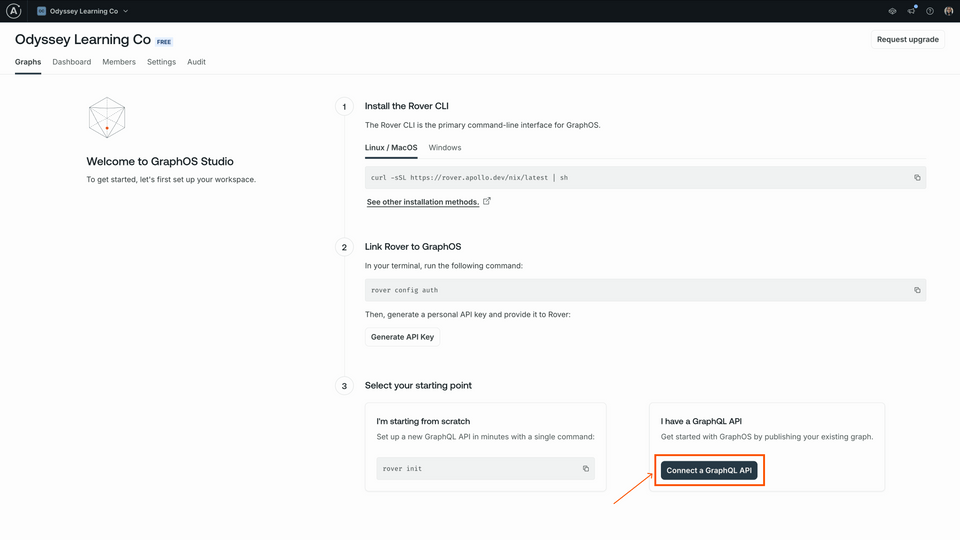
Otherwise, we can create a new graph by clicking the Add new graph button, then Connect a GraphQL API.
studio.apollographql.com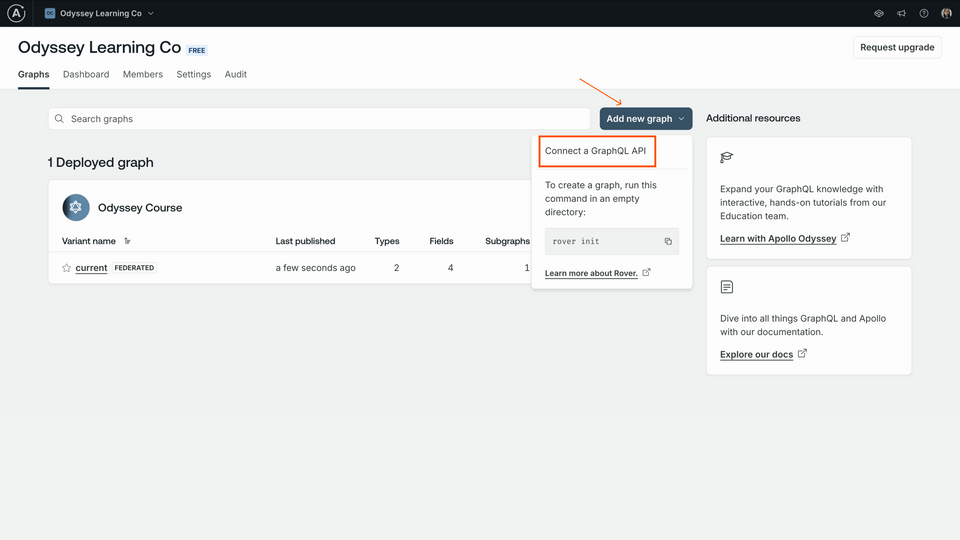
We'll give our graph a descriptive title, keep the default settings for Graph architecture as "Supergraph", then click Next.
studio.apollographql.com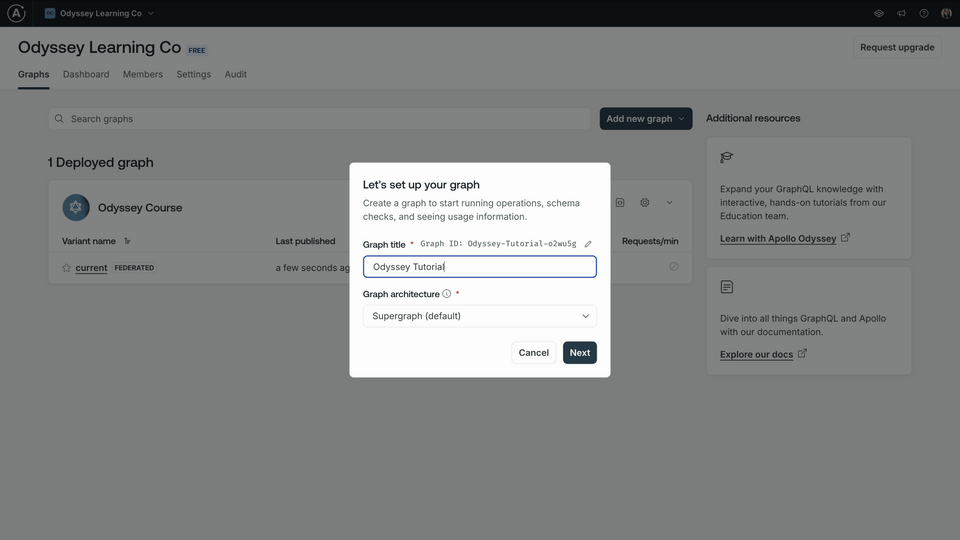
We should now see a modal with options for publishing a schema.
studio.apollographql.com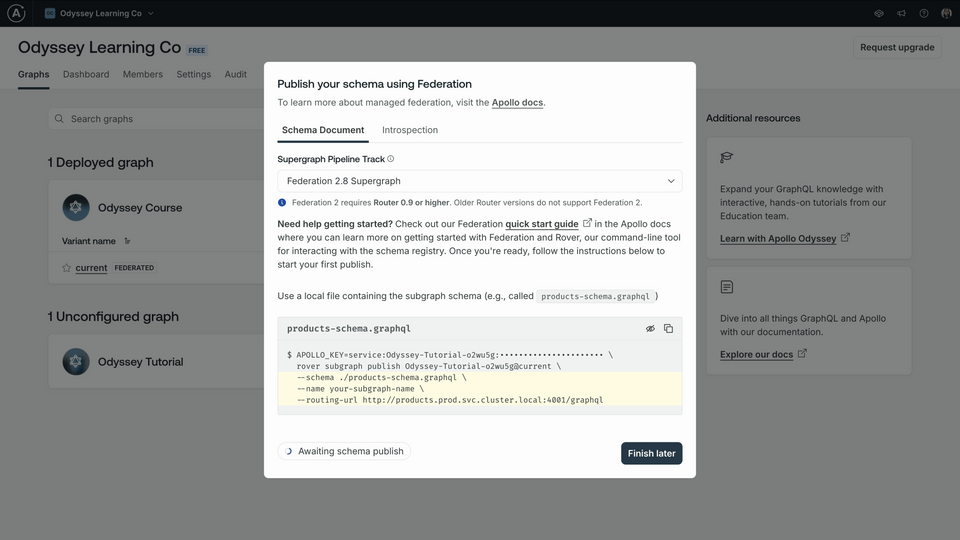
We're ready to store these graph variables!
Storing variables
The Docker process we'll boot up in the next lesson includes a locally-running router. In order for this router to connect with our newly-created graph, we need to provide it with a couple of variables.
APOLLO_KEY: Your graph's API key, used to interact with a single graph in GraphOS. It starts with something like"service:your-graph-name". Note that this is different from your personal API key, which we used to authenticate Rover, and which grants you partial access to every graph in the organization you belong to.APOLLO_GRAPH_REF: The graph reference (or graph ref) for our supergraph, which we'll use to tell Rover where to publish our subgraphs. A graph ref starts with the graph's ID, followed by an@symbol, followed by the graph variant.
In an IDE of your choice, open up the docker-compose.yaml file located in the root of the project directory. Scroll down until you find the router key under services.
router:image: ghcr.io/apollographql/router:v1.55.0environment:- APOLLO_KEY=add-your-apollo-key-here- APOLLO_GRAPH_REF=add-your-graph-ref-here
Right now we have placeholder (and non-functional) values stored for our APOLLO_KEY and APOLLO_GRAPH_REF environment variables. We're going to swap these placeholder values out for our own graph variables.
Let's see where we access those values.
APOLLO_KEY and APOLLO_GRAPH_REF
Go back to the configuration options in Studio that appeared after you created your supergraph. Make sure you're on the Schema Document tab.
First, make sure that the Supergraph Pipeline Track dropdown is set to Federation 2.8 Supergraph.
Below, take a little peek at the command for publishing a subgraph schema. We won't need to run this command in this course (our supergraph schema is part of our container setup), so for now, we just need the
APOLLO_KEYenvironment variable here. This will allow our locally-running router to connect with our Enterprise graph.APOLLO_KEY=your-graphs-apollo-key \rover subgraph publish your-graph-name@current \--name products --schema ./products-schema.graphql \--routing-url http://products.prod.svc.cluster.local:4001/graphqlClick on the eye icon on the code block to reveal the full value of
APOLLO_KEY. Copy the value forAPOLLO_KEYwhere indicated into thedocker-compose.yamlfile. We'll need it for the next step, and won't have access to the same key again through Studio.studio.apollographql.com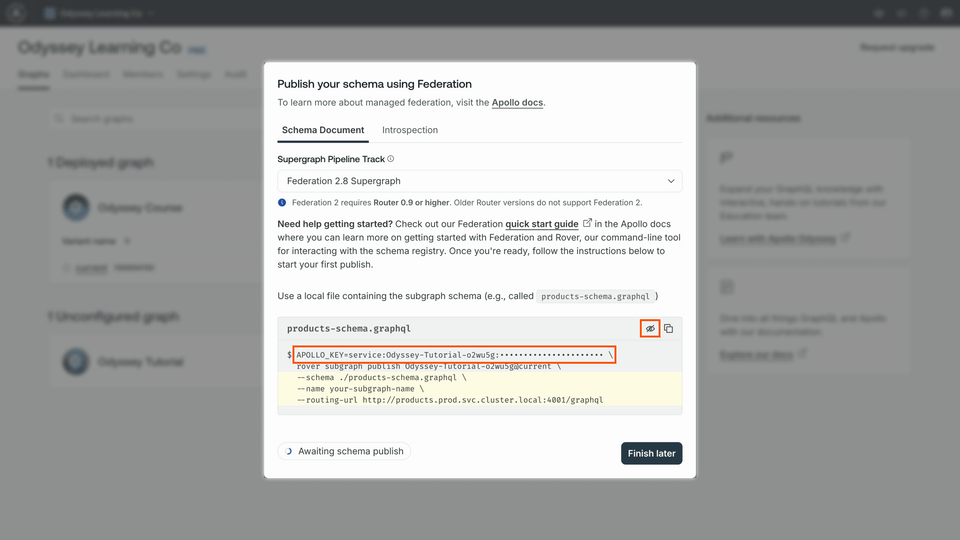 docker-compose.yamlrouter:image: ghcr.io/apollographql/router:v1.55.0environment:- APOLLO_KEY=add-your-apollo-key-here- APOLLO_GRAPH_REF=add-your-graph-ref-here
Now let's go back to Studio to get our graph ref. The value we're looking for appears in the same code block, directly after the "rover subgraph publish" part of the command (something like
your-graph-name@current). We'll save this value as an environment variable as well, but we can access it anytime from our graph's home page.studio.apollographql.com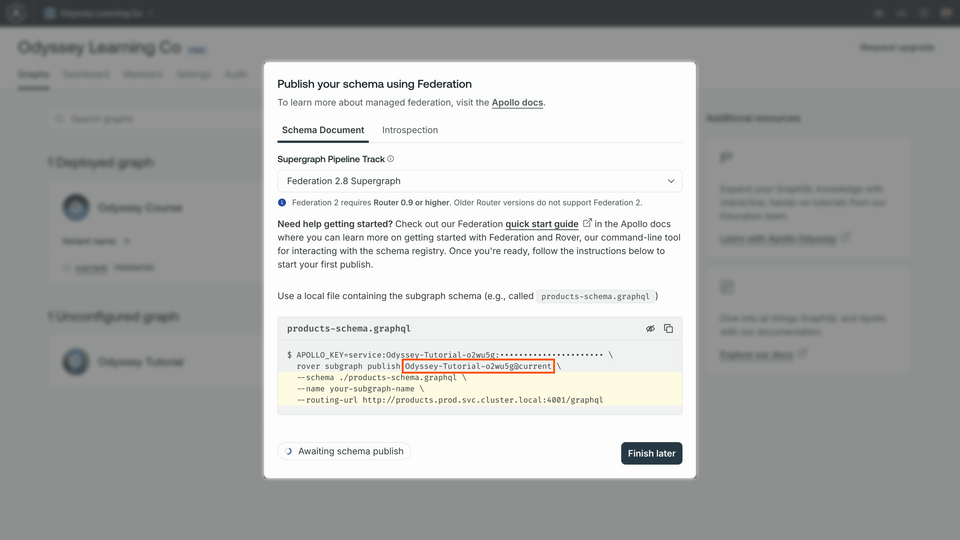 APOLLO_KEY=your-graphs-apollo-key \rover subgraph publish your-graph-name@current \--name products --schema ./products-schema.graphql \--routing-url http://products.prod.svc.cluster.local:4001/graphql
Great! Your docker-compose.yaml file should have a router section that looks something like this.
router:image: ghcr.io/apollographql/router:v1.55.0environment:- APOLLO_KEY=service:my-special-apollo-key- APOLLO_GRAPH_REF=my-graph@current
Up next
Let's get our code up and running in the next lesson.
Share your questions and comments about this lesson
This course is currently in
You'll need a GitHub account to post below. Don't have one? Post in our Odyssey forum instead.