Overview
Query and Mutation aren't the only types in GraphQL—when we want real-time updates about server-side events, we'll need the third and final GraphQL type: the Subscription!
In this lesson, we will:
- Write a subscription operation to receive booking notifications
- Enable
ApolloClientwithWebSocketsupport - Test the subscription in-app
Apollo iOS and subscriptions
With subscriptions, we can get notifications about real-time events as they happen. We'll spend this last lesson of the course exploring how we can build a subscription operation to receive a notification when someone books a seat on a launch! 🚀
Apollo iOS supports WebSockets and Multipart HTTP for subscriptions. For this tutorial we'll use WebSockets.
Note: To learn more about Multipart HTTP, see Multipart HTTP protocol for GraphQL Subscriptions.
Let's create a subscription!
Open up Sandbox, or use the embedded Explorer in the collapsible section below.
Click on the Schema tab at the far left. In addition to queries and mutations, we'll find a third operation type, Subscription. Click on Subscription to see the tripsBooked field:
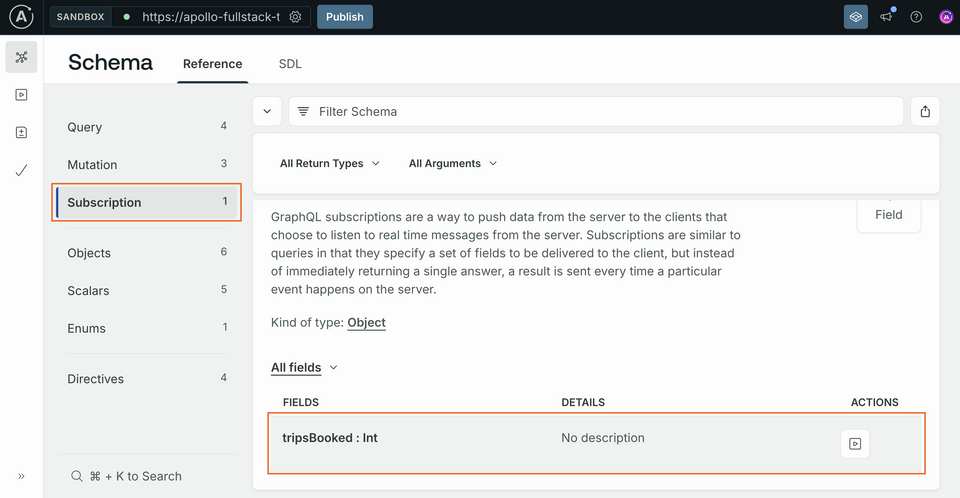
This subscription doesn't take any arguments and returns a single scalar named tripsBooked. Since we can book multiple trips at once, tripsBooked is an Int. It will contain the number of trips booked at once or -1 if a trip has been cancelled.
Click the play button to the far right of tripsBooked to open the subscription in Explorer. Open a new tab, then check the tripsBooked button to have the subscription added:
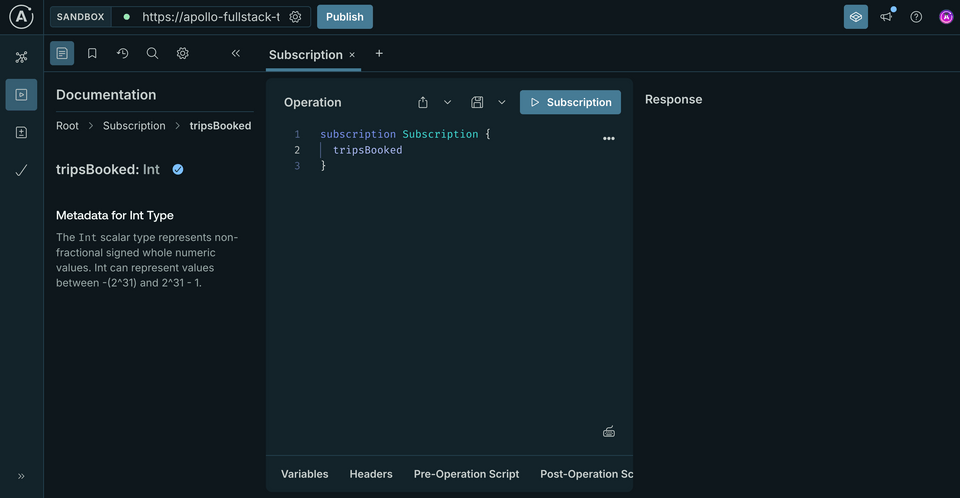
Again, we'll rename the subscription so it's easier to find:
subscription TripsBooked {tripsBooked}
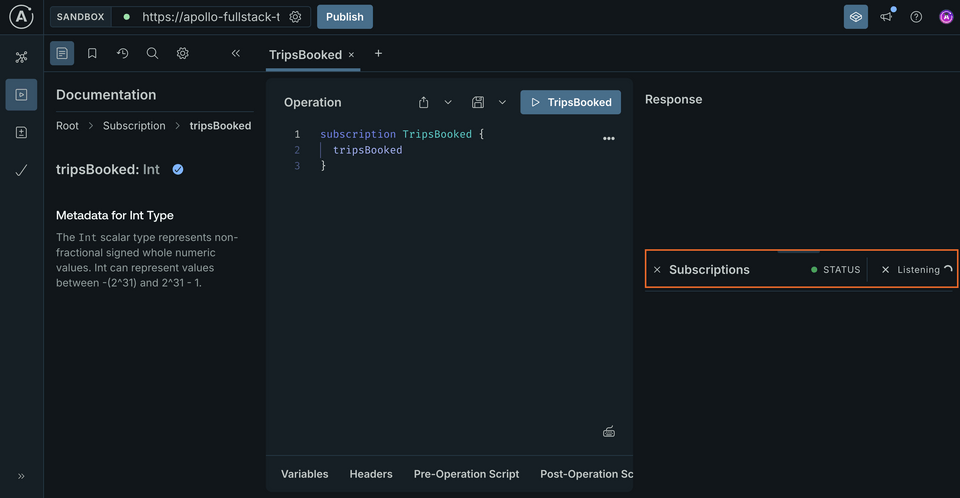
Click the Submit Operation button, and the subscription will start listening to events. We can tell it's up and running because a panel will pop up at the lower right where subscription data will come in:
Test your subscription
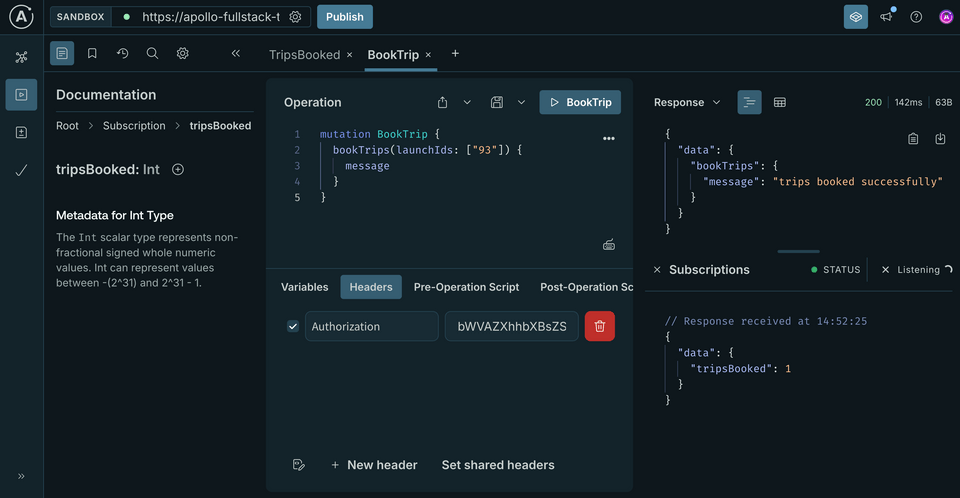
Open a new tab in Explorer. In this new tab, add code to book a trip like in the previous lesson, but with a hard-coded ID:
mutation BookTrip {bookTrips(launchIds: ["93"]) {message}}
Don't forget to include the authentication header! Make sure the Headers section in the Operation panel is populated with your token.
bWVAZXhhbXBsZS5jb20=
Click the Submit Operation button. If everything went well, we've just booked a trip! At the top of the right panel, we'll see the success JSON for our BookTrip mutation, and below it, updated JSON for the TripsBooked subscription:
Continue booking and/or canceling trips! We'll see events arriving in the subscription panel in real time. After some time, the server might close the connection and you'll have to restart your subscription to keep receiving events.
Add the subscription to your project
Now that the subscription is working, let's add it to the project. Create an empty file (don't add to the app target) named TripsBooked.graphql next to your other GraphQL files and paste the contents of the subscription. The process is similar to what we've already done for queries and mutations:
subscription TripsBooked {tripsBooked}
Now run code generation in the terminal to generate the code for your subscription.
./apollo-ios-cli generate
Keeping an eye on the RocketReserverAPI local package? We should see a new directory, called Subscriptions, was added!
Configure ApolloClient to use subscriptions
In Network.swift, we'll need to set up a transport which supports subscriptions in addition to general network usage. In practice, this means adding a WebSocketTransport which will allow real-time communication with the server.
First, at the top of the file, we'll add an import for the ApolloWebSocket framework to get access to the classes we'll need:
import Foundationimport Apolloimport ApolloWebSocket
Next, in the lazy declaration of the apollo variable, immediately after transport is declared, we'll set up what we require to add subscription support to the client:
private(set) lazy var apollo: ApolloClient = {let client = URLSessionClient()let cache = InMemoryNormalizedCache()let store = ApolloStore(cache: cache)let provider = NetworkInterceptorProvider(client: client, store: store)let url = URL(string: "https://apollo-fullstack-tutorial.herokuapp.com/graphql")!let transport = RequestChainNetworkTransport(interceptorProvider: provider, endpointURL: url)let webSocket = WebSocket(url: URL(string: "wss://apollo-fullstack-tutorial.herokuapp.com/graphql")!,protocol: .graphql_ws)let webSocketTransport = WebSocketTransport(websocket: webSocket)let splitTransport = SplitNetworkTransport(uploadingNetworkTransport: transport,webSocketNetworkTransport: webSocketTransport)return ApolloClient(networkTransport: splitTransport, store: store)}()
What's happening here?
- We've created a WebSocket connection with the server's WebSocket URL -
wss://is the protocol for a secure WebSocket. - We've created a
WebSocketTransport, which allows the Apollo SDK to communicate with the web socket. - We've created a
SplitNetworkTransport, which can decide whether to use WebSocket or HTTP automatically, with both theRequestChainNetworkTransportwe'd set up previously, and theWebSocketTransportwe just set up. - We're now passing the
splitTransportinto theApolloClient, so that it's the main transport being used.
Now, we're ready to actually use our subscription!
Use the subscription
To use the subscription we created, go to LaunchListViewModel.swift and start by adding a new variable to hold the subscription:
@Published var launches = [LaunchListQuery.Data.Launches.Launch]()@Published var lastConnection: LaunchListQuery.Data.Launches?@Published var activeRequest: Cancellable?var activeSubscription: Cancellable?@Published var appAlert: AppAlert?@Published var notificationMessage: String?
Now, replace the TODO in the startSubscription() method with the following code:
func startSubscription() {activeSubscription = Network.shared.apollo.subscribe(subscription: TripsBookedSubscription()) { [weak self] result inguard let self = self else {return}switch result {case .success(let graphQLResult):if let tripsBooked = graphQLResult.data?.tripsBooked {self.handleTripsBooked(value: tripsBooked)}if let errors = graphQLResult.errors {self.appAlert = .errors(errors: errors)}case .failure(let error):self.appAlert = .errors(errors: [error])}}}
Next, update the TODO in the init() method to the following:
init() {startSubscription()}
Notice in LaunchListView.swift there is already a line to handle displaying a view from the subscription:
.notificationView(message: $viewModel.notificationMessage)
Test your subscription in-app
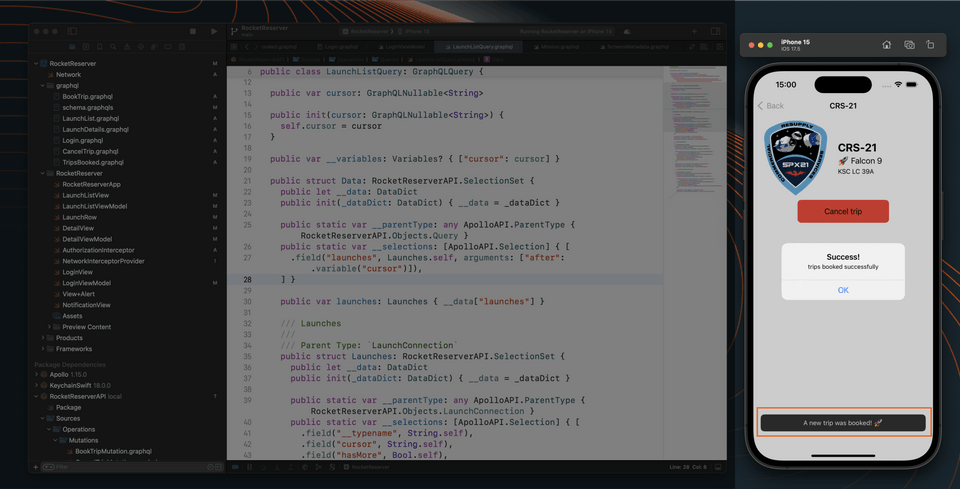
Build and run the application: now whenever a trip is booked or cancelled (from either in the app detail view or from Apollo Sandbox) we should see a small notification pop up at the bottom of the screen:
Practice
Journey's end
Congratulations on completing the two-part Apollo iOS and Swift series! You've successfully learned the basics of the Apollo iOS SDK to connect your Swift app to a GraphQL server. You have:
- Downloaded a schema
- Added code generation into your workflow
- Written and executed queries and mutations in Apollo Sandbox and in your app
- Learned how to handle errors
- Used basic authentication
- Implemented basic pagination
- Worked with WebSockets subscriptions to receive real-time updates
So, what's next? Keep your progress going! Check out these resources:
Feel free to ask questions by joining the Apollo community forums.
Thank you for choosing Odyssey!
Share your questions and comments about this lesson
This course is currently in
You'll need a GitHub account to post below. Don't have one? Post in our Odyssey forum instead.