Overview
We've got most of our setup in place, but we're missing a crucial piece: the Apollo Runtime Container, which provides us both a GraphOS Router instance, and the MCP server which connects our AI assistants with backend features.
In this lesson, we will:
- Run the Apollo Runtime Container using Docker
The Apollo Runtime Container
The Apollo Runtime Container is your one-stop-shop for the GraphOS Router and the Apollo MCP server. It's a great way to get up and running quickly, and see these two powerful components in action together. All we need to do is connect our graph and add a few variables to get it going!
Running the container
We'll use Docker to run the container. With Docker, we can run multiple lightweight processes that orchestrate different parts of our application, all in a single container. In our case, the Apollo Runtime Container includes both the GraphOS Router, which will connect to our graph in Studio, and the MCP server, which will communicate with our graph and expose a port that assistants can connect to.
To bring this process to life, we need to provide our graph credentials, and some additional configuration flags which will give us some more insight into what's happening under the hood.
docker run
Open up a new terminal window, and let's start building our docker run command. We'll need to provide a number of environment variables, which we'll indicate by passing a --env flag.
Here's what our command will contain:
- Our graph credentials:
APOLLO_GRAPH_REFandAPOLLO_KEY - An environment variable called
MCP_ENABLE, which we use to turn on the MCP server in the container by passing a value of1. - We'll also specify the ports that we want the internal processes to map to on our local machine. We'll use
4000:4000for the GraphOS Router, and5000:5000for the MCP server. This will map the ports each process uses inside the container to the same port on our local machine. - Finally, we'll specify the particular image we want to use, which Docker can find at
ghcr.io/apollographql/apollo-runtime:latest.
Running docker run
Let's build out this command! Here's what it looks like. Be sure to substitute in your own unique <APOLLO_KEY> and <APOLLO_GRAPH_REF> values.
docker run \--env APOLLO_GRAPH_REF=<APOLLO_GRAPH_REF> \--env APOLLO_KEY=<APOLLO_KEY> \--env MCP_ENABLE=1 \--rm -p 4000:4000 -p 8000:8000 \ghcr.io/apollographql/apollo-runtime:latest
Be sure that you paste only the values for your APOLLO_GRAPH_REF and APOLLO_KEY, without brackets.
And we should see some happy output!
INFO Starting MCP server in Streamable HTTP mode port=8000 address=0.0.0.0INFO GraphQL endpoint exposed at http://0.0.0.0:4000 /
Note: The MCP Server included in this container is currently experimental.
Connecting our graph
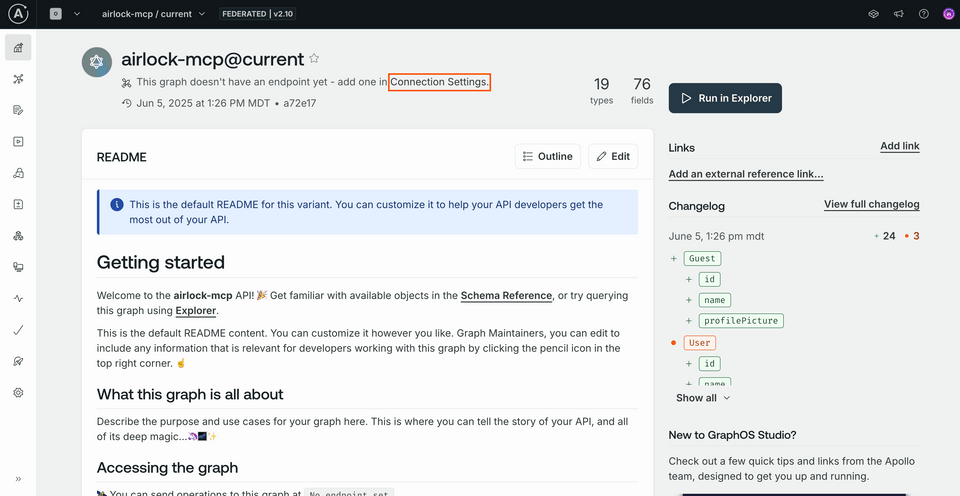
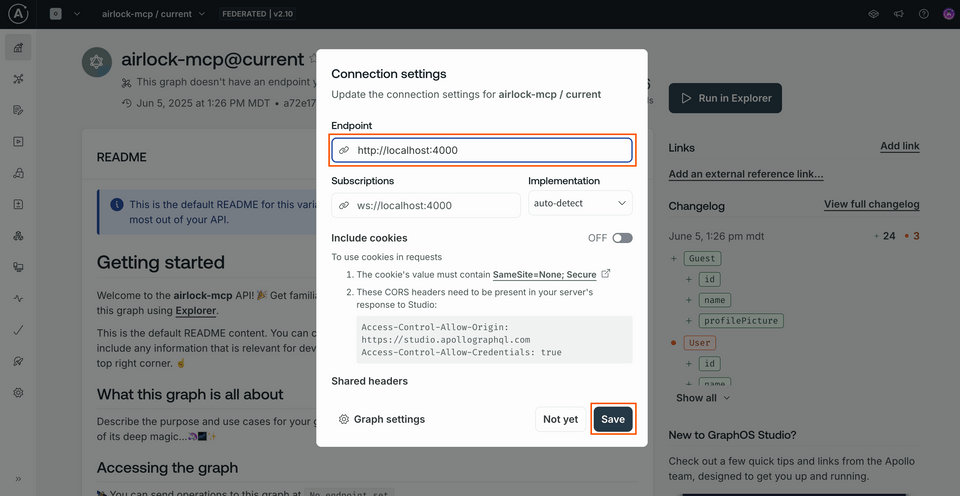
Back in Studio, let's provide this address where our router is running (http://localhost:4000) as our graph's endpoint. This will allow us to use the Explorer directly in Studio to send queries to our local router.
You can find a link to Connection Settings on the graph's homepage. (If the modal from the previous lesson is still open, you can click See schema changes, then navigate to the Overview page to see the homepage.)

Clicking this opens up a modal where we can set our endpoint (http://localhost:4000) and click Save.

Now we can jump to Explorer, which is accessible from the left-hand menu, to query our graph directly!
Practice
Key takeaways
- The Apollo Runtime Container provides us both a GraphOS Router instance and the Apollo MCP server, which connects our AI assistants with backend features.
- The
docker runcommand orchestrates the processes in the Apollo Runtime Container. We used a number of environment variables to connect to our graph in Studio (APOLLO_GRAPH_REFandAPOLLO_KEY), as well as to enable MCP to talk to our graph (MCP_ENABLE).
Up next
With our graph in place, we can get started! In the next lesson, we'll learn how to level up and secure the GraphQL operations we provide to our MCP server using persisted queries.
Share your questions and comments about this lesson
This course is currently in
You'll need a GitHub account to post below. Don't have one? Post in our Odyssey forum instead.