Overview
In this lesson, we will:
- Talk about "schema-first" design
- Learn the basics of Schema Definition Language (SDL)
Defining our data
Before we get our hands dirty, we need to answer one important question: What data do we need to build our feature?
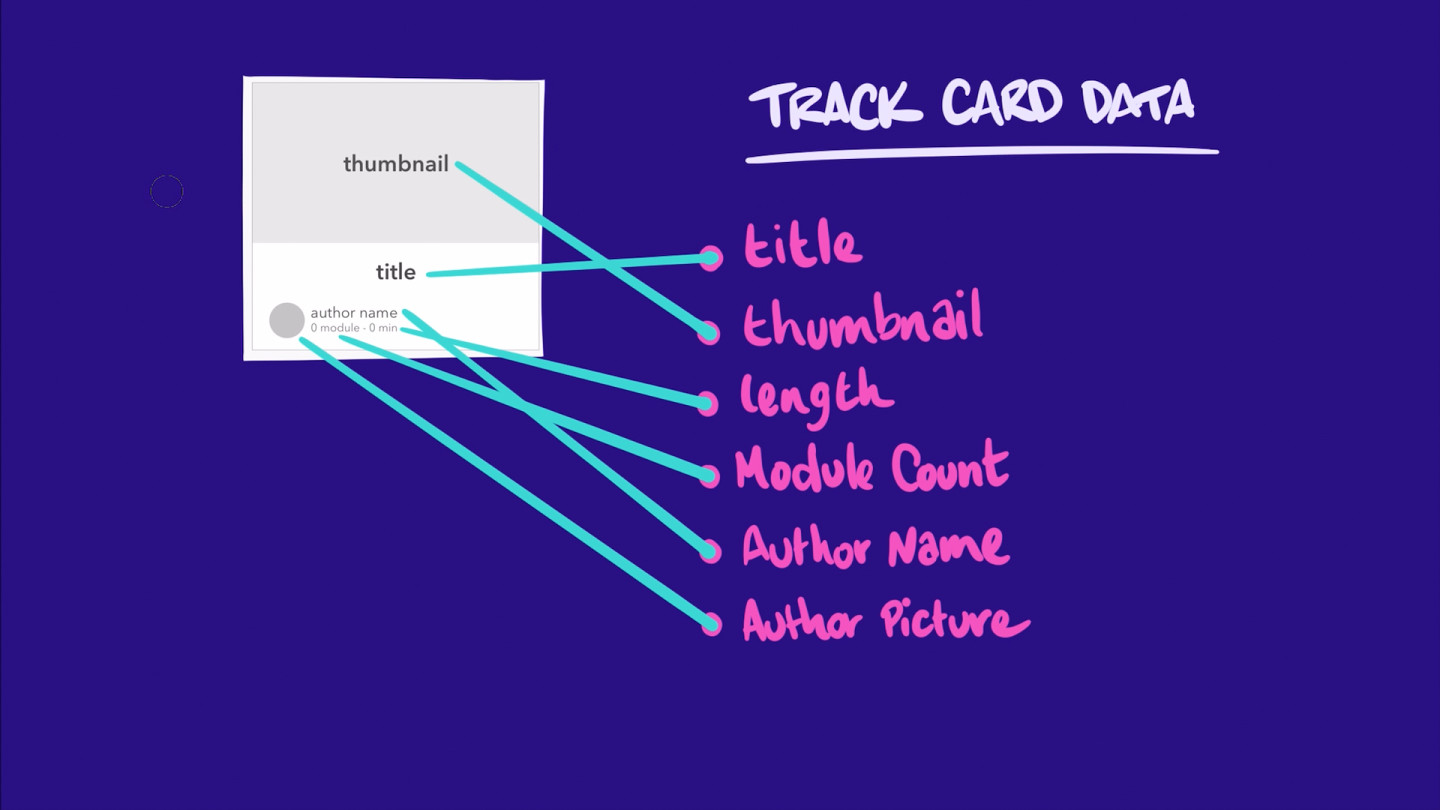
Let's take a look at the mockup our design team sketched for us. This is what the homepage should look like: a nice clean card grid.
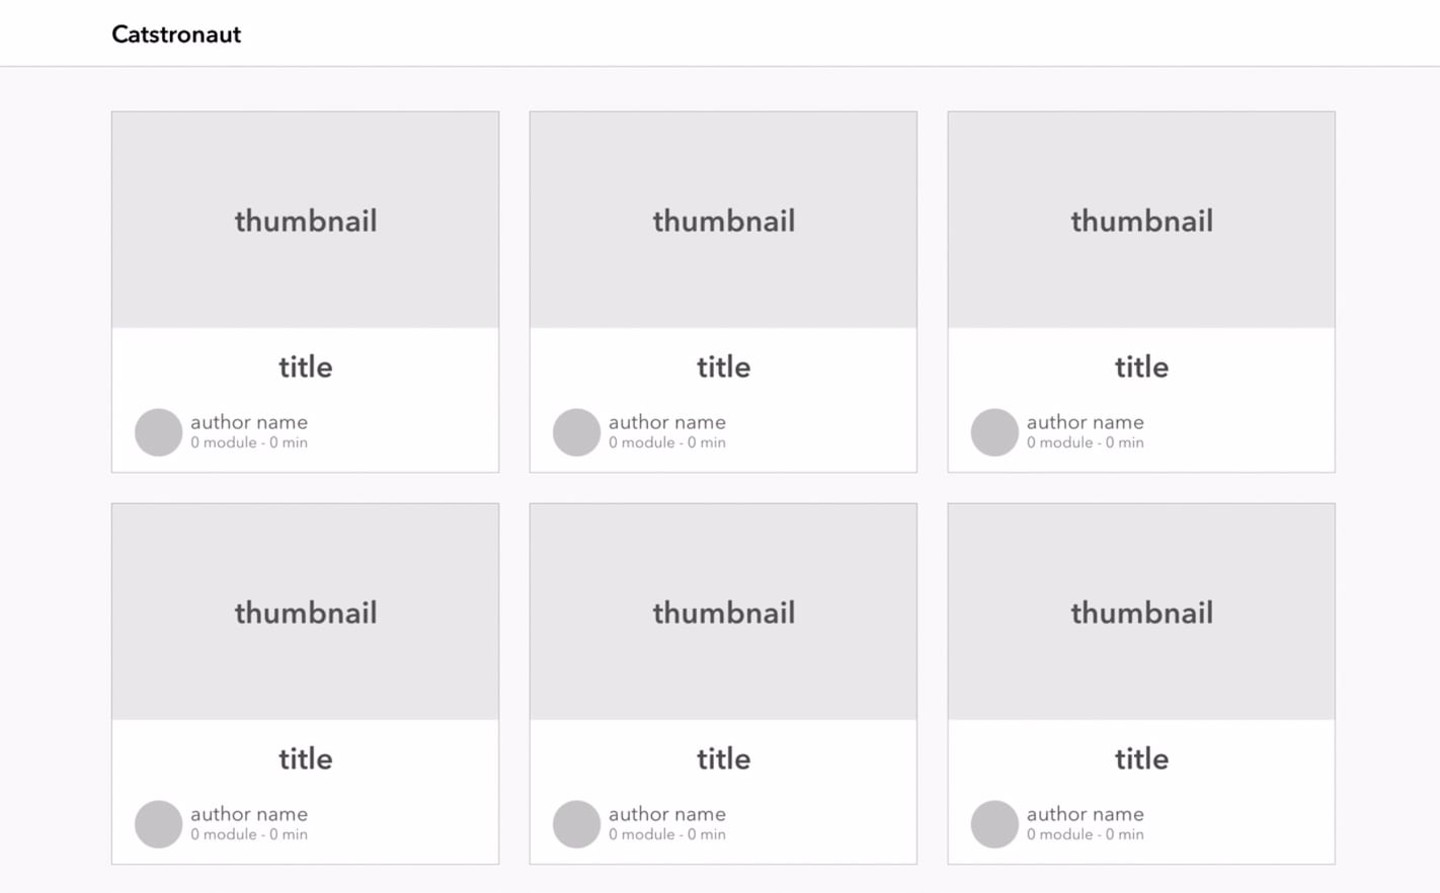
Before you continue, take a moment to review the mockup and determine which information we'll probably need to populate a single card.
Based on the mockup, it looks like we'll need the following information for each learning track:
- Title
- Thumbnail image
- Length (estimated duration)
- Module count
- Author name
- Author picture
The graph
Looking at the list above, we can start to think about our app's data as a collection of objects (such as learning tracks and authors) and relationships between objects (such as each learning track having an author).
Now, if we think of each object as a node and each relationship as an edge between two nodes, we can think of our entire data model as a graph of nodes and edges. This is called our application's graph.
Here's an incomplete representation of our application's graph, based entirely on our mockup's data requirements:
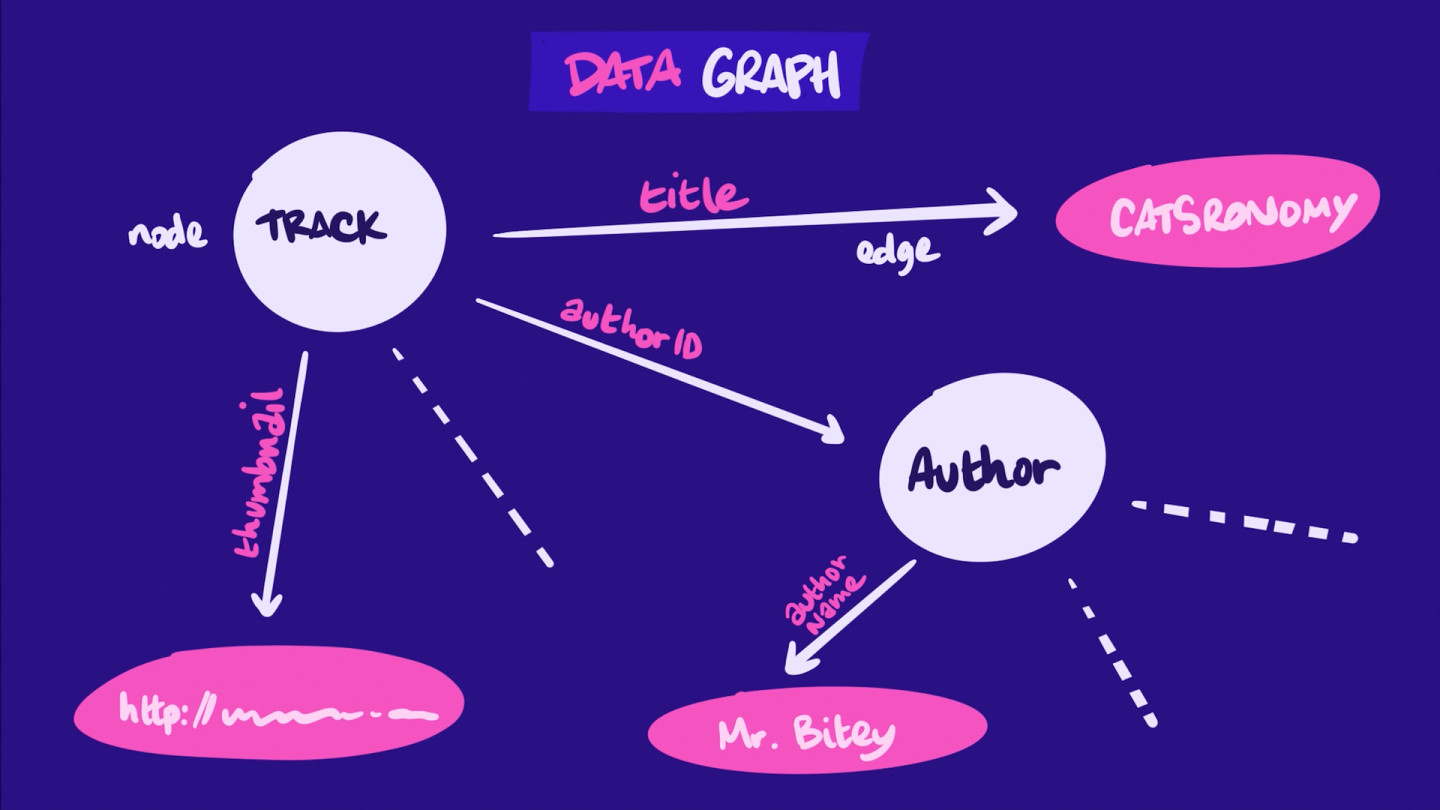
This graph structure reflects the kinds of relationships we'd expect to find in our GraphQL schema—the document that details the types, fields, and relationships that make up our application's data capabilities!
By defining the type of data we need for our frontend at the start, we've employed a strategy called schema-first design.
Schema-first design
Remember the schema we mentioned in the previous lesson? (Hint: it's the document that defines the types of data we're working with, and the relationships between them!)
Well, "schema-first" design is a common convention used by backend and frontend teams working with GraphQL. It lets us implement our GraphQL schema based exactly on the types of data our client application needs.
Schema-first design typically involves three major steps:
- Defining the schema: We identify which data our feature requires, and then we structure our schema to provide that data as intuitively as possible. Collaboration between the frontend and backend is essential here!
- Backend implementation: We build out our GraphQL API on the server-side, fetching and preparing the required data from whichever data sources contain it.
- Frontend implementation: Our client consumes data from our GraphQL API to render its views.
For the purposes of this course, we'll mark steps 1 and 2 complete—we've just walked through the data that we need, and we can imagine that our backend team has defined the schema and implemented the server logic. Our job now is to focus on the third step: consuming data from a GraphQL API and rendering views!
To do this, we need to equip ourselves with the basics of Schema Definition Language, or SDL.
If you're already familiar with SDL, feel free to move to the next lesson.
Schema Definition Language (SDL)
Our schema acts like a contract between the server and the client, defining what a GraphQL API can and can't do, and how clients can request or change data. It's an abstraction layer that provides flexibility to consumers while hiding backend implementation details.
We use Schema Definition Language (SDL) to define the object types and fields that make up a schema.
Types and fields
A GraphQL type begins with the type keyword, followed by the name of the type (PascalCase is best practice), then open brackets to hold its contained fields:
type Track {# Fields go here}
Fields are declared by their name (camelCase), a colon, and then the type of the field (scalar or object).
type Track {title: String}
Each field in the schema has a type of its own. A field's type can be scalar (such as an Int or a String, as shown above), or it can be another object type.
type Track {title: Stringauthor: Author}
A field can also contain a list, indicated by square brackets:
type Track {title: String!author: Author!modules: [Module]}
Unlike Javascript objects (which look very similar), fields are not separated by commas.
In addition, we can indicate whether each field value is nullable or non-nullable. If a field should never be null, we add an exclamation mark after its type:
type Track {title: String!author: Author!modules: [Module!]!}
Descriptions
It's good practice to document a schema, in the same way that it's helpful to comment your code. Descriptions make it easier for consumers to make sense of what's going on in an API. They also allow tools like the GraphOS Studio Explorer (more on this in the next lesson!) to guide API consumers on what they can achieve with an API right when and where they need it.
Descriptions in SDL can be applied to both types and fields by writing strings (in quotation marks) directly above them.
"I'm a regular description"
Triple "double quotes" allow you to add line breaks for clearer formatting of lengthier comments.
"""I'm a block descriptionwith a line break"""
Here's that Track type, updated with some helpful descriptions!
"A track is a group of Modules that teaches about a specific topic"type Track {"The track's title"title: String!"The track's main Author"author: Author!"The track's complete array of Modules"modules: [Module!]!}
The GraphQL API
We're going to use a pre-built GraphQL API to bring our frontend to life. Let's get to know this API using Apollo Sandbox. Sandbox is a special mode of GraphOS Studio that lets you test out a GraphQL API, with a lot of features we'll explore throughout this course.
Let's open the browser to the Sandbox Schema Reference page. Here we'll see a Schema overview page, but there's not much to look at yet. See the red dot at the top of the screen? This indicates that Sandbox is not yet connected to anything.

Let's take care of connecting it to the GraphQL API we'll be using throughout the course. Copy the following URL, and paste it into the endpoint input at the top of the page.
https://odyssey-lift-off-server.herokuapp.com/
After a few moments, we'll see the dot turns green—Sandbox has successfully connected to our API! We'll also notice that the interface has updated with some new data.

Let's click the Objects option in the left-hand menu. This takes us to our API's object types; they describe the different objects that this GraphQL API's schema deals with.

To provide us with data about tracks, modules, and their authors, this API's schema contains some object types we might expect: Track, Module, and Author. (We'll get to that IncrementTrackViewsResponse type in a bit!)

We can click on the Track type to take a closer look at the type of data it contains.

This type gives us a clear picture of everything that goes into a track object: the fields we can access on the type, along with their description and the type of data they return.
We can also begin to visualize how one object type relates to another. For instance, each Track instance has an author field, which returns a new object type, Author! Additionally, we can expect each Track to contain a list of Module types.

But the schema isn't complete with just these three object types; we also need a way to actually ask our GraphQL API for data.
The Query type
To define the different pathways that we can take to our data, our schema provides the Query type. We want to query for a list of tracks, for example—and theQuery type gives us a way to do this!
Let's jump back to the Query page by exiting the Object types view in Sandbox and returning to the Query page.

Each field that exists on the Query type can be thought of as an "entrypoint" to our data. It defines something very specific we can ask for (such as tracksForHome) and the type of data we can expect to receive from running this query (a non-null list of non-null Track types).

Though we've kept our views into the schema largely high-level, you can dive deeper into the actual syntax that brings this schema together.
From the navigation panel, select Schema, then Schema definition. Doing that opens up the entire GraphQL API—in its raw SDL—for you to browse!

Let's take what we've learned about our schema and its types, and see how we can actually apply it to consume some data!
Practice
Key takeaways
- The GraphQL schema is a collection of types and fields, written in Schema Definition Language (SDL).
- A field can be marked as non-null by applying an exclamation point (
!). - Descriptions in SDL are contained either in a set of double quotes (
"single line description"), or contained by triple double quotes ("""a multi-line description"""). - A schema's
Querytype defines the entrypoints to the API, and limits the types of data that can be queried. - Sandbox is a special mode of GraphOS Studio that lets you browse and test out a GraphQL API.
Up next
We've explored our API's types and fields from the perspective of the schema; now it's time to see how we can use these definitions to build queries and get our hands on some data! In the next section, we'll take our API for a spin.
Share your questions and comments about this lesson
This course is currently in
You'll need a GitHub account to post below. Don't have one? Post in our Odyssey forum instead.