Overview
Building our mutations in the Explorer is a great place to start, but now we need to bring the same functionality into our app. Let's jump back into the code and send off our mutation using a new hook!
In this lesson, we will:
- Learn about the
useMutationhook - Increment the number of views on a track when the page is visited
- Talk about the Apollo Client cache
💻 Mutation in client-land
Let's revisit our goal: we want to update the number of views just before we navigate from the homepage to the track page. This navigation is happening inside our TrackCard component.
Inside the src/containers folder, let's open up the track-card.tsx file.
At the top, let's start by importing the @apollo/client package. We'll need the useMutation hook to send our mutation to our server. We also need to bring in gql from our __generated__ folder, because we'll be using that same function for our mutation.
import { useMutation } from "@apollo/client";import { gql } from "../__generated__";
Next, let's make a new variable to hold our mutation called INCREMENT_TRACK_VIEWS, setting it to the gql function call adding backticks (`). Inside the backticks, we'll paste the mutation we built previously in Studio, and add a comment to explain what this mutation is for.
/*** Mutation to increment a track's number of views*/const INCREMENT_TRACK_VIEWS = gql(`mutation IncrementTrackViews($incrementTrackViewsId: ID!) {incrementTrackViews(id: $incrementTrackViewsId) {codesuccessmessagetrack {idnumberOfViews}}}`);
🎣 The useMutation hook
Because this is a mutation and not a query, we won't be using the useQuery hook we're familiar with. Instead we'll switch to the useMutation hook.
Inside the TrackCard component, we'll start off by calling the hook. It takes in the mutation we set up earlier, INCREMENT_TRACK_VIEWS, as the first parameter.
The second parameter is an options object with a variables key. Here, we'll add the incrementTrackViewsId variable and set it to the id of the track we're navigating to. This id has already been destructured for us at the top from the track prop.
useMutation(INCREMENT_TRACK_VIEWS, {variables: { incrementTrackViewsId: id },});
Now, here's a twist: unlike with useQuery, calling useMutation doesn't actually execute the mutation automatically!
Instead, the useMutation hook returns an array with two elements, which we'll start to destructure here.
const [incrementTrackViews] = useMutation(INCREMENT_TRACK_VIEWS, {variables: { incrementTrackViewsId: id },});
The first element is the mutate function we'll use to actually run the mutation later on. We'll call it incrementTrackViews. The second element is an object with information about the mutation: loading, error and data. This component doesn't need it, so we don't have to extract it.
We've added a new operation, so we need to regenerate our types for our frontend. Run the following command in the root directory.
npm run generate
👆🏽Setting up the onClick
When do we want to run our mutate function? When the user clicks on the card!
Let's add an onClick prop to the CardContainer component and configure it to call our mutate function, incrementTrackViews.
<CardContainerto={`/track/${id}`}onClick={() => incrementTrackViews()}>
1️⃣ One more thing…
One last thing—let's add a console log to check the mutation response when it's completed.
To do this, let's go back to where we set up our useMutation hook and add another property to our options object. The onCompleted property is a callback function that will run when the mutation successfully completes, and it has access to the response that comes back. We'll log the response to the browser console.
const [incrementTrackViews] = useMutation(INCREMENT_TRACK_VIEWS, {variables: { incrementTrackViewsId: id },// to observe what the mutation response returnsonCompleted: (data) => {console.log(data);},});
Our client app is ready to send off this mutation to the server! Let's see the results of our journey in the last lesson!
👀 Seeing the results
Let's see what our app looks like now!
Make sure your app is still running, or restart it by opening a terminal and running npm start. Then, we'll open up http://localhost:3000 in the browser.
We see all of the tracks on the homepage. Now let's click on the second track, and we should see the number of views here.
If we go back to the homepage and click on the track again, we now see that the number of views has gone up! Awesome!
Note: Keep in mind your number of views might differ from the video! To check if your mutation succeeded, open up your browser's Developer Tools and find the console.log message we set up earlier.
Now if you've got quick eyes (or a slow internet connection 🐌 ) you might notice something here. In fact, let's open up the developer tools console, and slow this down with video magic so we can see what exactly is going on.
Did you see that? The page loaded instantly with all the track data, then after a brief moment, the number of views changed from 2 to 3! And we see the console log we set up earlier pop up here. That means our mutation was completed after the page was loaded. So how were we seeing everything on the page with no errors before? And how did it update on this page even though we ran the mutation on the previous page?
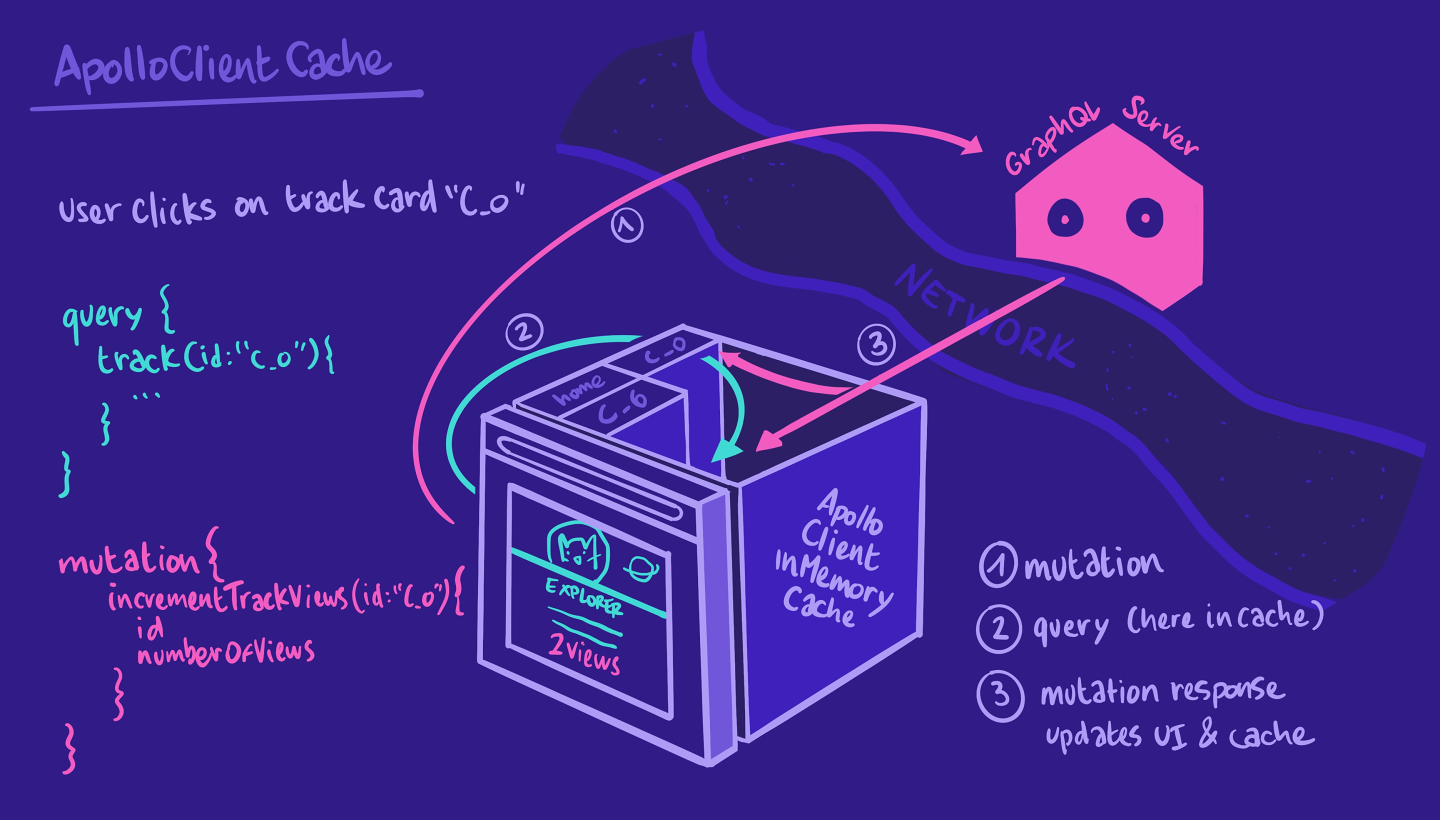
🗳️ Apollo Client cache
That's thanks to the Apollo Client cache!
When we used the useQuery hook with variables, we saw how fast our track was shown on the page if we had already clicked on it before. That was because it was loaded from the cache, which means we didn't send unnecessary queries to our GraphQL API.
Similarly, we're still getting our page loaded from cache while our mutation is sent off to our API. Once it returns successfully, we get back our updated value for numberOfViews. Apollo Client is doing the work behind the scenes to look at the id of this track, search for it in the cache, and update its numberOfViews field. When the cache updates, so does the UI. Thanks Apollo Client!
Practice
loading, error and Drag items from this box to the blanks above
integer
optionsmutate function
values
array
GraphQL operation
useMutationarguments
useGqlQueryvariablesuseQuerydata
useQuery and useMutation hooks?Use the useMutation hook to send the ASSIGN_SPACESHIP_MUTATION mutation to the server. It takes two variables: spaceshipId and missionId. Destructure the mutate function (call it assignSpaceship), as well as the loading, error and data properties from the return array of the hook.
Key takeaways
- The
useMutationhook accepts a mutation operation as its first parameter, and anoptionsobject with avariableskey as its second parameter. - The
useMutationhook does not execute the mutation automatically; instead, it returns an array. This array contains a mutate function, which we can call at a time of our choosing, as well as an object containingloading,error, anddataproperties. - The Apollo Client cache loads data that has already been fetched from the cache, leading to faster load time on the page and fewer unnecessary network calls!
🎉 And we're done!
Thanks so much for joining us for Client-side GraphQL with React & Apollo. We've now got a working application for aspiring catstronauts to use to explore the universe, and we can see how popular a track is with its number of views.
We'd love to hear your feedback. Let us know what you liked, didn't like, and what you'd like to see next on Odyssey!
Share your questions and comments about this lesson
This course is currently in
You'll need a GitHub account to post below. Don't have one? Post in our Odyssey forum instead.