Overview
We're ready to bring some GraphQL goodness into our frontend. Up until now, we've focused on the delightful querying experience we get with GraphQL—so what does this look like when we leave the Sandbox environment? And what happens when we actually send a query?
In this lesson, we will:
- Learn about the journey of a GraphQL query from client to server and back again
- Install and configure Apollo Client in our application
Journey of a GraphQL Query
Until now, we've glossed over some of the magic that makes the GraphQL API function on the backend. Before we equip our app to send its first query, let's first fill in a few holes in the journey from start to finish.
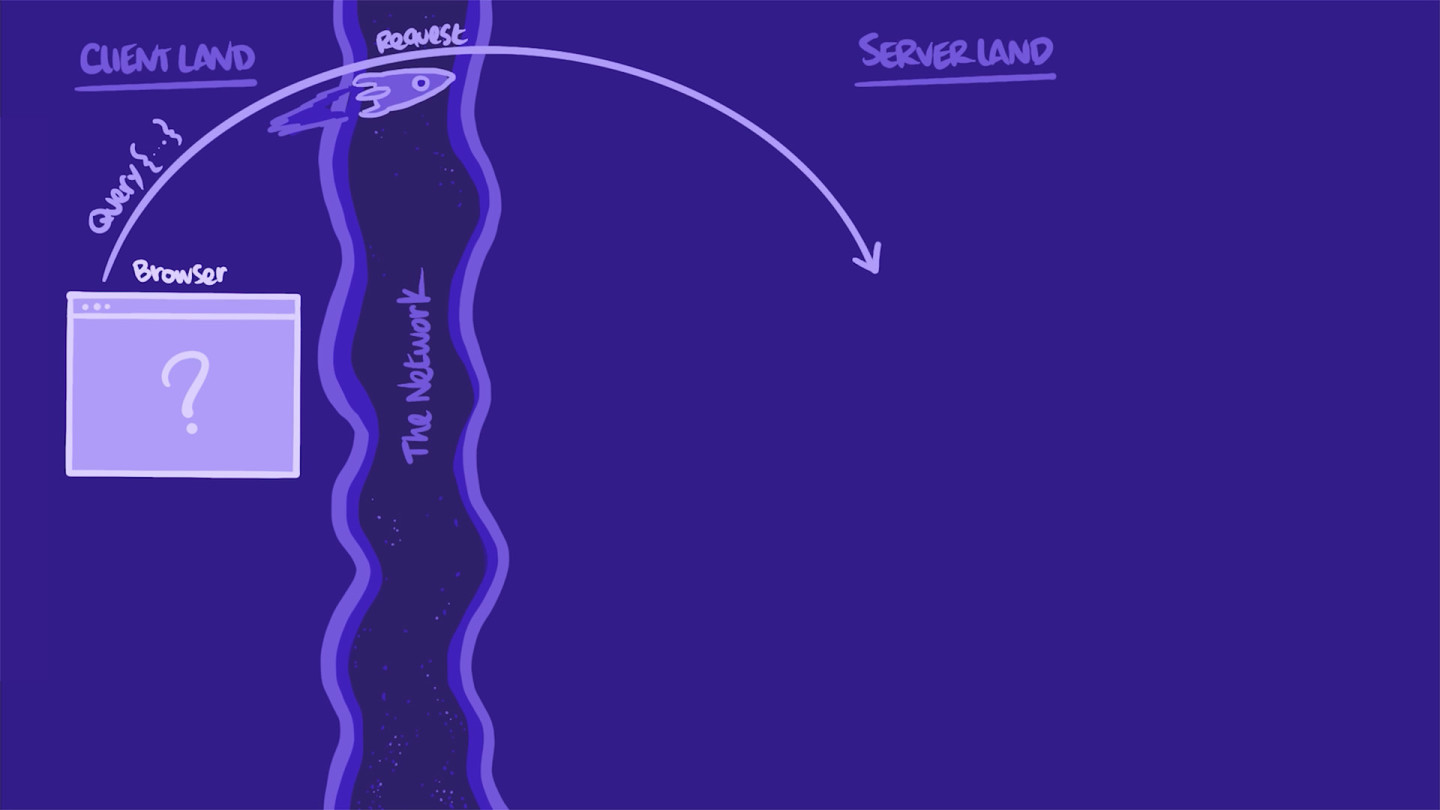
Let's start from the beginning: a query is born in client-land.
In client-land (📍You are here!)
Our web app needs some data to render a frontend view: to get that data, it needs to build a query. The app shapes the query as a string that defines the selection set of fields it needs. Then, it sends that query to the server in an HTTP POST or GET request.
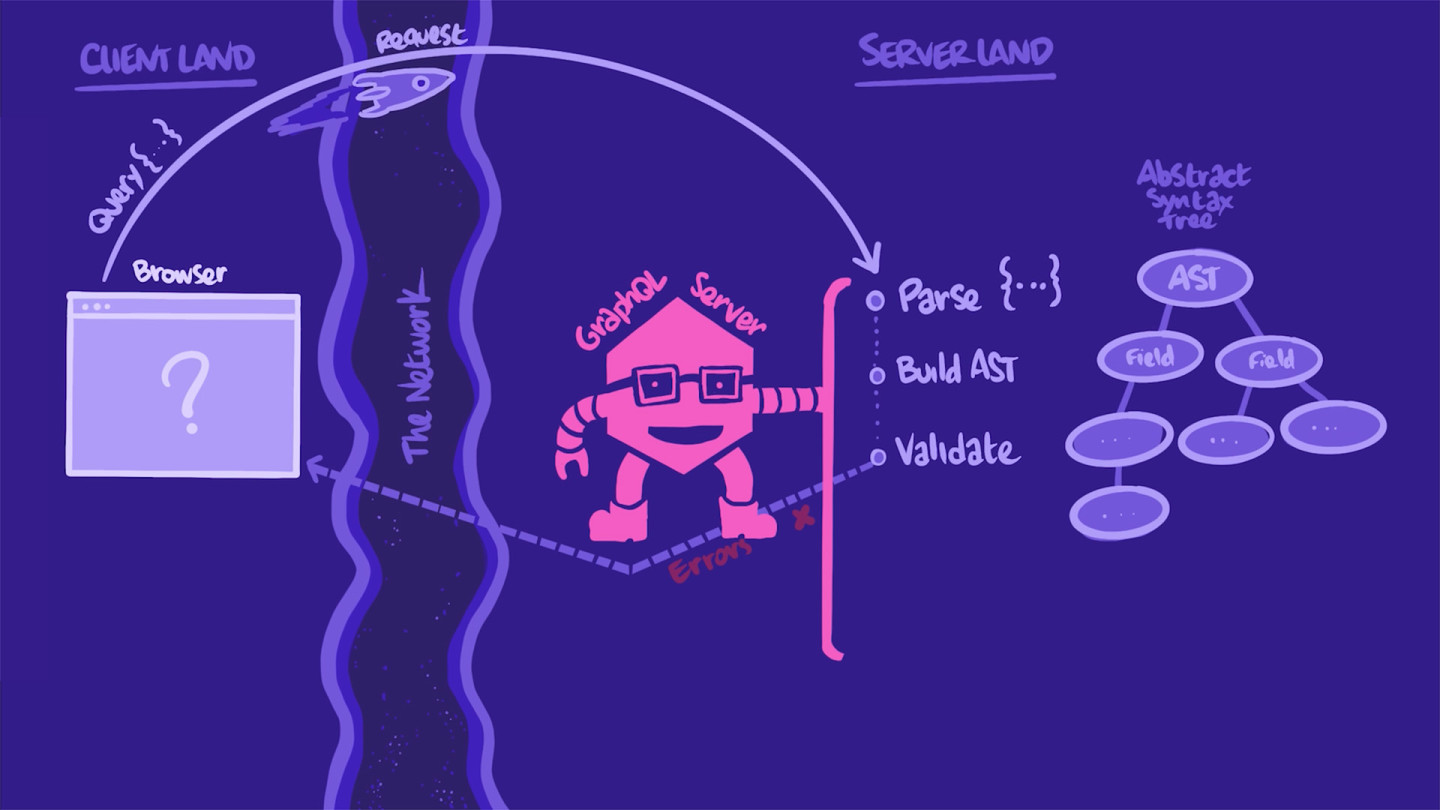
In server-land
When our server receives the HTTP request, it first extracts the string with the GraphQL query. It parses and transforms it into something it can better manipulate: a tree-structured document called an AST (Abstract Syntax Tree). With this AST, the server validates the query against the types and fields in our schema.
If anything is off (e.g. a requested field is not defined in the schema or the query is malformed), the server throws an error and sends it right back to the app.
In this case, the query looks good, and the server can "execute" it. Meaning, the server can continue its process and actually fetch the data. The server walks down the AST.
For each field in the query, the server invokes that field's resolver function. A resolver function's mission is to "resolve" its field by populating it with the correct data from the correct source, such as a database or a REST API.
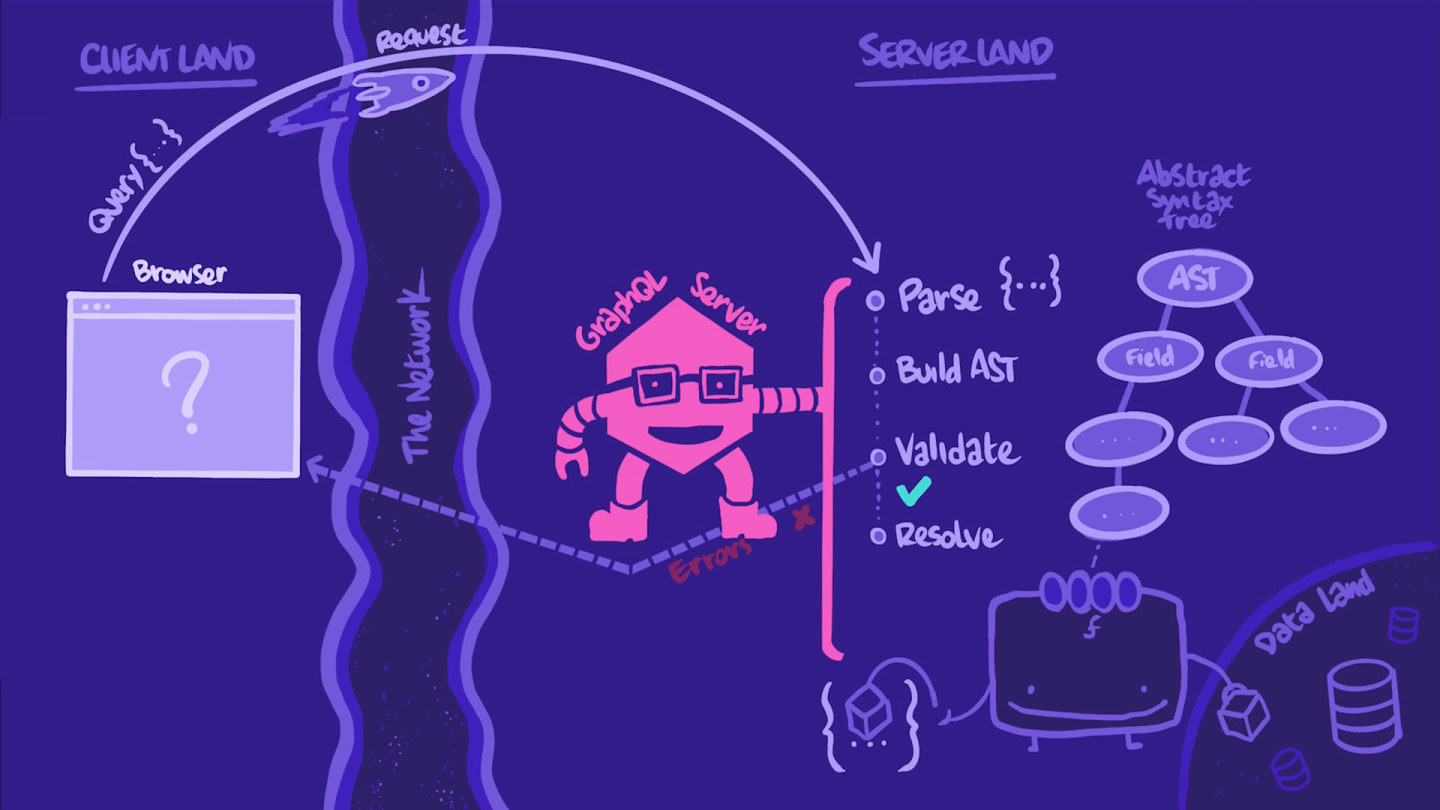
As all of the query's fields are resolved, the data is assembled into a nicely ordered JSON object with the exact same shape as the query.
The server assigns the object to the HTTP response body's data key, and it's time for the return trip, back to our app.
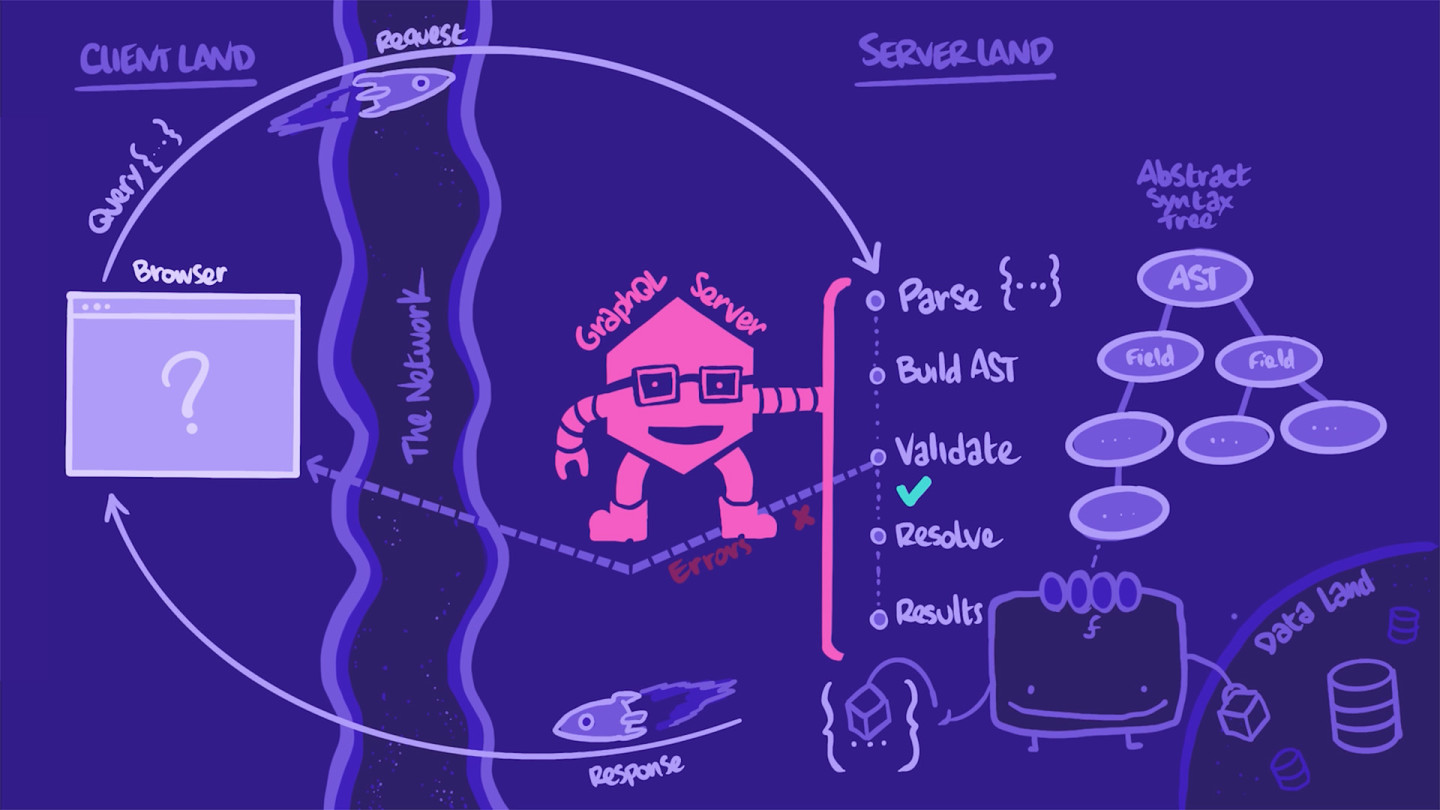
Back to client-land
Our client receives the response with exactly the data it needs, passes that data to the right components to render them, and voilà, our homepage is displaying its cards from remote data.
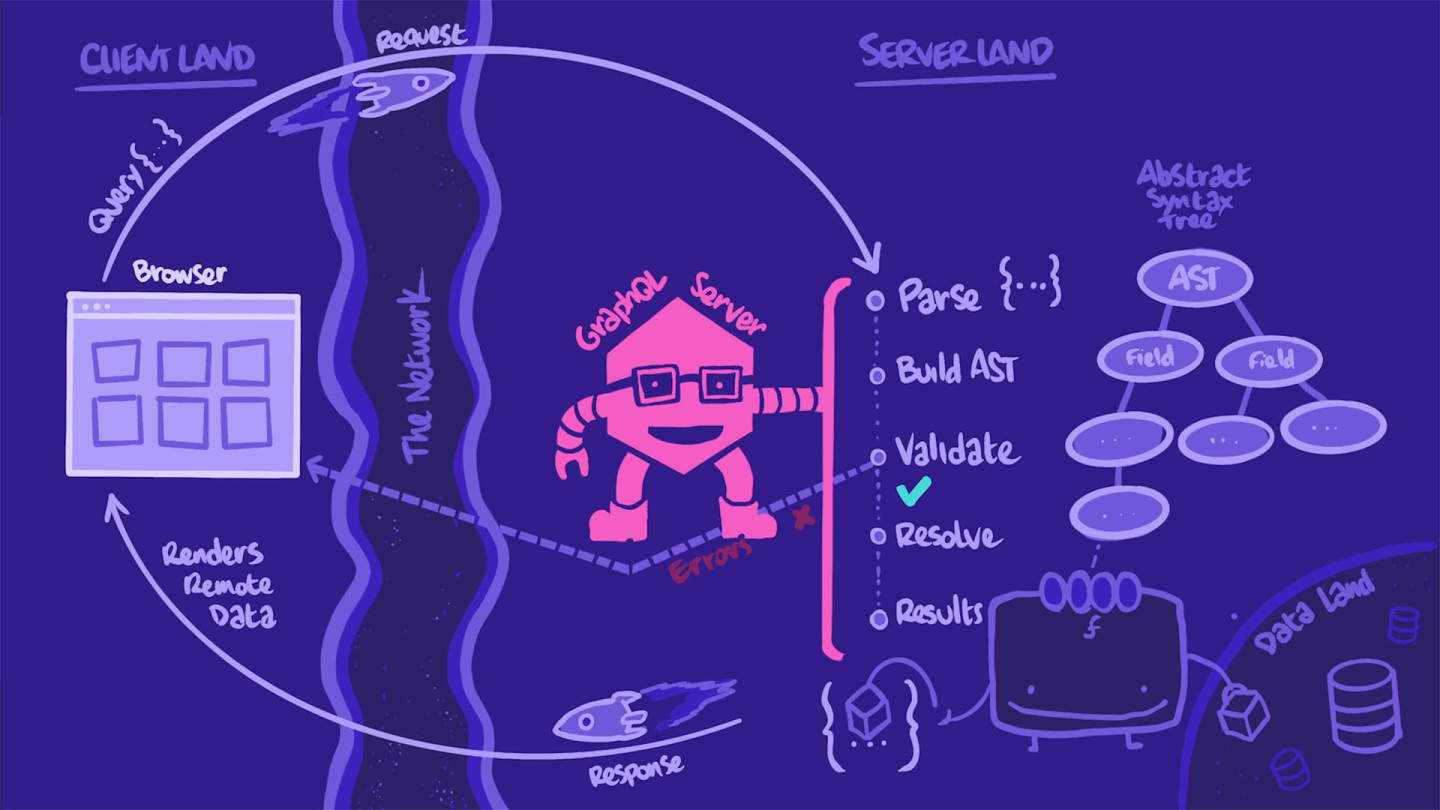
And that's the journey of a GraphQL query!
Apollo Client
To help prepare all of our queries for this journey to the server, we're going to use Apollo Client. Apollo Client is a library that helps us make requests and manage data in our frontend applications using GraphQL. It comes with a powerful cache and state management capabilities that make it a natural partner for our React app!
Let's dive into our frontend now.
🖼 Frontend first steps
Let's open up our React app in our IDE.
Within the src directory we have a few subdirectories: pages, containers, components, and assets:
📂 odyssey-client-side-graphql┣ 📂 src┃ ┣ 📂 assets┃ ┣ 📂 components┃ ┣ 📂 containers┃ ┣ 📂 pages┃ ┣ ...┣ ...
We'll spend most of our time in the pages/ and containers/ directories.
The components/ folder holds our UI React components. Those are only responsible for displaying the data they receive via props. Those components are already built, because they aren't the focus of this course.
Let's take the app for a spin and see how it looks right now! From the root directory, run:
npm start
The app builds and is then served from port 3000. For now, it's just an empty layout with a navigation bar, a title, a logo, a background, and... that's it.

⌨️ Let's play with AC3 (Apollo Client 3)
Let's open up the root of our React app (src/index.tsx). It's time to use Apollo Client to send queries to the GraphQL server!
We first need to install two packages: graphql and @apollo/client.
graphqlprovides the core logic for parsing GraphQL queries.@apollo/clientcontains pretty much everything we need to build our client, including an in-memory cache, local state management, and error handling.
In the root of your project, run the following command:
npm install graphql @apollo/client@3
With these installed, let's import the three symbols we need from the @apollo/client package in src/index.tsx:
import { ApolloClient, InMemoryCache, ApolloProvider } from "@apollo/client";
We'll be using all three packages to set up Apollo Client.
The ApolloClient class
As you'd expect, ApolloClient is the class that represents Apollo Client itself. We create a new client instance like so:
const client = new ApolloClient({// options go here});
We need to provide a couple of options to the constructor. The first is the uri option, which we use to specify the location of our GraphQL server. We'll pass it the same URL we used in Sandbox, so the uri option looks like this:
uri: 'https://odyssey-lift-off-server.herokuapp.com/',
Second, every instance of ApolloClient uses an in-memory cache. This enables it to store and reuse query results so it doesn't have to make as many network requests. This makes our app's user experience feel much snappier.
We provide an InMemoryCache instance in the cache option, like so:
cache: new InMemoryCache(),
That's all we need to configure our client! Here's the full call:
const client = new ApolloClient({uri: "https://odyssey-lift-off-server.herokuapp.com/",cache: new InMemoryCache(),});
Our client is ready to use, but how do we make it available to the components in our React app? That's where ApolloProvider component comes in!
The ApolloProvider component
The ApolloProvider component uses React's Context API to make a configured Apollo Client instance available throughout a React component tree. To use it, we wrap our app's top-level components in the ApolloProvider component and pass it our client instance as a prop:
root.render(<React.StrictMode><ApolloProvider client={client}><GlobalStyles /><Pages /></ApolloProvider></React.StrictMode>);
Now all of our pages, containers, and components can access the client via friendly React Hooks thanks to the context API.
Now we relaunch our app, aaaaand, drumroll... nothing changes! We still get our boring, mostly blank layout (well, at least there are little cats on rockets in the background).
Our client is configured and ready to use, but we aren't actually using it yet.
Practice
Create a new ApolloClient instance, with its options set up to connect to the endpoint https://graphql.org/swapi-graphql and use the InMemoryCache. Assign the instance to a variable called client.
Key takeaways
- The journey of a GraphQL query starts when a client app prepares a query and sends it to the server in an HTTP
POSTorGETrequest. - The GraphQL server's job is to parse, validate, and fulfill the queries it receives.
- The GraphQL server uses data sources and resolvers to resolve requests and return data to the client.
- Apollo Client is a state-management library that helps us make requests and manage data with GraphQL.
Up next
Apollo Client is ready to help us with our first queries, so let's hook up our frontend app with the last piece we need before go-time: type-safety and codegen!
Share your questions and comments about this lesson
This course is currently in
You'll need a GitHub account to post below. Don't have one? Post in our Odyssey forum instead.