Now that we've updated our codebase, it's time to deploy the code, publish our schemas, and make use of our graphvariants.
In this lesson, we will:
Learn how to automatically deploy changes to the staging and production environments
Learn how to apply the deployment steps from the staging environment to the production environment
Learn how to publish schema changes to the stagingvariant as part of the CD pipeline
Publishing to the schema registry in the CD workflow
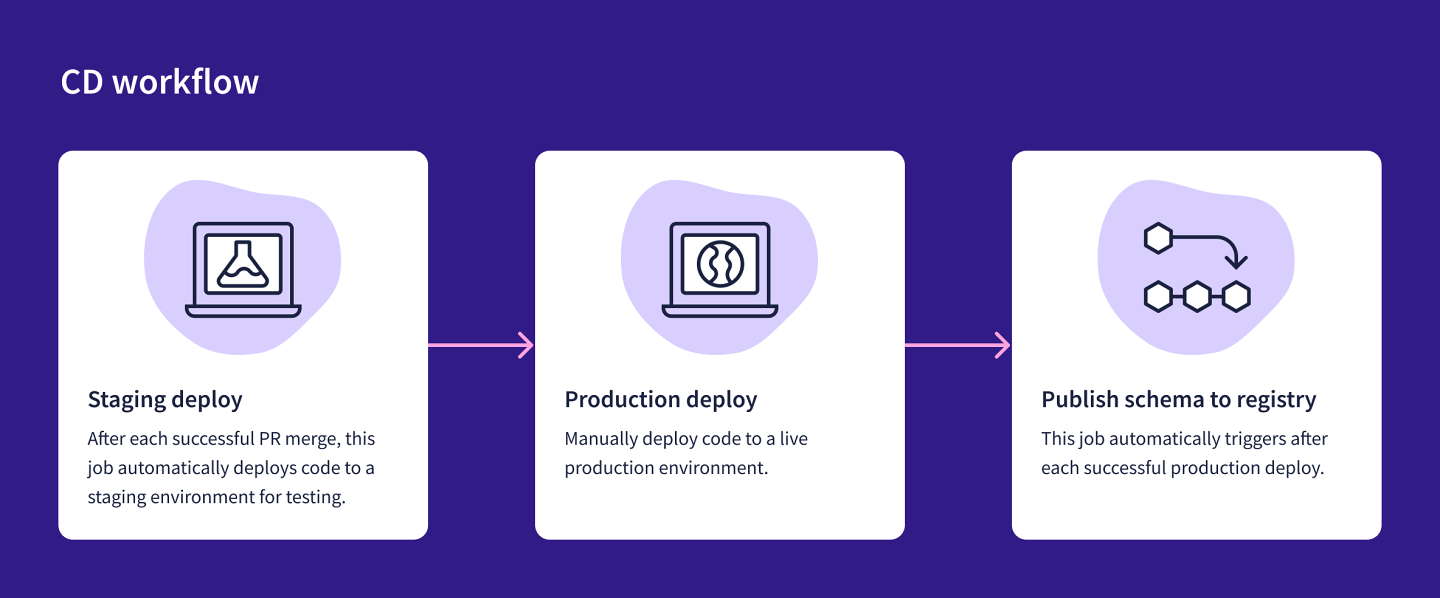
Let's review the original CD workflow.
The diagram shows a flowchart outlining the following process:
Staging deploy. Deploy code to staging environment, for testing. This job is done automatically, triggered after a successful PR merge.
Production deploy. Deploy code to production environment. This job is triggered manually after completing testing in the staging environment.
Publish schema to registry (production graph). This is triggered automatically after a successful production deploy.
Originally, the Airlock graph only tracked the production version of the graph (the currentvariant). Earlier in the course, we added a stagingvariant to the graph to correspond to the staging environment of our subgraphs. Let's make sure to update our CD workflow!
After deploying to the staging environment, we'll publish our subgraph schema changes to the stagingvariant of our graph, which will trigger a launch. This process will all be taken care of automatically by two separate GitHub Actions, which we'll take a look at in the next section.
The diagram below shows our updated CD workflow, for the staging deploy. We'll have a separate (and similar!) diagram for the production deploy.
The diagram shows a flowchart outlining the following process:
Staging deploy. Deploy code to staging environment, for testing. This job is done automatically, triggered after a successful PR merge.
Publish schema to staging graphvariant. This is triggered automatically after a successful staging deploy.
Launch process starts. GraphOS starts the launch process (composition, operation checks, etc.)
Staging deploy
The Airlock CD pipeline includes a GitHub Action called Staging Deploy, which is responsible for deploying the code to the staging environment on Heroku. This job is automatically triggered when a pull request is merged to our main branch.
This takes care of keeping the Heroku staging apps up to date with the main branch of our GitHub repo.
Publish schema to staging
After the Staging Deploy job runs, another begins automatically: the Staging Publish Schema job. This job publishes the subgraph schema to the stagingvariant in the schema registry.
This job uses the rover subgraph publish command behind the scenes to publish the schema changes to the relevant subgraph in GraphOS.
Seeing the CD workflow in action
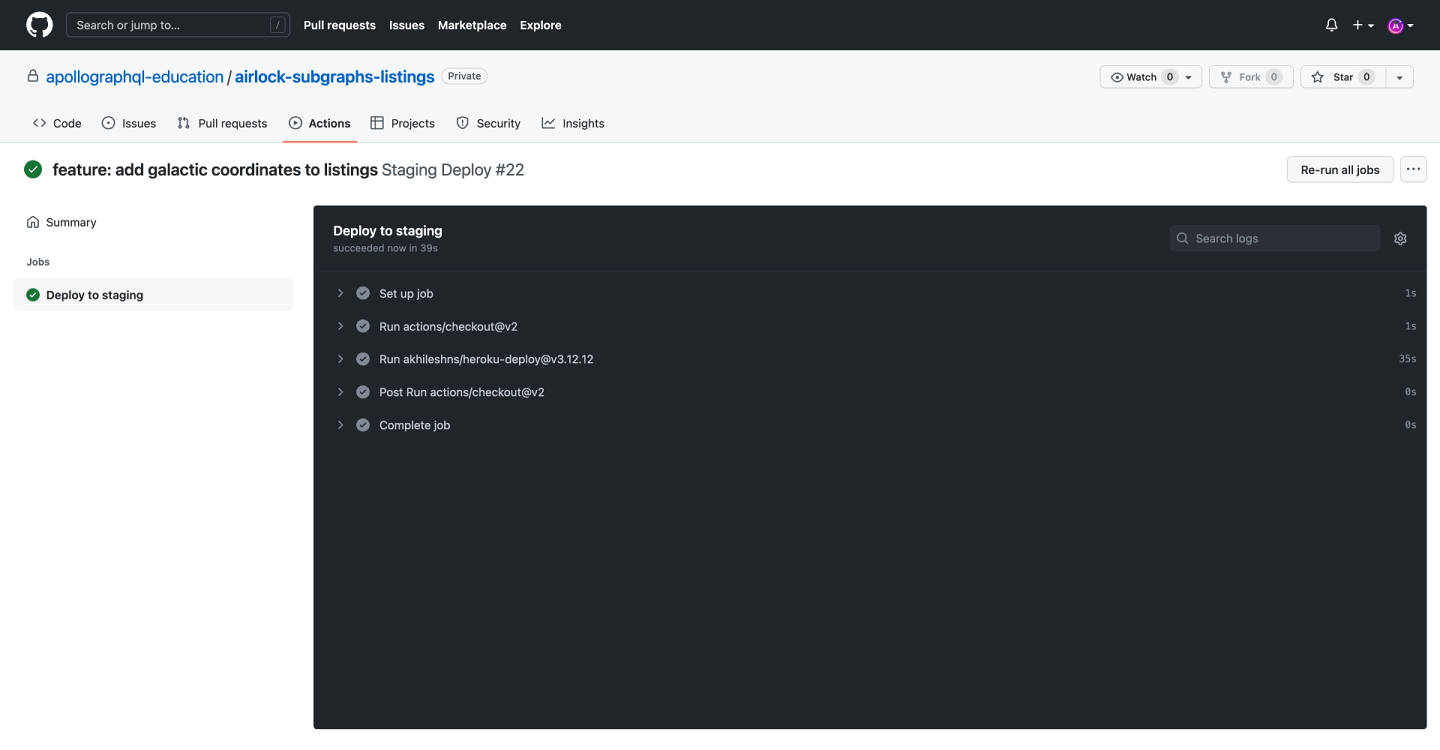
Let's see the jobs in action! After the Listings team has reviewed the changes in the pull request, we can click Merge to merge the updates into the main branch of the listings subgraph's repository.
This triggers the Staging Deploy job to deploy the changes to the Heroku app for the listingssubgraph's staging environment.
Here's a screenshot of the GitHub Actions page showing the workflows that have run so far. Currently, the Staging Deploy job for the PR that was just merged is running.
https://github.com
When clicking the Staging Deploy job, we can follow the job's progress until it completes.
https://github.com
After the job successfully completes, it triggers the next job, Staging Publish Schema, which publishes the new listingssubgraph schema to the stagingvariant on GraphOS.
https://github.com
Clicking into the details of the job, we can see the schema was successfully published to the stagingvariant.
https://github.com
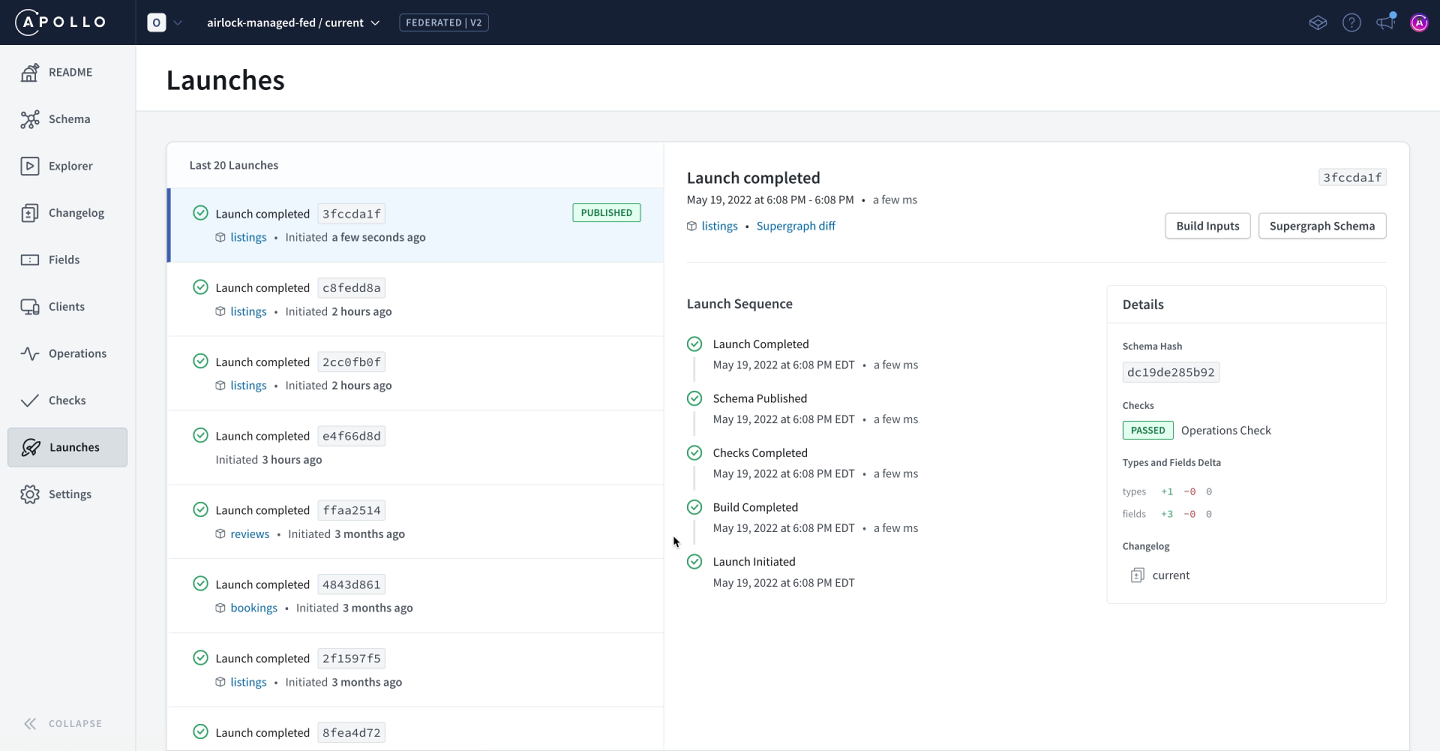
What happens after a schema is published to the registry? A launch starts! We can see the steps in the launch process in the Launches page of Studio, making sure we have the stagingvariant of our graph selected.
Now, Lisa's changes to the listingssubgraph are available in Airlock's staging environment. Teammates and other stakeholders can use the Apollo Explorer to test out the new supergraph and make sure everything works as expected.
Deploying to production
After initial testing on displaying the galactic coordinates for a listing on the staging environment is completed, we can try out deploying to production.
The diagram below illustrates the steps in our app's production workflow—and it looks a lot like our plan for the staging environment!
The diagram shows a flowchart outlining the following process:
Production deploy. Manually deploy code to a live production environment.
Publish schema to production graphvariant. This is triggered automatically after each successful production deploy.
Launch process starts. GraphOS starts the launch process (composition, operation checks, etc.)
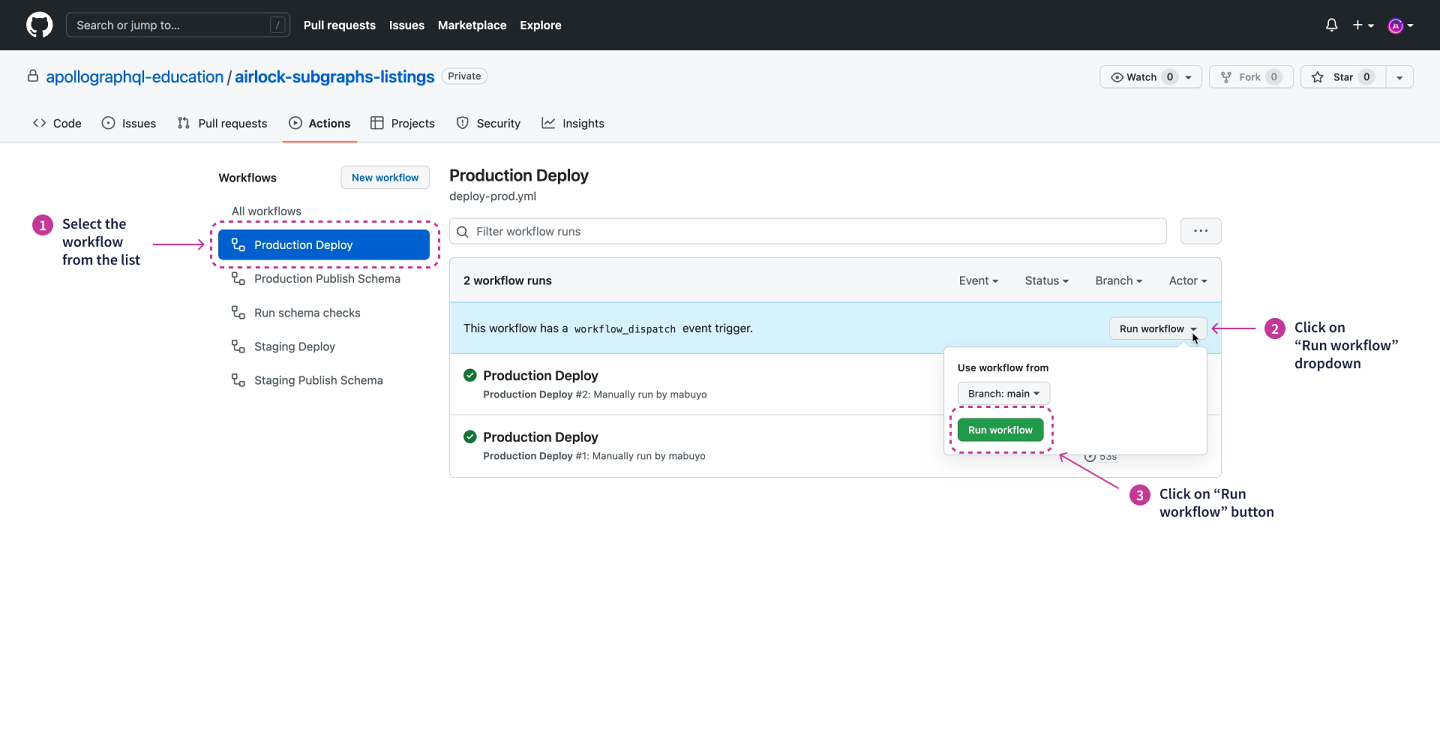
When we're ready to update our production environment, we first want to deploy our main code branch to the production version of the corresponding Heroku app. To do this, we can run the Production Deploy job manually on GitHub.
This pushes the latest code changes from the main branch on GitHub to the production environment hosted on Heroku. When this succeeds, it triggers another job called Production Publish Schema, which publishes the updated subgraph schema to our graph's currentvariant. This initiates a new launch, and we're back in the same process we've already covered in the staging environment!
Interested in what this looks like in action using GitHub? See below for detailed steps and screenshots!
Navigate to the Actions page, select Production Deploy from the list.
Click the Run workflow dropdown, select the main branch and click Run workflow to initiate the workflow.
https://github.com
Here is the workflow file for that job:
.github/workflows/deploy-prod.yml
# This job deploys the code to the production Heroku app environment
name: Production Deploy
# This job is triggered manually in the GitHub UI
on: workflow_dispatch
jobs:
deploy:
name: Deploy to production
runs-on: ubuntu-latest
steps:
-uses: actions/checkout@v4.1.5
-uses: akhileshns/heroku-deploy@v3.13.15
with:
heroku_api_key: ${{ secrets.HEROKU_API_KEY }}
heroku_app_name: ${{ secrets.HEROKU_APP_NAME }}
heroku_email: ${{ secrets.HEROKU_EMAIL }}
Refresh the page and select the job that was initiated. When this job successfully completes, another one is triggered.
Go back to the Actions page and select the Production Publish Schema workflow from the list. We'll see a new job running.
Here is the workflow file for that job:
.github/workflows/publish-schema-prod.yml
# This job deploys the code to the production Heroku app environment
Wait for this to complete successfully. Next, it will trigger a launch in GraphOS, which you can find in the Launches page of the currentvariant of the graph.
https://studio.apollographql.com
What happens when we want to update how the router is configured? Let's take a moment to look at what goes into the process of making changes and deploying them!
All of the code for the router lives in a single GitHub repository. It includes the router binary, the config.yaml configuration file, and a Procfile, which is specific to Heroku, where the router is hosted.
airlock-router
┣ router
┣ config.yaml
┗ Procfile
Like any other GitHub repository, we can clone and run the router repo locally. When we make changes, we open up a new PR and (once it's approved!) merge the new code to the main branch of the repo. From there, a few things are ready to occur.
The diagram shows a flowchart outlining the following process:
Schema and code changes are made in the local environment, in a separate branch.
Create a pull request (PR) to merge into the main branch. PR is reviewed and merged into main branch.
Staging deploy. Deploy code to staging environment, for testing. This job is done automatically, triggered after a successful PR merge.
Production deploy. Deploy code to live production environment. This job is triggered manually.
The router repo is set up to deploy to two apps on Heroku: one for the staging environment, and one for production. Just as we've seen with our subgraph repos, when we merge code to the main branch, the deploy to the staging environment happens automatically.
When we query our staging app on Heroku, we're running operations against our graph's stagingvariant. This is because we've configured the Heroku app to connect to the stagingvariant, using the APOLLO_GRAPH_REF and APOLLO_KEY environment variables.
https://studio.apollographql.com
While the deploy to the staging app occurs automatically, we don't want to push our changes to production in the same way. Once we've tested out the updates to the stagingvariant and feel confident our router is running as expected, we can manually trigger a deploy of the main branch to our router's production app on Heroku. The production app runs operations against the currentvariant of our graph.
https://studio.apollographql.com
We need both instances of the router to test our staging and currentgraphvariants separately. Heroku allows us to set a command in the router's Procfile that specifies the environment variables to use when running the router in different environments.
The diagram shows the command we're using to run the router. In it, we reference two environment variables with the following placeholders: $APOLLO_KEY and $APOLLO_GRAPH_REF.
The value of these environment variables is set based on the environment they're used in. Staging will use a different APOLLO_KEY than production, and the APOLLO_GRAPH_REF differs between staging and production by the variant set after the '@' symbol. In staging, we reference the stagingvariant, while in production we reference current.
By keeping the method of deployment for each of our environments separate, we can make sure that any changes we've made to the router or its config.yaml file continue to work correctly.
Practice
Which of the following events triggers a launch in GraphOS?
Key takeaways
We can automate publishing a subgraph to the registry inside our CD pipeline using the rover subgraph publish command.
Publishing a subgraph schema to any variant in the registry triggers a launch. We can view the launch sequence in the Launches page of Studio.
Up next
And there we go! We've integrated publishing to the schema registry into our CD pipeline, running automatically for us! All our checks passed successfully here, but in the next two lessons we'll see
what happens when things don't go smoothly.
Share your questions and comments about this lesson
Your feedback helps us improve! If you're stuck or confused, let us know and we'll help you out. All comments are public and must follow the Apollo Code of Conduct. Note that comments that have been resolved or addressed may be removed.