Overview
Welcome to the third and final course of the Voyage series!
So far, we've used Apollo Federation to modularize the graphs for both a new greenfield project and an existing monolithic application. In both cases, we worked on the schemas for the apps' graphs locally, on our personal computer. But what happens when it's time to deploy an app to production?
In this course, we'll dive deeper into the benefits of managed federation and how to use Apollo GraphOS tools to monitor and make changes to a supergraph in production.
In this lesson, we will:
- Explore adding a new feature to our Airlock demo app
- Review the current architecture for Airlock
- Learn about the environments, tools, and processes used in the development workflow
Prerequisites
You'll need to be familiar with the basic concepts of federation and managed federation, such as:
- What a router does in a federated architecture and how it works with subgraphs
- How to use Rover to publish subgraphs to the schema registry
- How to run the GraphOS Router
We cover these concepts in Voyage I.
You will also need to be comfortable with:
- Running commands in the terminal, such as navigating between directories
- Basic Git concepts, such as branches, pull requests, and merging
You'll be learning how to integrate certain concepts into a development workflow, but prior knowledge of continuous integration and continuous delivery (CI/CD) principles is not required. For a quick introduction, you can read GitHub's overview of CI/CD.
Note: This series is primarily intended for backend developers. If you're a frontend developer who doesn't work on the backend, the good news is that your workflow stays the same, whether you're dealing with a federated or a non-federated graph. You'll still send all your GraphQL operations to a single endpoint, and the backend team will handle the rest!
How to follow along
This course is a bit different from the previous Odyssey courses you've done so far. To demonstrate how the concepts work in a real-world context, this course will use the Airlock app (from Voyage II) to show you how to use managed federation in production.
However, Airlock consists of multiple services, and deploying them individually requires quite a bit of setup work. And the focus of this course is managed federation in production, not deploying things!
Note: You can find instructions in the Apollo docs about how to deploy a graph.
As a result, in this course, you won't be following along by performing the exact steps in your own starter project. Instead, you'll read along to get a general sense of the concepts and how you can apply them to your own CI/CD pipeline. At the end of each lesson, there will be a Practice section with assessment questions, so that you can check your understanding of the key ideas.
Evolving the graph
Let's revisit Airlock, our interplanetary travel app where space adventurers can find new intergalactic places to visit!
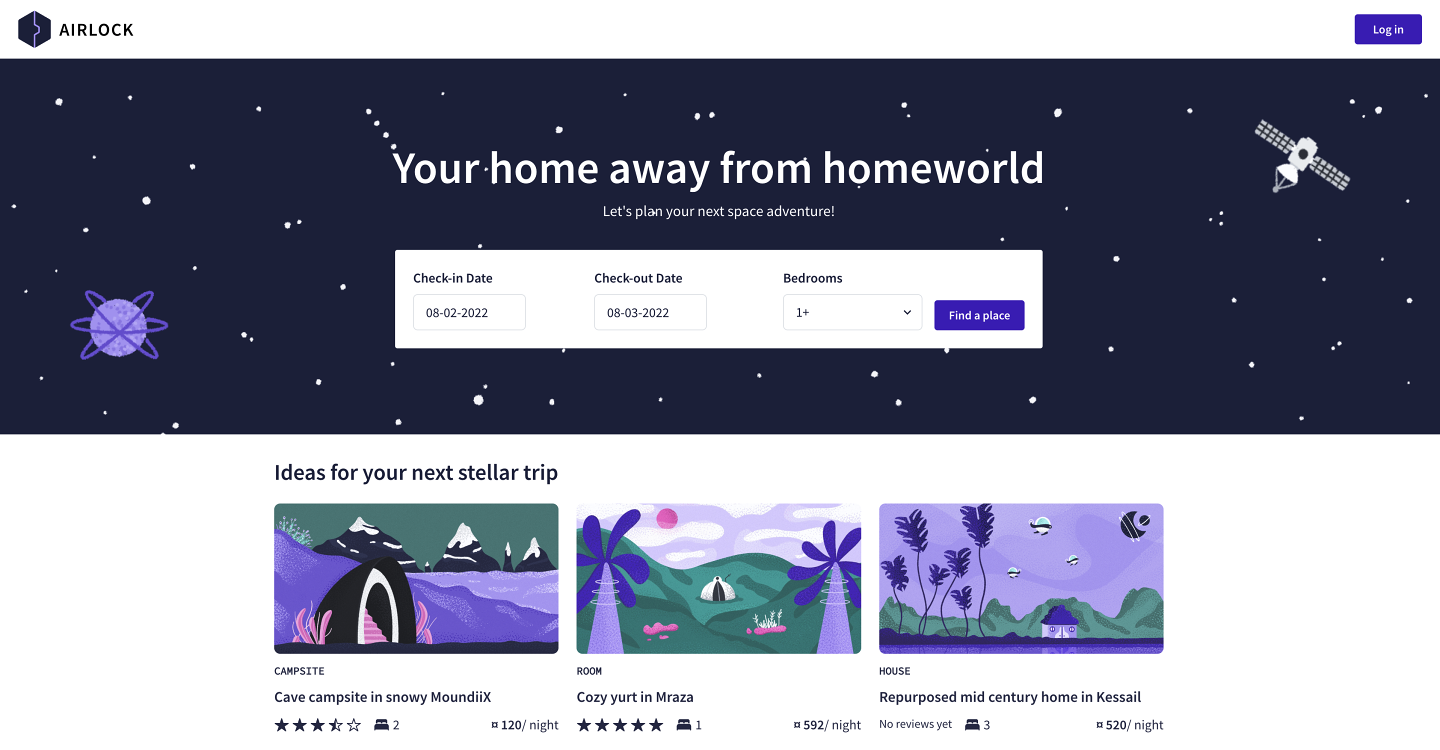
The Airlock team is always looking to improve the experience for their users. Right now, they want to focus on the guest experience. Guests have been having a difficult time finding exactly where they're staying after they've booked their trip. Sometimes, hosts even give them the wrong space address! Additionally, guests have had frustrating experiences where hosts were nowhere close to the location after they arrived. They had been expecting personal welcomes and quick service.
To address these guest complaints, the Airlock team is tackling a new project: Project Galactic Coordinates. This project improves how guests can easily find two things: the listing they've booked and the host that owns it. With precise galactic coordinates, guests will feel confident that they're staying in the right place, and they'll know where the host is too! This vital piece of information will set clearer expectations about the listings our guests are booking.
The designs for Project Galactic Coordinates have already been created, so let's take a look!
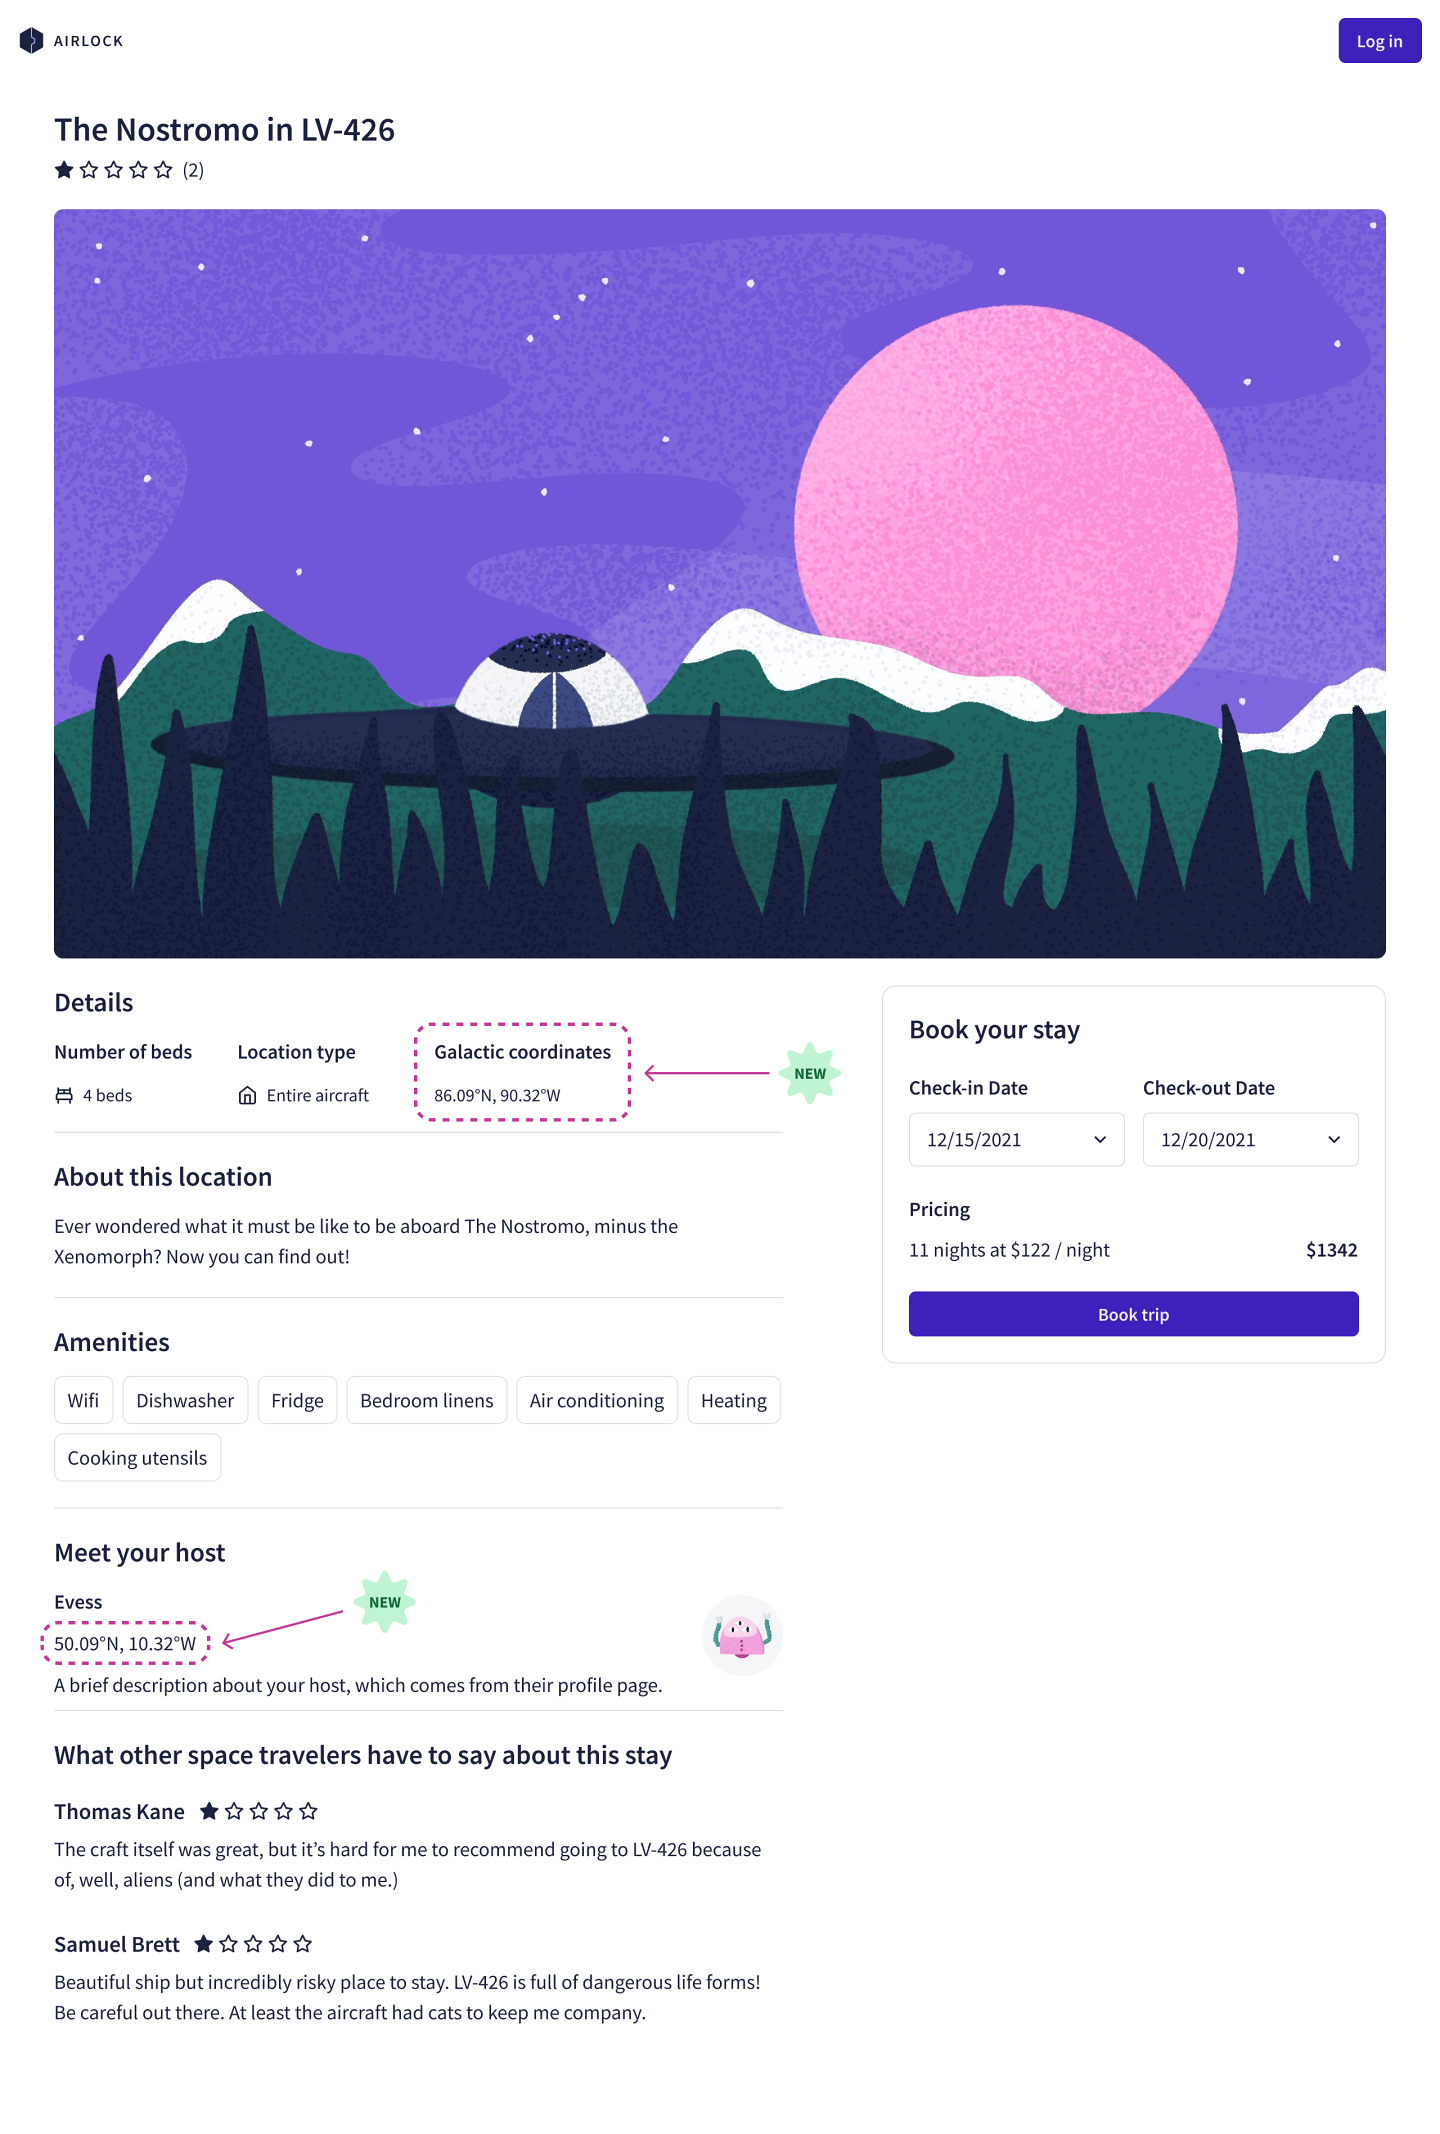
From the mockup designs, we can see that we'll need a new piece of data for each listing and host: galactic coordinates. These coordinates consist of a latitude and longitude, both precise numbers that pinpoint the listing or host's location in the galaxy.
We can start to evaluate how to integrate this new piece of data into our existing schema. Where would this type live? Which types need a new field, and in which subgraph? Take some time to review the mockup and sketch out how you would evolve the graph to accommodate this new feature.
🚀 Airlock deployed to production
Before we tackle how to implement this new feature, let's first revisit Airlock's current architecture, how it's changed, and how it's been deployed to production.
Airlock started out with a monolithic GraphQL architecture that we iteratively split into subgraphs and converted to a fully federated architecture. For the purposes of the Voyage II course, all of that work was done locally, with each subgraph server and the router hosted on local ports.
Since then, the team has deployed each service, subgraph, and the router, so that they're available outside of their local machines. Airlock is officially in production!

You should already be familiar with these subgraphs and services from Voyage II.
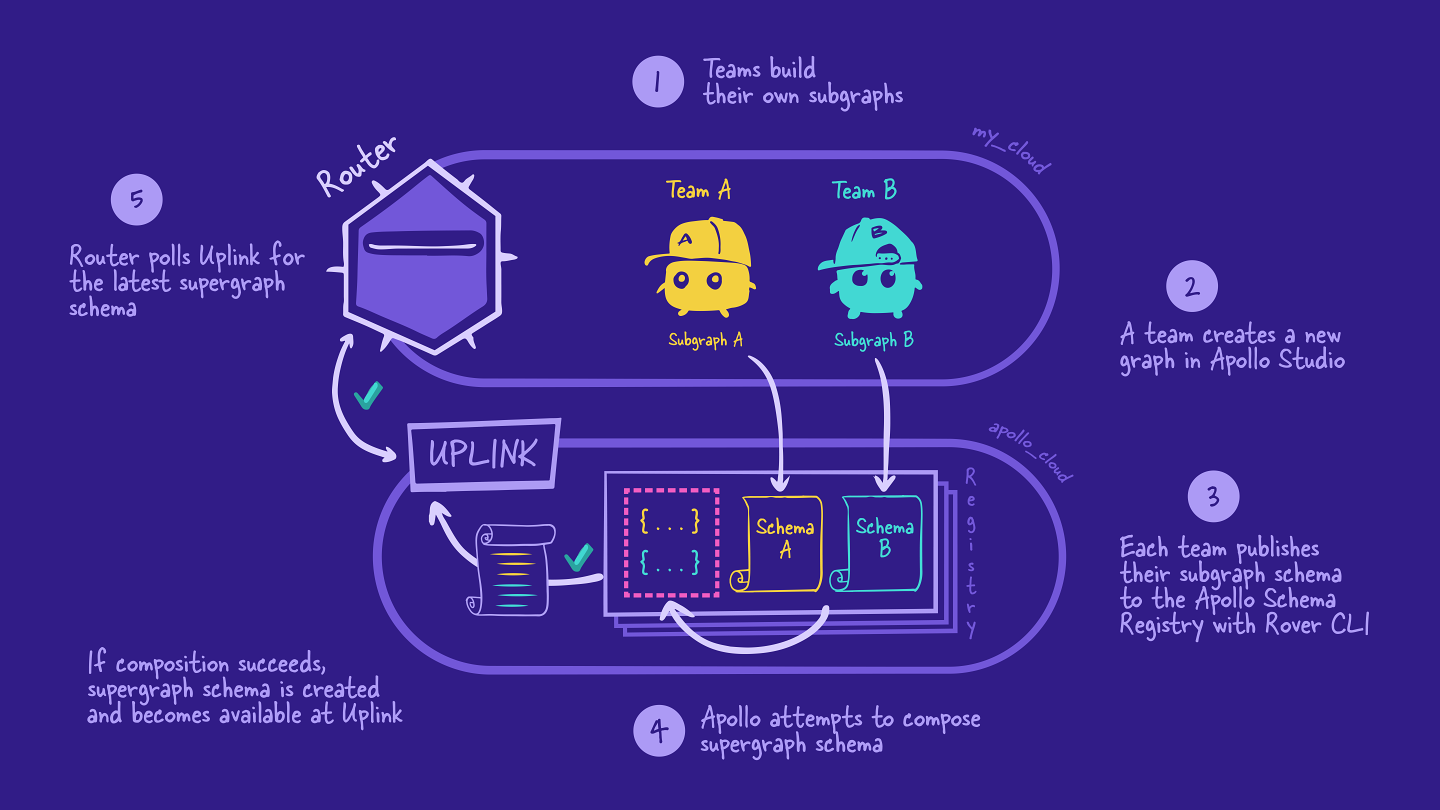
The deployed version of Airlock uses managed federation. Recall from Voyage I that using managed federation means that each subgraph is published to the Apollo schema registry, which then handles composition for us. The router polls Apollo Uplink to retrieve the latest version of the supergraph schema for it to use. (Need a quick refresher? Check out the diagram of the managed federation process below.)
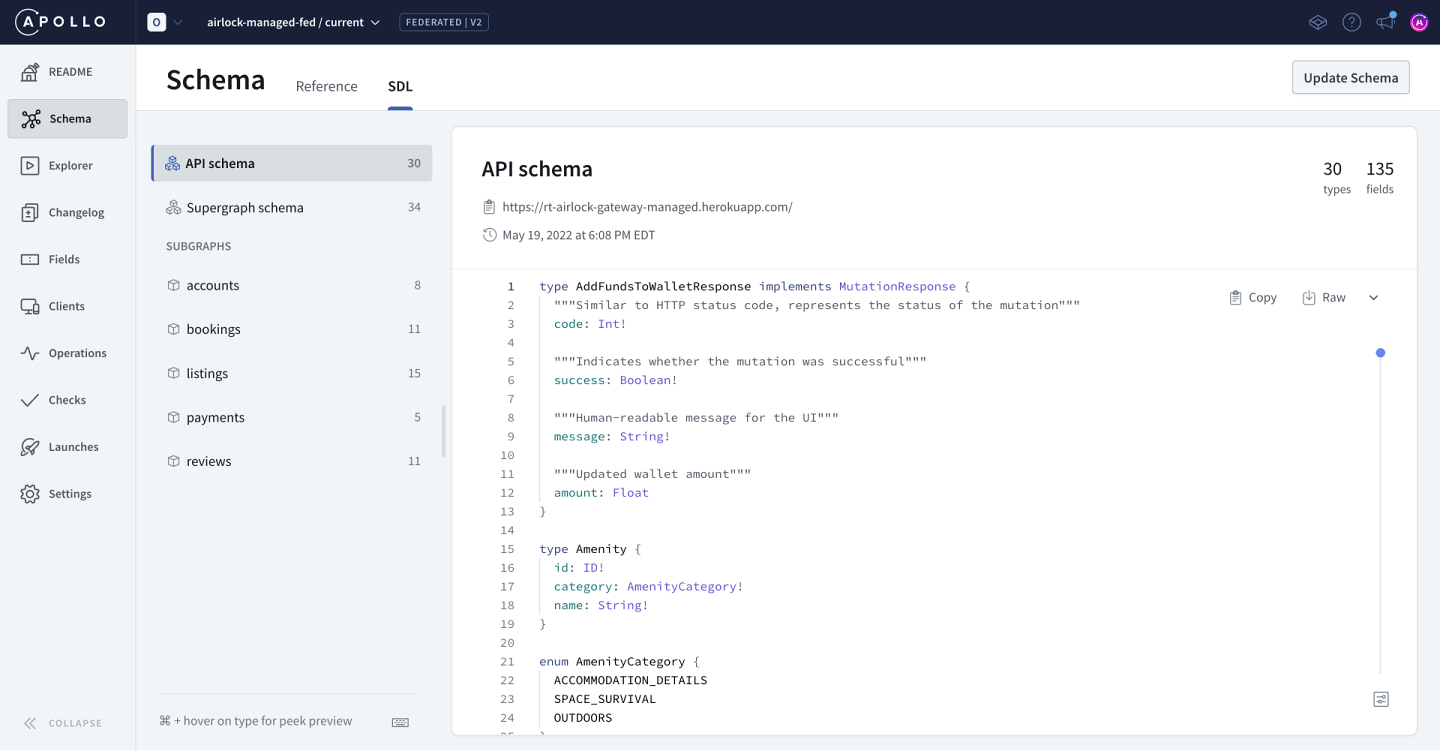
With this setup, we have our Airlock graph available in Studio. We can see our API schema and all the subgraphs involved in the screenshot below:
We'll also start to explore more of Studio's features and how they can support us as we evolve our graph.
The development workflow
The Airlock teams apply continuous integration and continuous delivery (CI/CD) principles, which means that new code changes are regularly merged into the main codebase and delivered to different environments.
Let's take a look at the tools, environments, and processes the Airlock teams have been using to evolve the graph so far.
Tools
We use a few different tools to get Airlock up and running:
GraphOS Studio: Where we'll find the schema registry, along with many other helpful ways to interact with our graph and track its health. We'll learn more about Studio throughout the course.
The Rover CLI: We use Rover in our local environments to publish subgraphs and run schema checks (which we'll learn about later!). We'll also learn how to integrate Rover into our CI/CD processes.
GitHub: Where our code lives for easier collaboration and version control within the team.
GitHub Actions: How we automate our CI/CD workflows. These workflows can be triggered by events such as creating or closing pull requests, new commits on a branch, or even manually with a push of a button.
Heroku: A cloud service platform that enables us to deploy our app without having to worry about the infrastructure specifics.
Note: Your platform of choice may vary! For example, you can replace Heroku with another hosting platform, such as Google Cloud or AWS. Or, you can replace GitHub with GitLab or BitBucket.
Environments
Complex applications almost always run in multiple environments, each with a different purpose. You can think of an environment like a separate space with its own instance of code and environment variables. We run Airlock in three distinct environments: local development, staging, and production.
- Local: A developer's local workspace, running on their own computer. Any code or schema changes start here.
- Staging: The staging environment is generally used to test and validate changes before they're made available in production.
- Production: This is the “live” version of your application that users actually interact with.
We're going to focus on how these environments work on the server side with the tools we outlined earlier.
The router, subgraphs, and services each have their own repository on GitHub. The diagram below shows the full list of Airlock repositories.

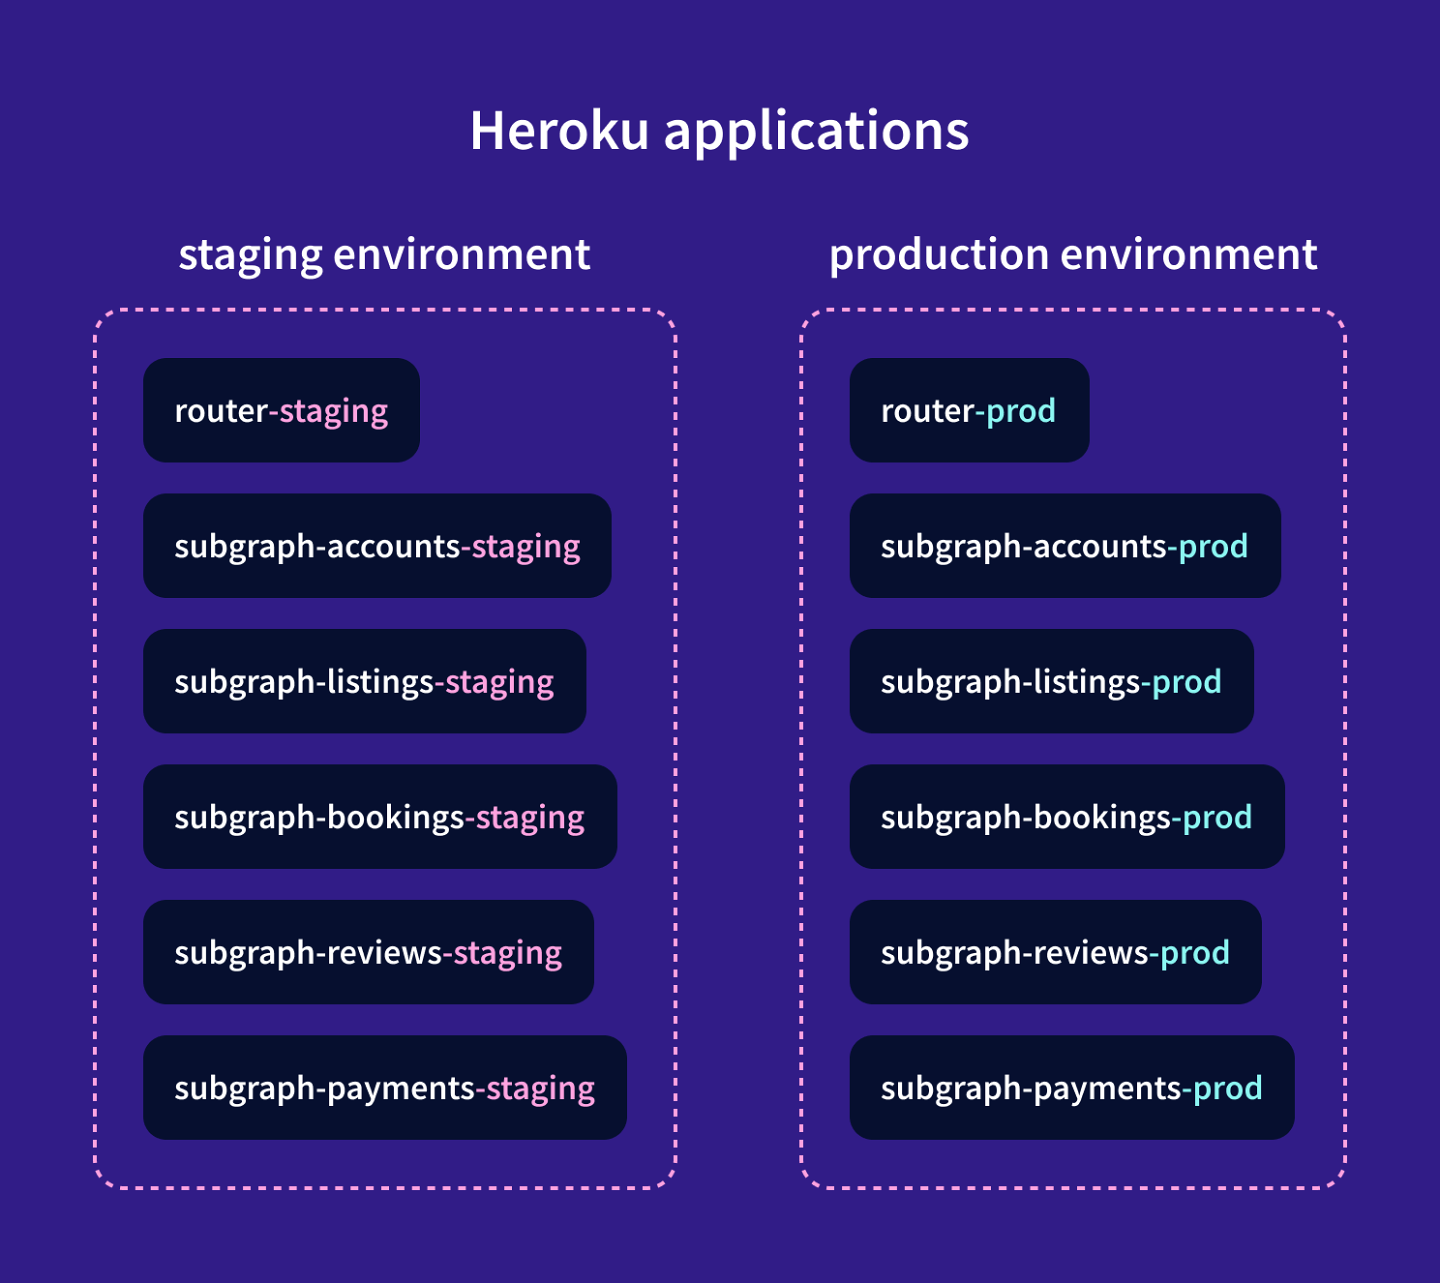
Each of these codebases is hosted on Heroku in its own application. The router and subgraph servers each have two Heroku applications: one for a staging instance and one for a production instance. These instances are completely separate and they have different GraphQL endpoint URLs.
The services are also hosted on Heroku, but they each only have a production instance.
The diagram below shows all the Heroku applications for Airlock that we're concerned with in this course.
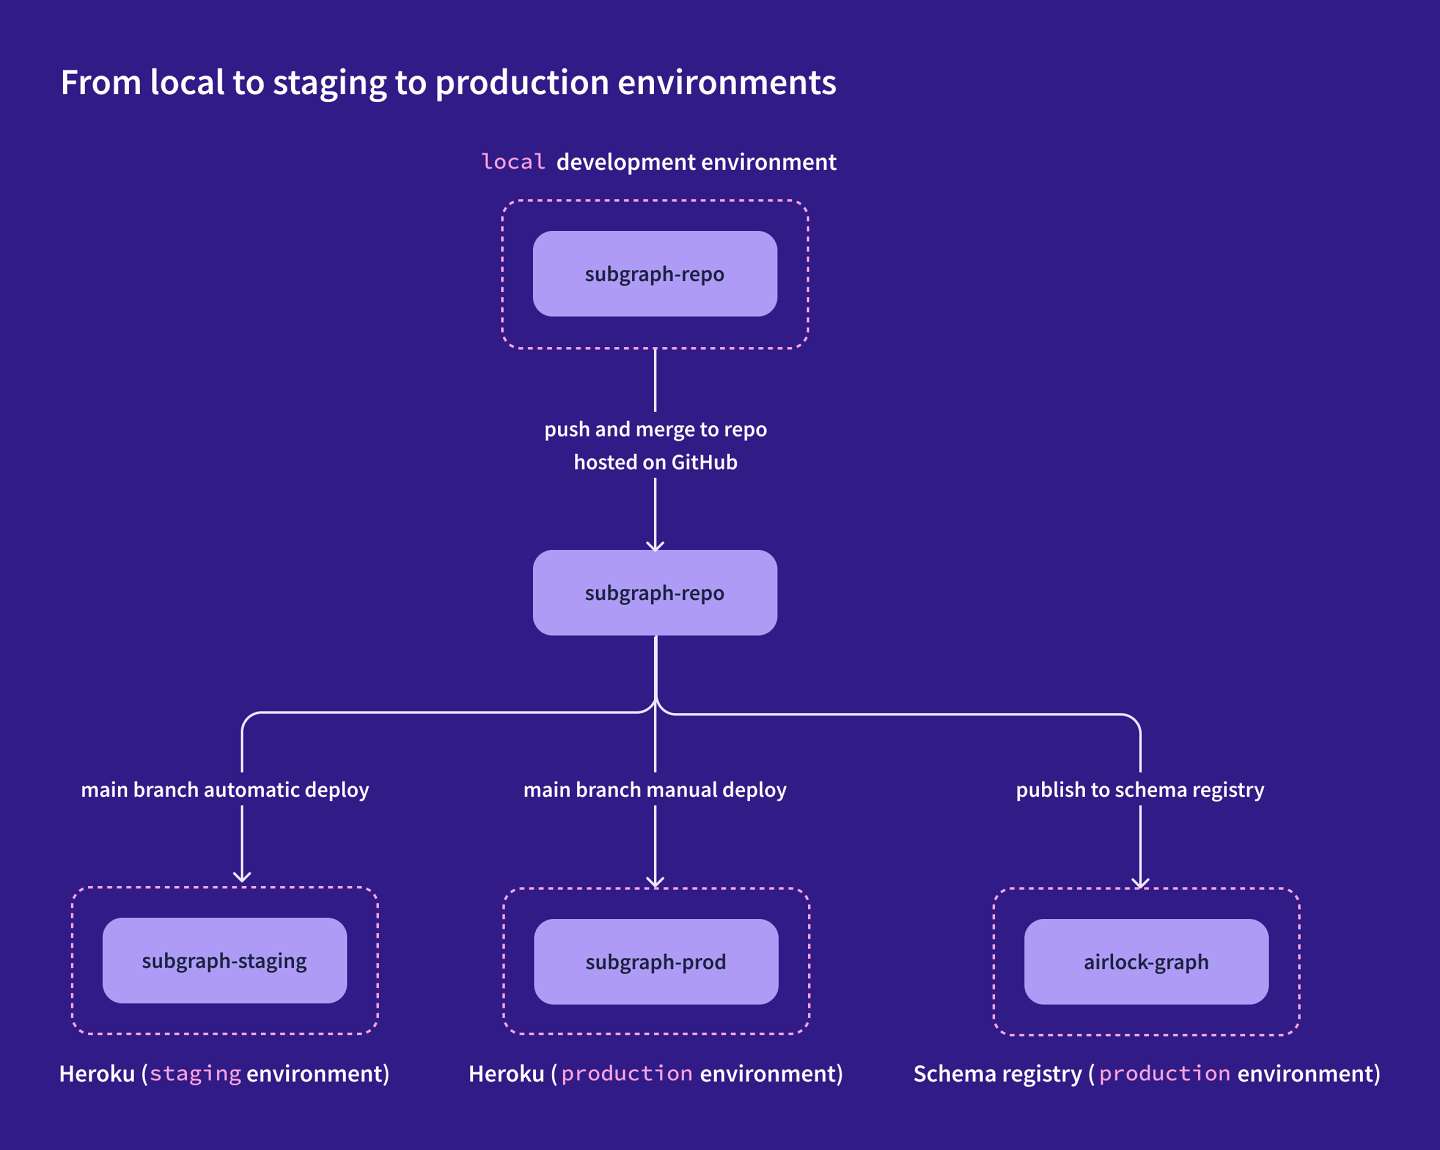
So how are the GitHub repositories and Heroku apps connected?
Let's take a closer look at the accounts subgraph as an example. When we merge a change into the main branch of the subgraph-accounts repo on GitHub, our CI/CD pipeline deploys the new version of the code to the staging environment first, so we can check that everything works as expected.
If everything looks good, we then deploy that same version of the code to the production environment as well, where real Airlock users can access it. We'll cover this process in more detail in the next section.
If our change includes an update to the subgraph schema, we also use the Rover CLI to publish the new subgraph to the schema registry. (At the moment, the Airlock graph only tracks the production version of the graph, but we'll look at how to add graph variants to mirror our staging environment later on.)
The diagram below shows the high-level development process for shipping a change to a subgraph, from local development to production deployment.
Note: As we mentioned in the beginning, we're only focusing on the server side of development and deployment. The client app will follow a similar approach, with the omission of the schema registry publishing step.
The process
Now that we're familiar with the environments and tools used, let's dive deeper into the development process and how our CI/CD pipeline works. This process starts when we make a change to a subgraph, such as adding a field or changing a field description.
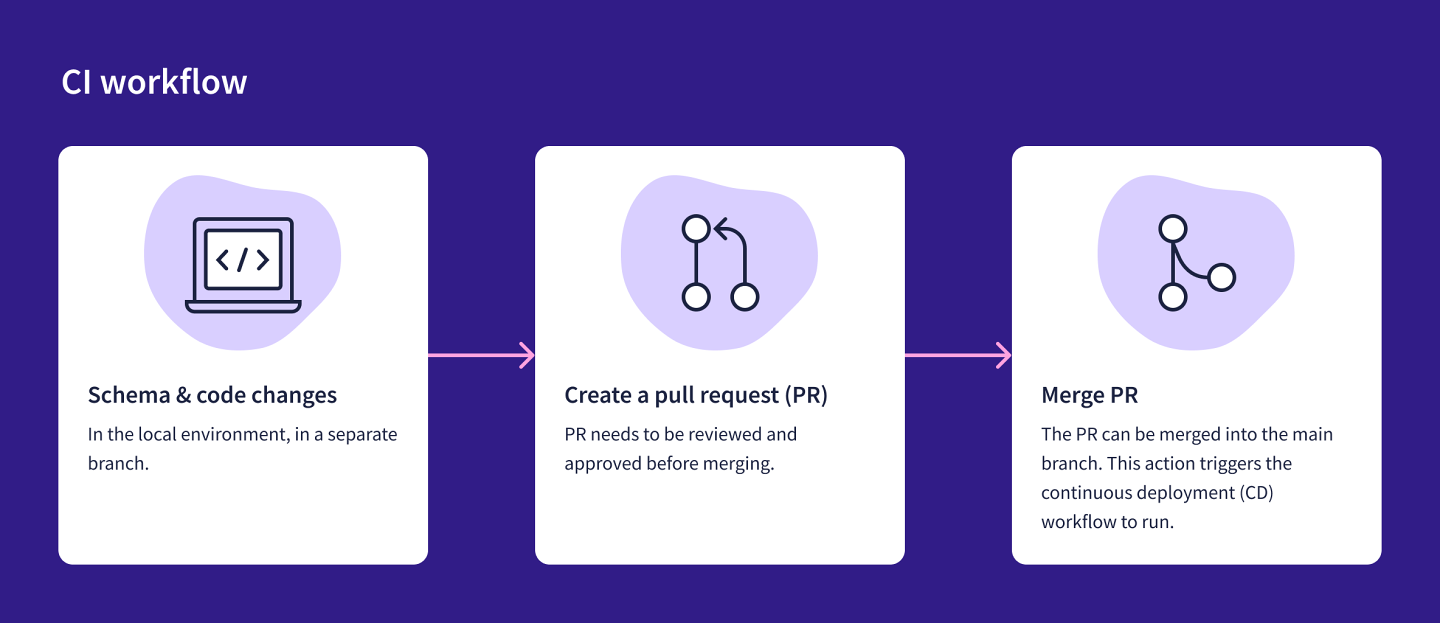
CI workflow
First, we make schema and code changes in the local environment, in a separate branch. Next, we push changes up to the GitHub repository and create a Pull Request (PR). Team members review the PR and make any necessary changes before merging the PR into the main branch. This PR merge automatically triggers the CD workflow.
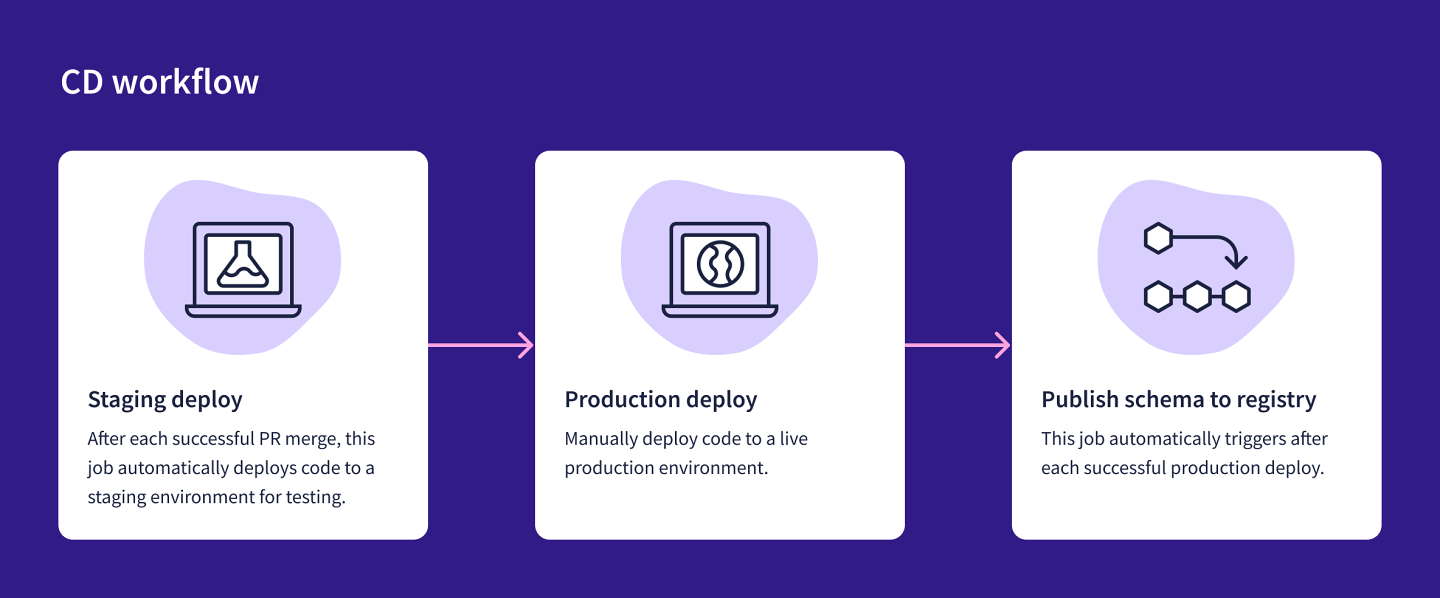
CD workflow
Updates to the main branch are automatically deployed to the staging environment on Heroku, via a GitHub Action. Initial testing is conducted in the staging environment. If everything looks good, the same changes are manually deployed to the production environment. We'll do this through the GitHub Actions UI in the browser.
After a successful deployment to production, another GitHub Action is triggered. It publishes the schema changes to the Apollo schema registry, and GraphOS kicks off composition. The router can then fetch the latest supergraph schema from Uplink.
Note: Your CI/CD process might look similar to this, with some additions (e.g., automated tests, linting checks, or sending webhooks). We've tried to keep it simple for the purposes of this course.
Practice
Drag items from this box to the blanks above
data source
subgraphs
supergraph schema
development environment
small graphs
composition
combination
universal schema
schema registry
version control
subgraph schema
Drag items from this box to the blanks above
QA
local development
production
real life
CI/CD
staging
end-to-end
Key takeaways
Airlock uses three developer environments commonly found in other projects: local, staging, and production.
We use a CI/CD process to make changes to our graph and to automatically deploy these changes to different environments.
Up next
In this course, we'll learn how to improve the CI/CD workflow by introducing graph variants and schema checks. These two additions will help us identify and prevent breaking changes to the graph as we work to get Project Galactic Coordinates out into the world. We'll also cover observability with managed federation to check on the health of our graph.
We'll start with graph variants, in the next lesson.
Share your questions and comments about this lesson
Your feedback helps us improve! If you're stuck or confused, let us know and we'll help you out. All comments are public and must follow the Apollo Code of Conduct. Note that comments that have been resolved or addressed may be removed.
You'll need a GitHub account to post below. Don't have one? Post in our Odyssey forum instead.