Overview
In this section, we'll cover:
- Creating a subgraph to expose our REST API
Prerequisites
- Apollo Rover installed in your local machine
- Your GCP project id, service account email, and key. If you have not received these, your Apollo host should be able to provide it
gcloud, the GCP command line tool installed in your local machine.
Building the subgraphs
To power our supergraph, we have three different subgraphs using Apollo Server, an open-source GraphQL server for Node.js fetching against different data sources.
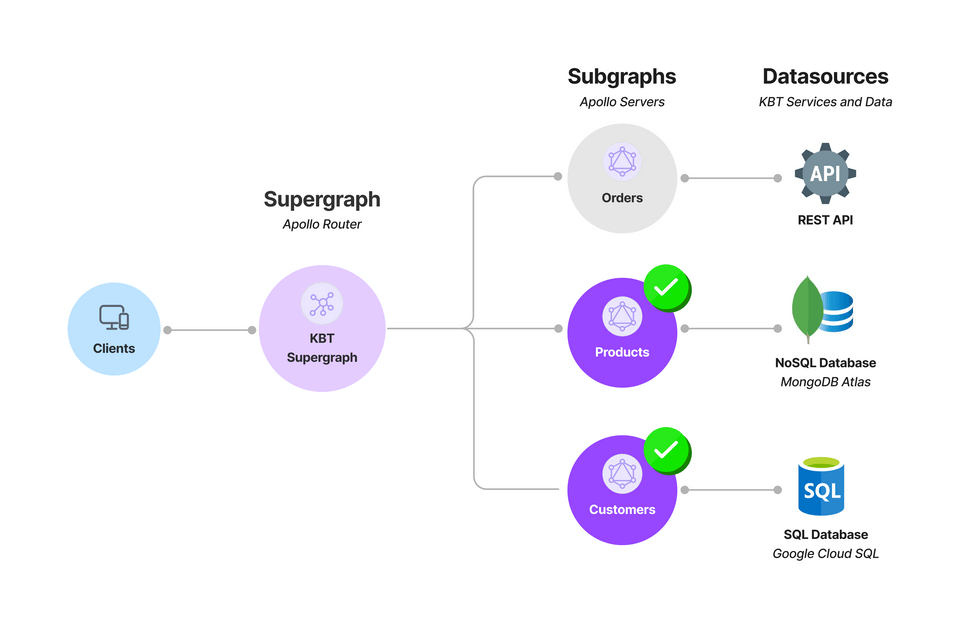
In this section we will cover how to build our Orders subgraph which is fetching against a REST API.
Note: Apollo Server is spec-compliant, which means that the fundamentals of how a GraphQL query is processed and resolved will be identical to any spec-compliant GraphQL framework that you may use in your own evaluation in the future. See the full list of compliant libraries.
Orders subgraph (REST datasource)
Currently our client-side teams have implemented the orchestration logic to fetch the associated product and customer IDs from our REST endpoint.
The Order subgraph serves all data associated within the domain of an order. In addition, its schema needs to reflect the relationship with the products and customers subgraphs by providing the IDs for the entities.
Note: in a federated graph, the GraphOS Router can create a query plan to automatically resolve the details of a product and customer. This makes it incredibly easy for clients to make a single request where the Router will perform an API join behind the scenes.
The Router is responsible for accepting incoming operations from clients and splitting them into smaller operations that can each be resolved by a single subgraph. To learn more, go to Intro to Federation.
✏️ Schema design for an Order
There are two main issues with the current way things are running at the moment at KBT Threads:
One one hand, KBT's Orders team is not responsible (ideally) for managing the information for Products and Customers. They just manage the Orders system and store only the IDs of the product and customers associated with an order.
On the other hand, our Client teams, historically, would make three round-trip calls to fetch the entire order information:
- The
IDs of theproductsandcustomerof anorder - The
customerinformation for the customerIDassociated in the order - The
productinformation for theIDs in the order items
- The
And in many instances, these responses were over fetching data, as many of the fields returned in these calls were not used at all by the client front-end.
Fortunately, GraphQL will give us that flexibility by defining exactly what we need, and federation will abstract this orchestration logic into one single request. Let's take a look at how we can model this in our Orders subgraph schema:
Open the schema.graphql file found in rest-orders/schema.graphql. You'll immediately notice two types already defined for us: Query and Order:
Query is a special root type that serves as an entry point for your services. In this case, Query allows an order to be retrieved by passing an ID, which returns an Order.
type Query {order(id: ID!): Order}type Order @key(fields: "id") {id: ID!}
Now if we look at our Order type, it currently only has a single attribute defined, id. This isn't very helpful for our client teams, so let's expand this type with more information.
To do this, we first need to add attributes that reflect the buyer and items of an order:
# unfinished schematype Order @key(field: "id") {id: ID!buyer: ?items: [?]}
Go to GraphQL.com for a refresher on what GraphQL is, and how schemas are defined.
Given that this is a Federated Graph, let's see if we can reuse what other teams have provided to prevent code duplication and standardize on common types that our clients expect.
We do this by referencing another object type provided by other subgraphs, or in other words an Entity.
In Apollo Federation, an entity is an object type that you define in one subgraph and can then reference and extend in other subgraphs, which are the core building block of a federated graph. Learn more: Introduction to Apollo Federation
We know that the Users subgraph is returning a User entity that requires a User ID. That’s great, as we have a User ID. Let’s return the User type for the buyer attribute:
type Order @keys(field: "id") {id: ID!buyer: User!items: [?]}
Repeating the same approach for items, we can see that ProductVariant would contain the type within Items.
type Order @keys(field: "id") {id: ID!buyer: User!items: [ProductVariant!]!}
If we tried to run this server, we would run into an issue because this isn't a valid GraphQL schema. This is because we don't have a User or ProductVariant type defined within our schema.
To fix this, we need to define a stub type for User and ProductVariant, where we provide the entity keys as their attributes and mark them as resolvable: false:
type User @key(fields: "id", resolvable: false) {id: ID!}type ProductVariant @key(fields: "id", resolvable: false) {id: ID!}
Now a common question around stub references, why do I need to define a stub type?
Remember that each subgraph is a valid GraphQL server, and it needs to properly compile. If you are referencing a type that is not defined…. well, it wouldn't be a valid GraphQL server.
Hence the federation specifications, provides mechanisms (aka directives) that allow for your servers to compile, and provide contextual metadata around their ownership and knowledge of fields and types to the federated runtime.
If we put it all together, it should look something like this:
extend schema@link(url: "https://specs.apollo.dev/federation/v2.0", import: ["@key"])type Query {"""Get a specific order by id. Meant to be used for a detailed view of an order"""order(id: ID!): Order}"""Returns information about a specific purchase"""type Order @key(fields: "id") {"""Each order has a unique id which is separate from the user or items they bought"""id: ID!"""The user who made the purchase"""buyer: User!"""A list of all the items they purchased. This is the Variants, not the Products so we know exactly which product and which size/color/feature was bought"""items: [ProductVariant!]!}type User @key(fields: "id", resolvable: false) {id: ID!}type ProductVariant @key(fields: "id", resolvable: false) {id: ID!}
✏️ Datasources
When we develop a GraphQL server, a common pattern is to separate out service logic from the GraphQL resolver logic. This allows us to create separation of concerns as resolver logic will be simpler to rationalize and service orchestration logic can abstract the underlying details that can be complex, such as batching and caching.
First open the data sources directory: rest-orders/src/datasources/orders-api.js:
const { RESTDataSource } = require("@apollo/datasource-rest");class OrdersAPI extends RESTDataSource {// @WORKSHOP 2.2.1: Apply the base URL herebaseURL = "";async getOrder(id) {// @WORKSHOP 2.2.2: Make HTTP Get call to endpoint}}
Within this file, you'll notice this import statement:
const { RESTDataSource } = require("@apollo/datasource-rest");
This is importing a module by Apollo called RESTDataSource, a library implementation by Apollo that simplifies fetching data from REST APIs, while including common optimizations like caching and deduplications.
In this workshop, we've provided a hosted REST endpoint, https://rest-api-j3nprurqka-uc.a.run.app/api. We can query from our browser to see what it returns. Let's try https://rest-api-j3nprurqka-uc.a.run.app/api/orders/1. Examining the JSON response, we notice that it contains the ID of the order, the customer ID and the product IDs.
{"id": 1, # Order ID"customerId": 10,"variantIds": [1, 2, 3] # Product IDs}
That's exactly what we need to allow the Router to resolve the customer and product details.
✏️ Let's start by overriding the baseURL to the Orders URI. (you can search "@WORKSHOP 2.2.1" comment), and then configure getOrder to make a HTTP GET request to the /orders/ endpoint.
baseURL = "https://rest-api-j3nprurqka-uc.a.run.app/api";
Next, let's use the built in HTTP GET Method from our REST Datasource Class, this.get, to call the endpoint passing along the parameter:
return this.get(`orders/${encodeURIComponent(id)}`);
1const { RESTDataSource } = require("@apollo/datasource-rest");23class OrdersAPI extends RESTDataSource {4baseURL = "https://rest-api-j3nprurqka-uc.a.run.app/api";56async getOrder(id) {7return this.get(`orders/\${encodeURIComponent(id)}`);8}9}
Typically, we would need to instantiate this class upon every request, however, a common pattern is to instantiate the service once, and pass it through something called a context object.
To do this, go to rest-orders/src/index.js and locate the @WORKSHOP: 2.2.3:
Here you'll see a method called, startStandaloneServer, which receives the server instance, and another parameter containing configuration information.
Within the configuration, we can pass along a context, which we can define a property for our Orders API service that we can reference throughout the application.
Typically, it's best practice to namespace our data sources as "dataSource" and define the sources under it.
The final context should look like this:
1const { url } = await startStandaloneServer(server, {2context: async ({ req }) => ({3dataSources: {4ordersAPI: new OrdersAPI(),5},6}),7listen: { port },8});
Now that we have an instance of the Orders service available in our context object, all that is left is to call our Orders API and fetch an order by its ID when a client requests it. This is mapped through our resolvers.
Resolvers
Resolvers are how you inform the GraphQL server on how to populate the data for each field or type in your schema – the orchestration logic.
No matter the programming language, all spec-complaint GraphQL servers and frameworks provide the following four arguments:
- root (sometimes also referred to as Parent) — The data of the parent type of that field
- args — The parameters passed to the field
- context — A shared object that is passed through all the resolvers. Useful for sharing per-operation state (data sources, caching, API keys, etc)
- info — Additional information pertaining to the operation (field name, query path, etc)
Now let's write our resolver. You can follow along using the more in-depth or quick walkthrough below:
Writing our resolver
Open the resolver index file: rest-orders/src/resolvers/index.js. You'll see a exported object with two properties: Query and Order
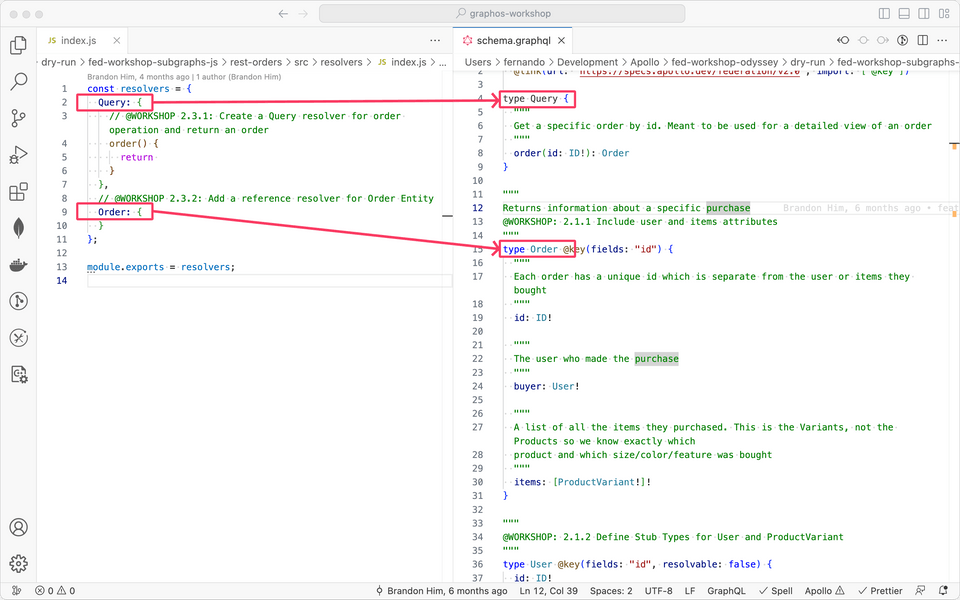
Starting with our Query type, let's now create the resolver to pull the order from our RESTful API, and provide that order to our GraphQL server for processing.
Let's define the parameters for order: order(root, args, context, info).
Now, recall that we passed out datasource in the context parameter of our GraphQL server. We can reference that datasource with the context parameter, and use the getOrder method to fetch our order and get the order ID from our query argument.
1const resolvers = {2Query: {3// @WORKSHOP 2.3.1: Create a Query resolver for order operation and return an order4order(root, args, context, info) {5const orderID = args.id;6const ordersAPI = context.dataSources.ordersAPI;7return ordersAPI.getOrder(orderID);8},9},10// @WORKSHOP 2.3.2: Add a reference resolver for Order Entity11Order: {},12};
Optionally, if we want to clean this up with common javascript conventions (underscoring omitted arguments, destructuring parameters, etc). The order query will look like this:
1Query: {2// underscore to omit root, destructure argument and context3order: (_, { id }, { dataSources }) => dataSources.ordersAPI.getOrder(id)4,
It's common that the bulk of resolvers may serve as a way to perform a mapping across fields to the data attributes, while others will work to resolve the data of the type.
Next, because our Orders subgraph is aware of how to resolve Order entities, we need to define a reference resolver.
Note: The @key directive effectively tells the Router, "This subgraph can resolve an instance of this entity if you provide its primary key." In order for this to be true, the subgraph needs to define a reference resolver for the entity.
Within the Orders attribute under resolvers, let's edit the reference resolver code (look for @TODO 2.1.4).
Apollo Server defines reference resolvers as a method called, __resolveReference(reference, context, info) with the following parameters:
- reference - the representation of the entity that's passed from another subgraph.
- context - same as in our resolvers method, used to pass a shared object throughout resolvers
- info - same as our resolver method for additional information around the query
The code will be similar to the Query.order, but instead of an argument from a query, we have the entity's reference keys within our reference argument. In this case, our Order type keys are defined in the schema @key(fields: "id"). Any set of attributes in this directive, would be passed to our reference resolver.
Now putting that together, a verbose version of the code:
Order: {__resolveReference: (reference, context, info) => {// This is the Order type with all of it's entity keys values defined to perform a lookupconst orderID = reference.id;// Use the same ordersAPI.getOrder methodconst ordersAPI = context.ordersAPI;return ordersAPI.getOrder(orderID);};}
And if we want to revise this to include short-hand and be more explicit:
Order: {__resolveReference: (order, { dataSources }) =>dataSources.ordersAPI.getOrder(order.id),}
Now we also need to create resolvers that map our raw data set to the expected fields within order: buyer and items. If you recall the raw data from our API:
{"id": 1,"customerId": 10,"variantIds": [1, 2, 3]}
We need to map the customerId to match a buyer object with its id, we do this by defining a resolver for the buyer within the Order resolver.
1const resolvers = {2Query: {3// Returns the order4order: (_, { id }, { dataSources }) => {5return dataSources.ordersAPI.getOrder(id);6},7},8Order: {9__resolveReference: (order, { dataSources }) => {10return dataSources.ordersAPI.getOrder(order.id);11},12buyer: (root) => {13// Take the customer id14const customerId = root.customerId;15// Return a object that has id assigned from the customer id16return {17id: customerId,18};19},20},21};
Next we want an items property within Order which will iterate through the product ids, and create an object for each product:
1const resolvers = {2Query: {3// Returns the order4order: (_, { id }, { dataSources }) => {5return dataSources.ordersAPI.getOrder(id);6},7},8Order: {9__resolveReference: (order, { dataSources }) => {10return dataSources.ordersAPI.getOrder(order.id);11},12buyer: (root) => {13// Take the customer id14const customerId = root.customerId;15// Return a object that has id assigned from the customer id16return {17id: customerId,18};19},20items: (root) => {21const variantIds = root.variantIds;22const items = [];23// iterate through product ids and assign the id24for (let index = 0; index < variantIds.length; index++) {25const item = {26id: variantIds[index],27};28items.push(item);29}30return items;31},32},33};
Let's see a reduced version, if you are faimilar with short-hand syntax. If we put it all together, it should look something like this:
const resolvers = {Query: {order: (_, { id }, { dataSources }) => dataSources.ordersAPI.getOrder(id),},Order: {__resolveReference: (order, { dataSources }) =>dataSources.ordersAPI.getOrder(order.id),buyer: (root) => ({ id: root.customerId }),items: (root) => root.variantIds.map((variantId) => ({ id: variantId })),},};module.exports = resolvers;
Writing our resolver
Open the resolver index file: rest-orders/src/resolvers/index.js. You'll see a exported object with two properties: Query and Order

Starting with our Query type, let's now create the resolver to pull the order from our RESTful API, and provide that order to our GraphQL server for processing.
Let's define the parameters for order: order(root, args, context, info).
Now, recall that we passed out datasource in the context parameter of our GraphQL server. We can reference that datasource with the context parameter, and use the getOrder method to fetch our order and get the order ID from our query argument.
Using common javascript conventions (underscoring omitted arguments, destructuring parameters, etc), the order query will look like this:
1Query: {2// underscore to omit root, destructure argument and context3order: (_, { id }, { dataSources }) => dataSources.ordersAPI.getOrder(id)4},
It's common that the bulk of resolvers may serve as a way to perform a mapping across fields to the data attributes, while others will work to resolve the data of the type.
Next, because our Orders subgraph is aware of how to resolve Order entities, we need to define a reference resolver.
Note: The @key directive effectively tells the Router, "This subgraph can resolve an instance of this entity if you provide its primary key." In order for this to be true, the subgraph needs to define a reference resolver for the entity.
Within the Orders attribute under resolvers, let's edit the reference resolver code (look for @TODO 2.1.4).
Apollo Server defines reference resolvers as a method called, __resolveReference(reference, context, info) with the following parameters:
- reference - the representation of the entity that's passed from another subgraph.
- context - same as in our resolvers method, used to pass a shared object throughout resolvers
- info - same as our resolver method for additional information around the query
The code will be similar to the Query.order, but instead of an argument from a query, we have the entity's reference keys within our reference argument. In this case, our Order type keys are defined in the schema @key(fields: "id"). Any set of attributes in this directive, would be passed to our reference resolver.
Now putting that together, a short-hand version looks like this:
1Order: {2__resolveReference: (order, { dataSources }) =>3dataSources.ordersAPI.getOrder(order.id),4}
Now we also need to create resolvers that map our raw data set to the expected fields within order: buyer and items. If you recall the raw data from our API:
{"id": 1,"customerId": 10,"variantIds": [1, 2, 3]}
We need to map the customerId to match a buyer object with its id, we do this by defining a resolver for the buyer within the Order resolver.
We also want an items property within Order which will iterate through the product ids, and create an object for each product. If we put it all together, it should look something like this:
1const resolvers = {2Query: {3order: (_, { id }, { dataSources }) => dataSources.ordersAPI.getOrder(id),4},5Order: {6__resolveReference: (order, { dataSources }) =>7dataSources.ordersAPI.getOrder(order.id),8buyer: (root) => ({ id: root.customerId }),9items: (root) => root.variantIds.map((variantId) => ({ id: variantId })),10},11};1213module.exports = resolvers;
Now that we have finished building the Orders subgraph, let's run it locally and verify that it works successfully. In the rest-orders/ directory run the following commands to start the subgraph:
npm installnpm start
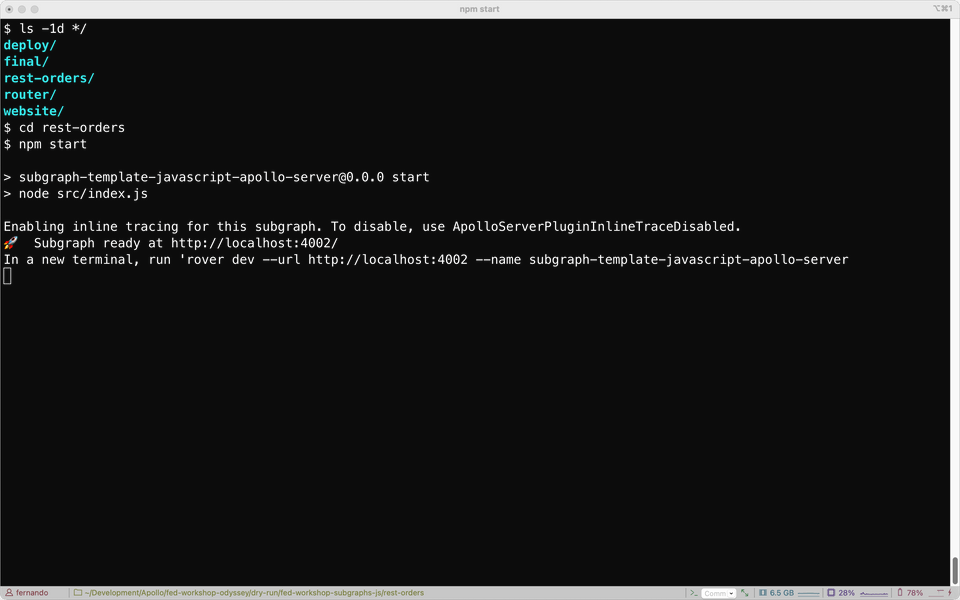
Once your terminal shows "Subgraph ready at http://localhost:4002/" we have successfully started our subgraph server.
Let's validate that the resolver and datasource code is valid. Open http://localhost:4002/ on your browser and copy and execute the query below with orderId set to 1.
Note: don't forget to enter your variable for orderId in the Variables panel. It should read { "orderId": 1 }
The subgraph should return a response with the order ID, if it returns null or an error, we have an issue with our resolver or datasource code that we need to fix before deploying.
query Order($orderId: ID!) {order(id: $orderId) {id}}
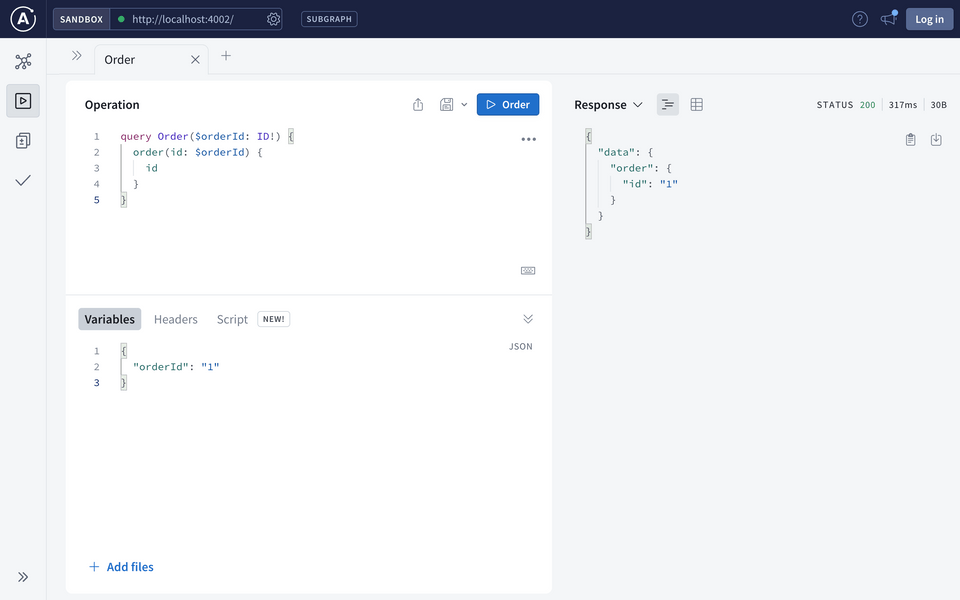
If it returns the data we expect, exit the process and move on to the next step.
What about User and ProductVariant?
You may have noticed that the User and ProductVariant types are missing. As you probably discovered, that is correct!
It's important to remember that the Orders subgraph is not responsible for knowing how to call the underlying services for Users or ProductVariants, all it has available in its services is the ID of the User / ProductVariant in question.
That wraps up our resolvers for the Orders subgraph, if you are running into issues with your code, you can compare it against the final/rest-orders/ directory.
✏️ Deploy the Orders subgraph
To prepare for deployment of the orders subgraph and the Router, some environment variables need to be set. The following variables need to be pulled from GraphOS management plane.
IMPORTANT: The personal API key will not work here. You need to get a new graph service key!
APOLLO_KEYAPOLLO_GRAPH_REF
Let's get these values and note them down before continuing. On the Readme page, we can easily copy the graph ref by clicking on the Graph Name in the title, as shown below:

To create an Apollo Key, go to Settings Tab > This Graph Tab > API Keys on the sidebar:
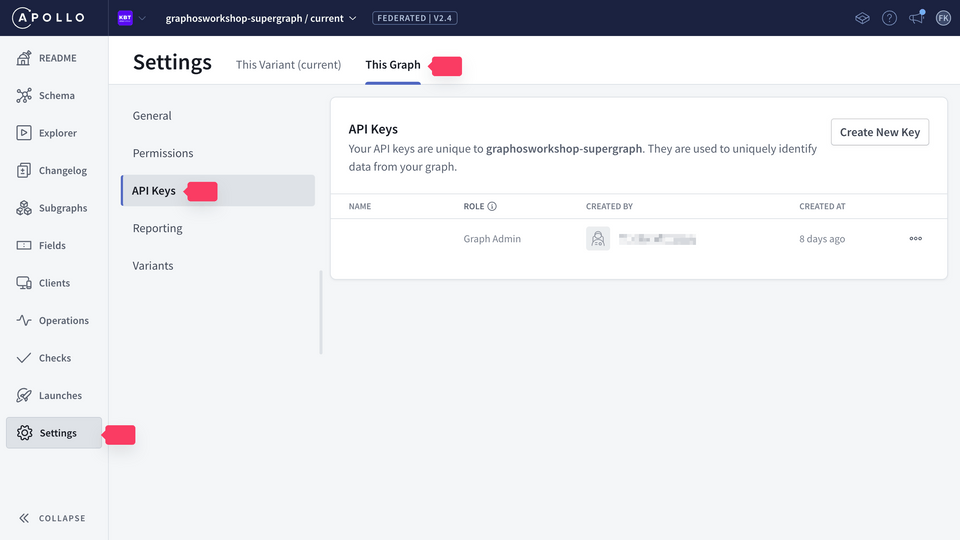
From here, create a new API key and save it for reference during our deployment.
Now that we have the environment variables, we need to set them in our environment:
- In the main folder, rename
example.envto.env - Change the values for
APOLLO_KEYandAPOLLO_GRAPH_REFto the values you captured above.
APOLLO_KEY=service:key_hereAPOLLO_GRAPH_REF=ref@variant
IMPORTANT NOTE: The APOLLO_KEY should be in the form of service:XXX:XXXX and NOT user:XXX:XXX
With our environment variables properly set, let's deploy the Orders subgraph.
We will use a shared Google Cloud environment to deploy our applications for this workshop. To prepare for deployment, we first have to authenticate using gcloud, the GCP command line tool.
At this point in the workshop, you should have received your GCP project id, service account email, and key. If not, your Apollo host should be able to provide it.
With that information, it's time to authenticate our service account.
gcloud auth activate-service-account <service account email> --key-file=<path to json key file> --project=<project_id>
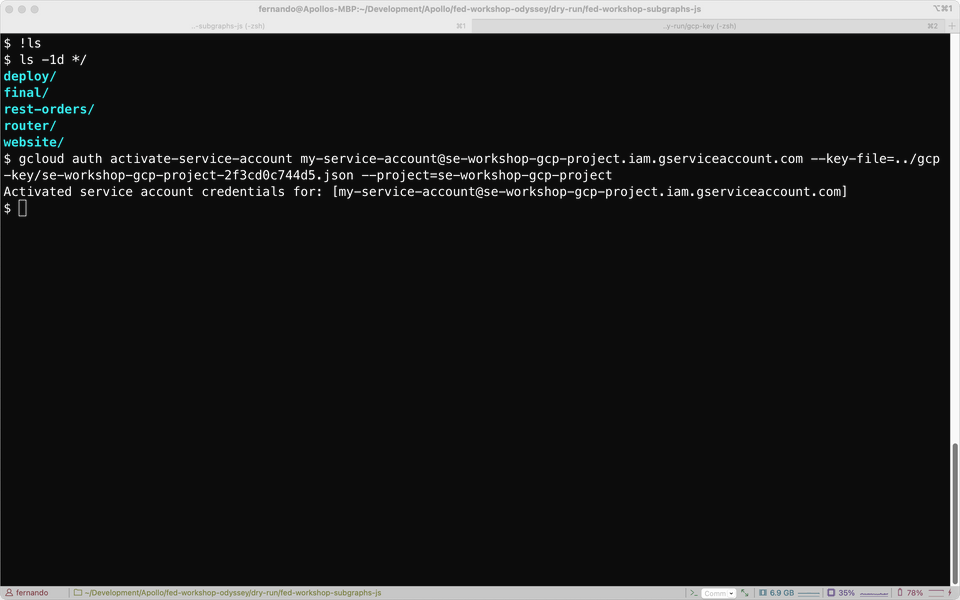
With that done, the build files need to be edited.
In your terminal, go to deploy/. From here, we need to modify orders.yaml to reflect the proper project name and unique service name. We need to find and replace two values in the orders.yaml file, you can refer to the table below:
| Default Value | New Value |
|---|---|
| federation-workshop | <your-workshop-name> (This will be provided by Apollo) |
| orders-api | <your-name-orders> |
There are many ways to find and replace text in this file, one command-line option is sed. Here are the commands to modify the file using sed in unix.
sed -i '' 's/federation-workshop/<your-workshop-name>/g' orders.yamlsed -i '' 's/orders-api/<your-name>-orders/g' orders.yaml
With those changes saved, we need to deploy the Orders subgraph. To run the deploy, go back up the root directory, ../. From here, we want to kick off the build by running the following command:
make deploy-orders
gcloud builds submit --config ./deploy/orders.yaml
✏️ Publish the Orders API schema
Now that the subgraph is deployed, we need to publish this subgraph to the GraphOS schema registry so it gets added to the supergraph. In order to do the publish, we will need the URL. To get the URL for the service we have just deployed, run the following command:
gcloud run services describe <your-name>-orders --region us-east1 --format 'value(status.url)'
Now that we have the URL, we can run the following command to publish the Orders subgraph to GraphOS. Go to rest-orders/ again and run the following command:
rover subgraph publish <GRAPH_REF> \--schema ./schema.graphql \--name orders \--routing-url <ORDERS_SUBGRAPH_DOMAIN_URL>
Replace <GRAPH_REF> with your Apollo graph ref, which should be in the form of <your-graph-name>@current and replace the <ORDERS_SUBGRAPH_DOMAIN_URL> with the one you pulled from the gcloud run services describe command above.
You can head to Studio and check in the Subgraphs section to see the newly published Orders subgraph.
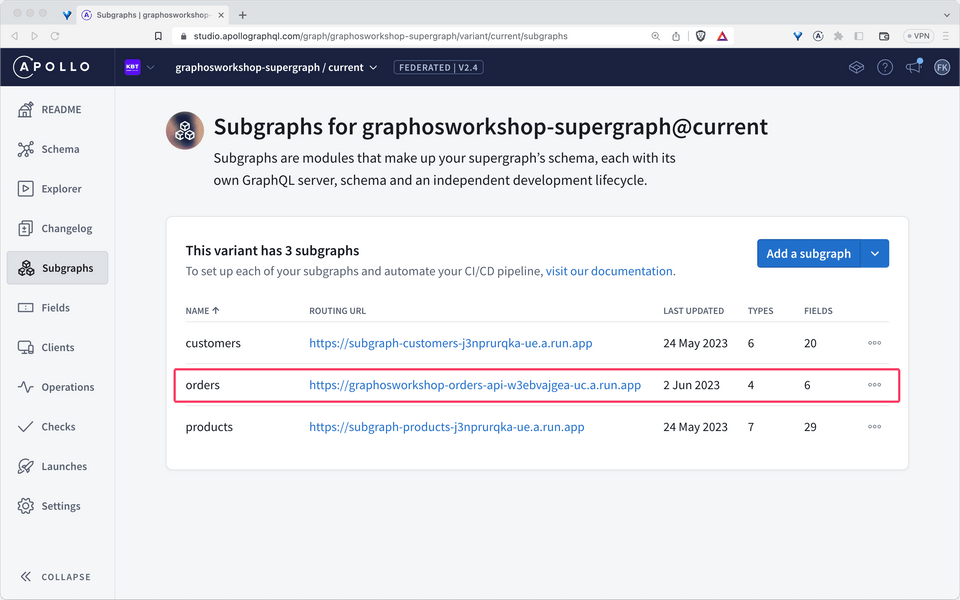
However, we can't execute queries yet. If you try, Studio will prompt for a URL to query. This is where Router comes in: it will be the entry point that receives a request, plans its execution, collects and returns the results. Therefore, our next step is to deploy it in our Google Cloud environment.
✏️ Deploy the Router
A supergraph architecture includes the Router, which sits between clients and the subgraphs. The Router is responsible for accepting incoming operations from clients and splitting them into smaller operations that can each be resolved by a single subgraph. Take a look at Intro to Federation for more information.
To begin, we need to edit the cloudbuild.yaml file to reflect the proper project id. Go to router/. From here, we need to modify cloudbuild.yaml to reflect the proper project name and unique service name. We need to find and replace two values in the cloudbuild.yaml file. We will replace two values:
| Default Value | New Value |
|---|---|
| federation-workshop | <your-workshop-name> (This will be provided by Apollo) |
| router-api | <your-name-router> |
There are many ways to find and replace text in this file, one command-line option is sed. Here are the commands to modify the file using sed in unix:
sed -i '' 's/federation-workshop/<your-workshop-name>/g' cloudbuild.yamlsed -i '' 's/router-api/<your-name>-router/g' cloudbuild.yaml
With the proper variables in place, it's time to deploy the Router. Go back up to the root folder (../) and run:
make deploy-router
gcloud builds submit --substitutions=_APOLLO_KEY=service:key_here,_APOLLO_GRAPH_REF=ref@variant --config ./router/cloudbuild.yaml
Once that command is finished, we once again need to get the URL for this endpoint we have just deployed. To do that run the following command:
gcloud run services describe <your-name>-router --region us-east1 --format 'value(status.url)'
Now that we have the URL, We need to add it into GraphOS Studio so Explorer can query this endpoint.
In GraphOS Studio at the Readme page, your graph should say,
This graph doesn't have an endpoint yet - add one in Connection Settings
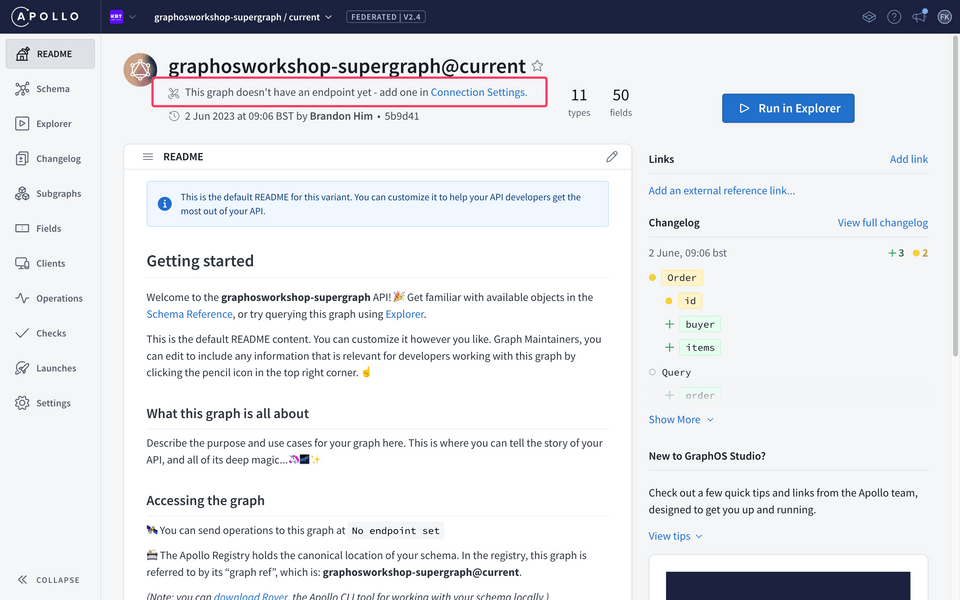
Click on "Connection Settings". In here, paste the domain that you received from GCP.
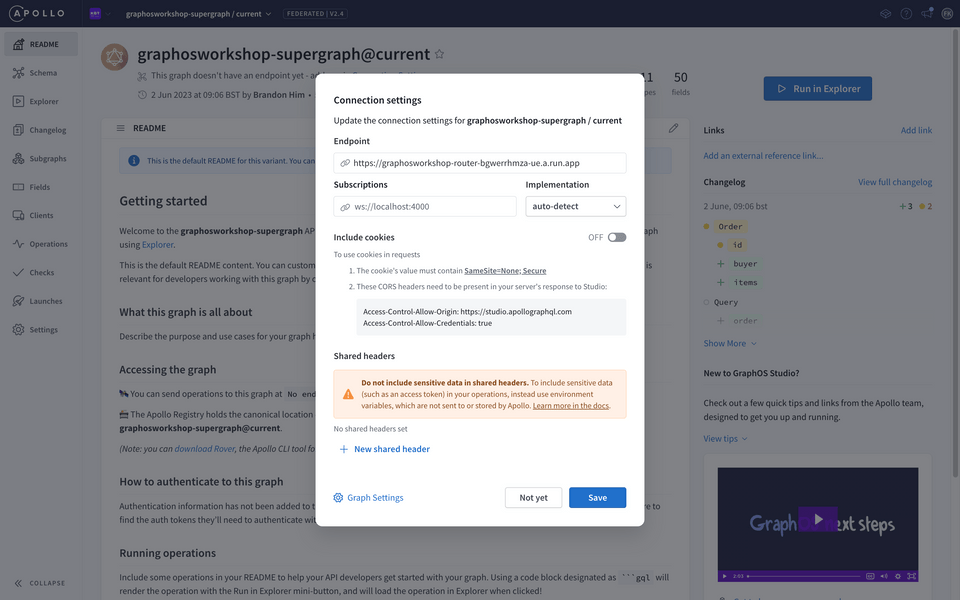
Then click Save. Once you have saved your URL, you are ready to test out this supergraph in GraphOS Studio Explorer. Go to the Explorer tab and let's build a query.
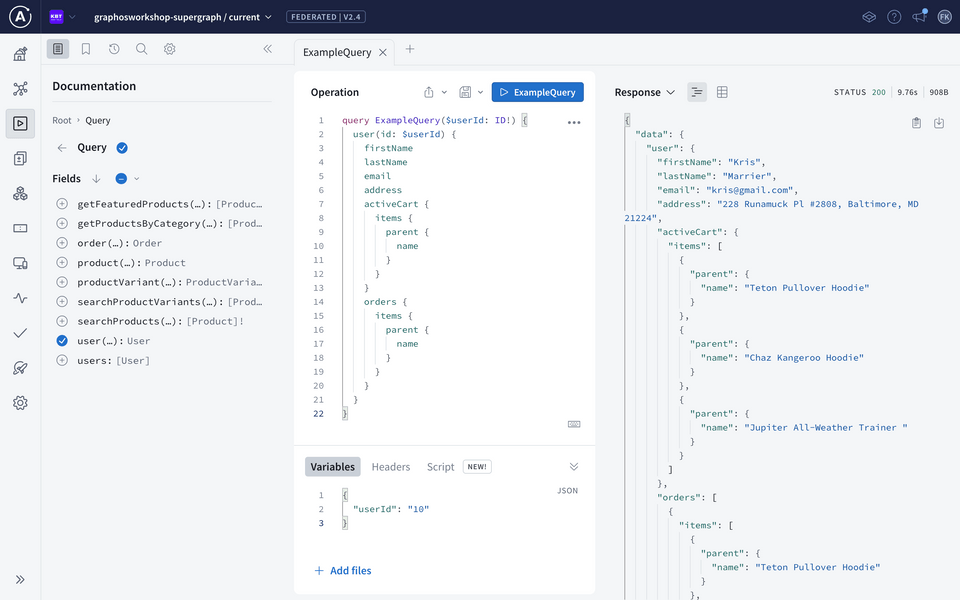
In Explorer, let's run the following query:
query ExampleQuery($userId: ID!) {user(id: $userId) {firstNamelastNameaddressactiveCart {items {parent {name}}}orders {items {parent {name}}}}}
And in the variables tab, set the userId to 10.
{"userId": "10"}
This gives us a query that will hit all three subgraphs as it includes customer, order, and product information. Run this query to see the results, that we successfully pull data from all three subgraphs! To see this visually, we can select the drop down menu in the response pane, and select Query Plan Preview:
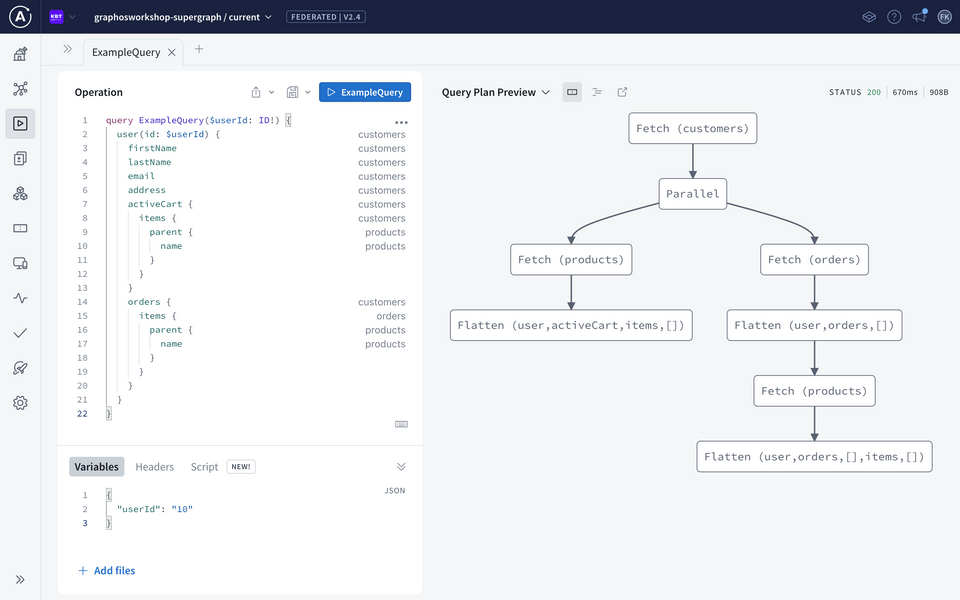
🎉 Congratulations! Your supergraph is working! 🎉

In this section we will cover how to build our Orders subgraph which is fetching against a REST API.
Up next
Now that we have a working supergraph, it's time to work on the front-end! In the next section, we'll see how to:
- set up the Apollo Client in our React app
- use Hooks to fetch data from our supergraph to get a list of Products and view the details of a Product
- how to optimise queries using deferred responses