Overview
It's time to jump into the datasource we'll be using throughout this course.
In this lesson, we will:
- Explore the Spotify REST API
- Create a class that can manage our requests to different REST endpoints
Exploring real data
The data that our datafetchers (or resolvers) retrieve can come from all kinds of places: a database, a third-party API, webhooks, and so on. These are called data sources. The beauty of GraphQL is that you can mix any number of data sources to create an API that serves the needs of your client applications and graph consumers.
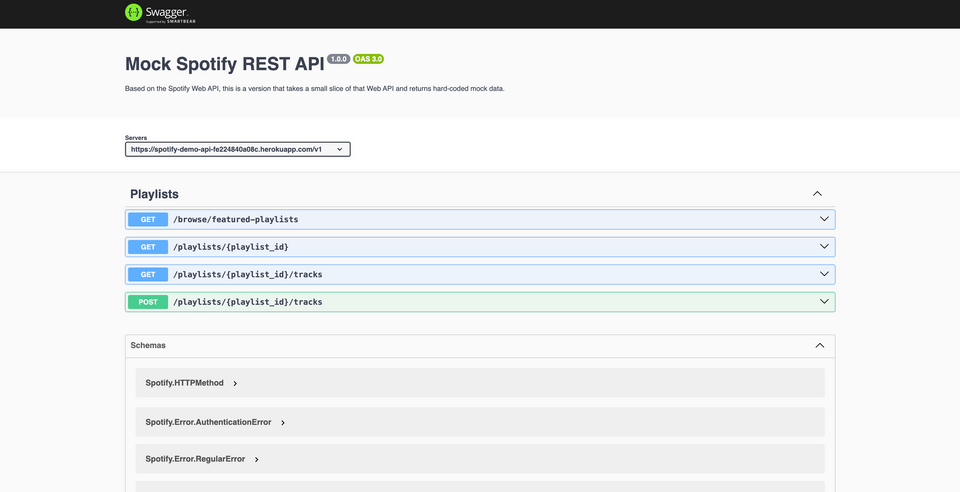
For the rest of the course, we're going to be using a lite, pared down version of the Spotify Web API. We can access the API documentation here.

How is our data structured?
The next question we need to answer is how our data is structured in our REST API. This impacts how we retrieve and transform that data to match the fields in our schema.
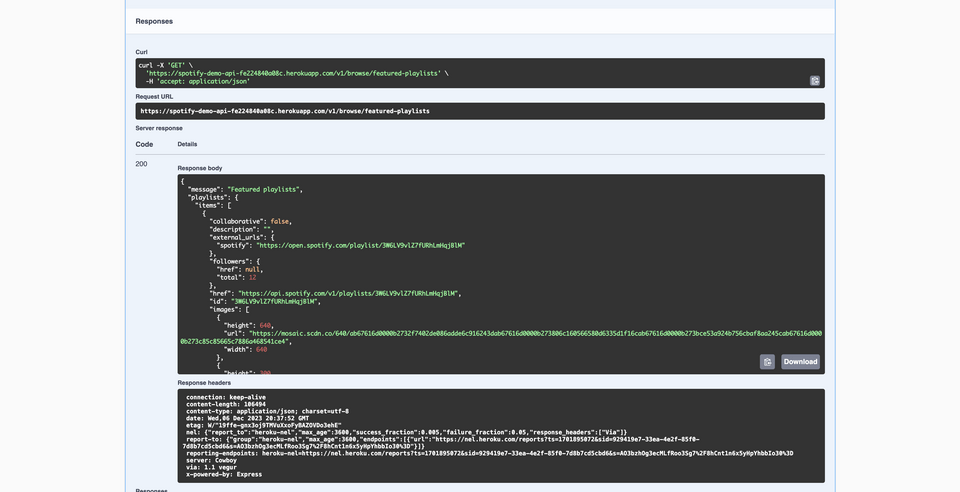
Our goal is to retrieve data for featured playlists, and there's an endpoint for exactly that: GET /browse/featured-playlists. We can execute it right here in the API documentation, and inspect the shape of the response we get back.
Under the GET /browse/featured-playlists dropdown, click Try it out, then Execute.

This response is lengthy! You'll notice a "playlists" key, which holds an array of playlist "items", which is a good start. Let's see in greater detail what matches, referring back to the Playlist type in our GraphQL schema:
Here are the fields we need from our schema.
type Playlist {id: ID!name: String!description: String}
Each object in the "items" array includes all of these properties, along with a bunch of properties that we don't need for now—images and followers, to name a few!
It's okay that the response contains fields that we don't need. Our datafetchers—along with our generated classes—will take care of picking out the data properties that match what a query asks for.
Setting up our datasource
We know where our data is, and we understand how it's structured. Awesome. Now, we need a way to request everything it has to offer!
We should start by creating a file that can hold all of the logic specific to this Spotify service—we'll call it SpotifyClient, and we'll store it in a new package called datasources that will sit next to datafetchers and models.
📂 java┣ 📂 com.example.soundtracks┃ ┣ 📂 datafetchers┃ ┣ 📂 datasources┃ ┃ ┃ ┣ 📄 SpotifyClient┃ ┣ 📂 models
First, we'll give our class the @Component annotation so the Spring framework understands how to scan, identify, and instantiate our Spotify client.
package com.example.soundtracks.datasources;import org.springframework.stereotype.Component;@Componentpublic class SpotifyClient {}
Next, we'll give our class some properties, such as a String to hold the API URL, and a pre-configured instance of RestClient builder so we can make our requests as seamless as possible.
package com.example.soundtracks.datasources;import org.springframework.stereotype.Component;import org.springframework.web.client.RestClient;@Componentpublic class SpotifyClient {private static final String SPOTIFY_API_URL = "https://spotify-demo-api-fe224840a08c.herokuapp.com/v1";private final RestClient client = RestClient.builder().baseUrl(SPOTIFY_API_URL).build();}
Note: The client variable lets us write and send different requests to the REST API directly without needing to repeat this code in every request.
Next, we can give our SpotifyClient a method specific to retrieving featured playlist data. Here's the initial syntax:
public void featuredPlaylistsRequest() {return client.get().uri("/browse/featured-playlists").retrieve()}
Note: A less verbose name for this method would be featuredPlaylists. We've opted for the longer name here to help distinguish this method from the one we defined in PlaylistDataFetcher! Though they'll both come into play, they're separate and distinct methods.
So far, our client builds a get request to the /browse/featured-playlists endpoint. Next, it chains on a retrieve method to actually bring the data back.
But we're not quite done here—let's remind ourselves of the shape of the data this endpoint returns.
{"message": "Featured playlists","playlists": {"items": [// ...playlist items]}}
The response is not just an array of playlist objects—we actually have to go a couple levels deep to get to this data! In order to turn this JSON object into a Java class we can actually work with, we can chain on the method .body(). This method takes in the name of a class that we want our JSON data to be converted to.
public void featuredPlaylistsRequest() {return client.get().uri("/browse/featured-playlists").retrieve().body();}
The MappedPlaylist class won't work in this case—the data we're getting back from this endpoint consists of many playlist objects, and MappedPlaylist is intended to represent a singular object of playlist data.
To better manage this list of playlists, we need a new a class—we can call it PlaylistCollection.
Referencing PlaylistCollection.class
In a moment, we'll actually create this class in our project—but first, let's set up our SpotifyClient to use it.
We'll complete the body method with PlaylistCollection.class. We'll notice that we also need to update our method's return type to PlaylistCollection.
public PlaylistCollection featuredPlaylistsRequest() {return client.get().uri("/browse/featured-playlists").retrieve().body(PlaylistCollection.class);}
And let's make sure that we add an import statement at the top of the file.
import com.example.soundtracks.models.PlaylistCollection;
Now we'll jump to the models directory, and actually create the PlaylistCollection class we've referenced!
Creating the PlaylistCollection class
In our main com.example.soundtracks.models package, add a new class file called PlaylistCollection.
package com.example.soundtracks.models;public class PlaylistCollection {// TODO}
Adding a playlists setter method
Next, let's add a new method called setPlaylists.
public class PlaylistCollection {public void setPlaylists() {// TODO}}
When working with JSON we rely on the Jackson serialization library to automatically map responses to corresponding Java types. Since our responses do not exactly match our GraphQL data model, we can also use the generic JsonNode representation to manually map our data.
import com.fasterxml.jackson.databind.JsonNode;
When we convert our JSON response into an instance of PlaylistCollection, setPlaylists acts as the setter that will receive the JSON response's "playlists" key into. We'll update the method to receive this argument, and provide its JsonNode type.
public void setPlaylists(JsonNode playlists) {}
We know from inspecting the shape of the response from this endpoint that the next key inside of playlists will be "items". We can call the JsonNode get method to pluck off this value.
public void setPlaylists(JsonNode playlists) {JsonNode playlistItems = playlists.get("items");}
Next, we want to take each object inside of playlistItems and map it to a MappedPlaylist instance. For that, we can bring in a few dependencies.
ObjectMapperandTypeReferencefrom Jackson- Java's
Listutility - Java's
IOExceptiontype, to account for any thrown errors
import com.fasterxml.jackson.databind.ObjectMapper;import com.fasterxml.jackson.core.type.TypeReference;import java.util.List;import java.io.IOException;
Inside of setPlaylists, we'll create a new instance of ObjectMapper.
public void setPlaylists(JsonNode playlists) {JsonNode playlistItems = playlists.get("items");ObjectMapper mapper = new ObjectMapper();}
The ObjectMapper contains methods that let us easily deserialize JSON into Java objects. Because playlistItems is a JSON node, we can use the new mapper we've created to map its properties to the class we specify (the deserialization process).
ObjectMapper mapper = new ObjectMapper();mapper.readValue(playlistItems.traverse(), new TypeReference<List<MappedPlaylist>>(){});
The mapper.readValue method receives playlistItems, traverses each item, casts each to a MappedPlaylist object, and returns them all contained in a List type.
Setting playlists
We need to actually set this list of playlists somewhere. So let's create a new playlists property on our class where we can store the output of our setter.
public class PlaylistCollection {List<MappedPlaylist> playlists;// setter method}
And finally, we'll update the line where we return a List of MappedPlaylist objects, and set it as the value of the playlists property. We'll find that our IDE also nudges us to simplify our TypeReference, as setting the result to this.playlists will take care of mapping our items to a List of MappedPlaylist instances.
this.playlists = mapper.readValue(playlistItems.traverse(), new TypeReference<>(){});
We might see a red squiggly error under readValue—that's ok! Our IDE is giving us a helpful reminder to account for when things don't go as planned. To fix the error, we can annotate our method with throws IOException.
public void setPlaylists(JsonNode playlists) throws IOException {JsonNode playlistItems = playlists.get("items");ObjectMapper mapper = new ObjectMapper();this.playlists = mapper.readValue(playlistItems.traverse(), new TypeReference<List<MappedPlaylist>>(){});}
Adding a playlists getter method
That's our setter method taken care of, but we need a corresponding getter function to actually retrieve our playlists. We'll define getPlaylists to returns the value of playlists.
public List<MappedPlaylist> getPlaylists() {return this.playlists;}
Practice
Key takeaways
- With GraphQL, we can access any number of data sources to create robust APIs that meet the needs of multiple clients.
- Bringing a new datasource into our GraphQL API starts with assessing the shape of its responses, and determining how best to map them to our schema fields.
Up next
We're ready to connect our datasource to our datafetcher method—and query for some actual data!
Share your questions and comments about this lesson
This course is currently in
You'll need a GitHub account to post below. Don't have one? Post in our Odyssey forum instead.