Overview
Let's jump into how GraphQL works, and the components that bring a GraphQL server to life!
In this lesson, we will:
- Explore the journey of how a client requests data and how a GraphQL server retrieves it
- Learn about the components that make up a GraphQL server
Journey of a GraphQL operation
Let's imagine our frontend needs to fetch data for a particular page.
To get that data, it sends a GraphQL operation to our GraphQL server. The app shapes the operation as a string that defines the selection set of fields it needs. Then, it sends that operation to the server in an HTTP POST or GET request.
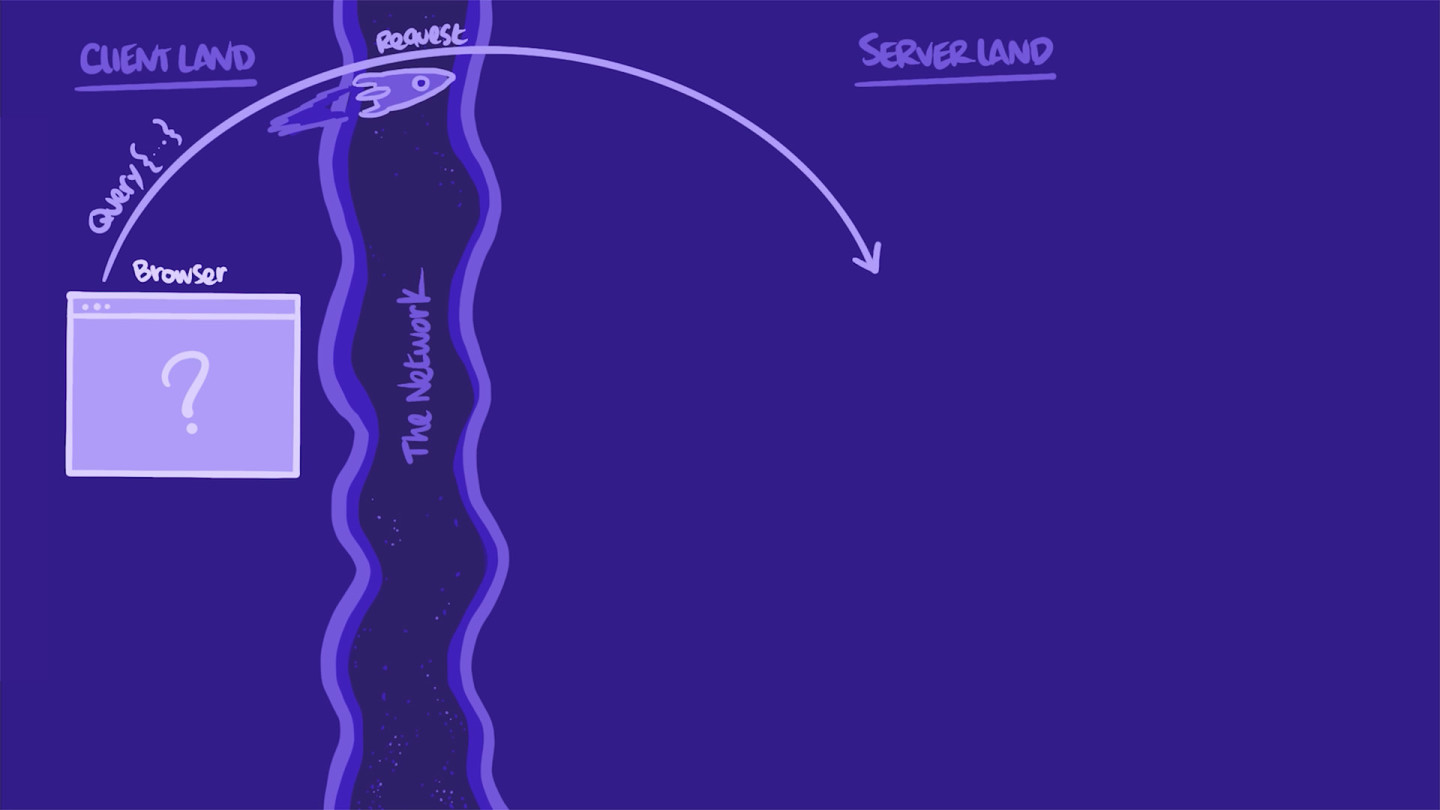
In server-land
When our server receives the HTTP request, it first extracts the string with the GraphQL operation. It parses and transforms it into something it can better manipulate: a tree-structured document called an AST (Abstract Syntax Tree). With this AST, the server validates the operation against the types and fields in our schema.
If anything is off (e.g. a requested field is not defined in the schema or the operation is malformed), the server throws an error and sends it right back to the app.
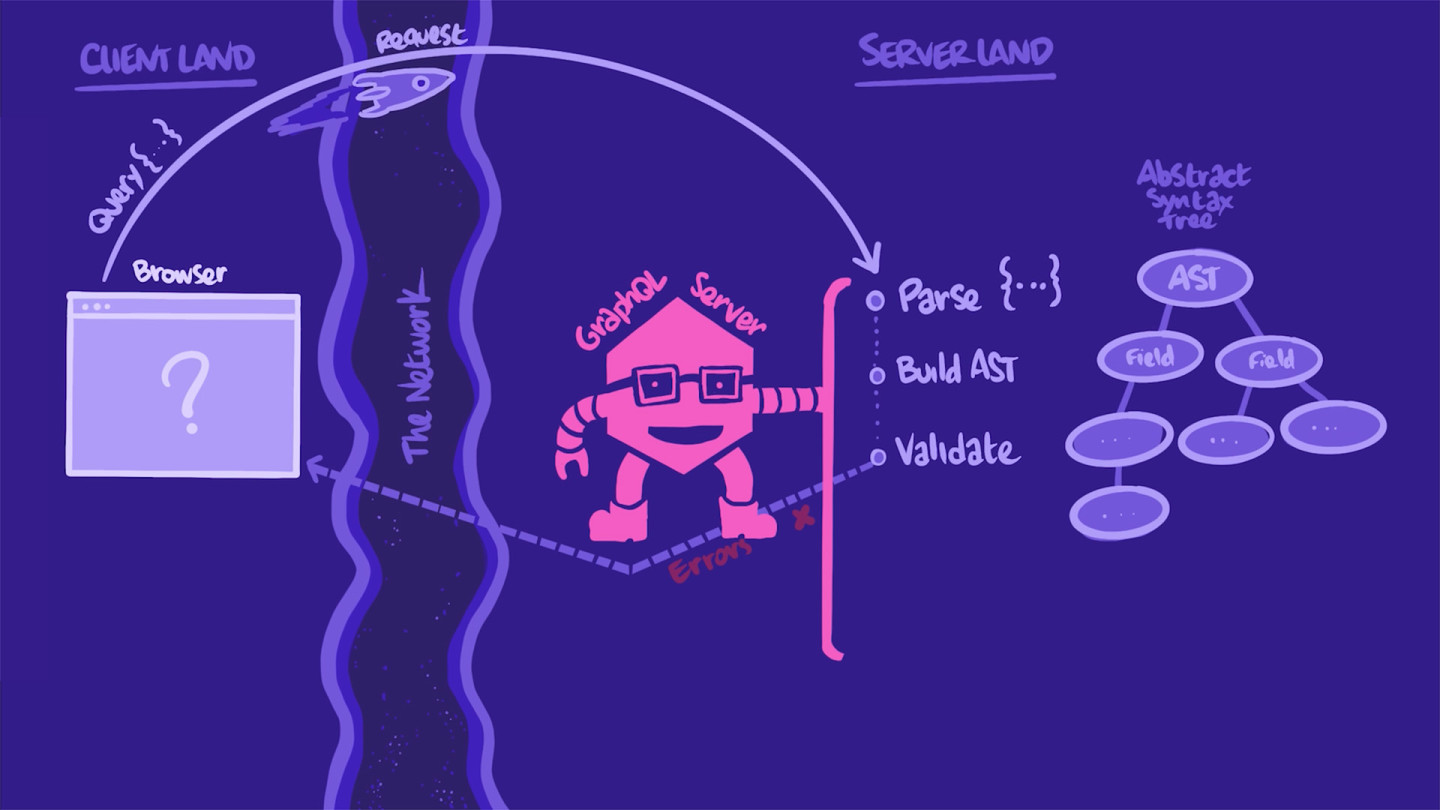
In this case, the operation looks good, and the server can "execute" it. Meaning, the server can continue its process and actually fetch the data. The server walks down the AST.
For each field in the operation, the server invokes that field's resolver function. This function's mission is to "resolve" its field by populating it with the correct data from the correct source, such as a database or a REST API. These data sources don't necessarily need to live within the GraphQL server; they can be hosted externally.
In this way, GraphQL is a powerful bridge to REST (and other data sources!) that ties all of your app's data together. The GraphQL API acts as the layer on top of them, providing a single interface through which multiple data sources can be queried simultaneously.
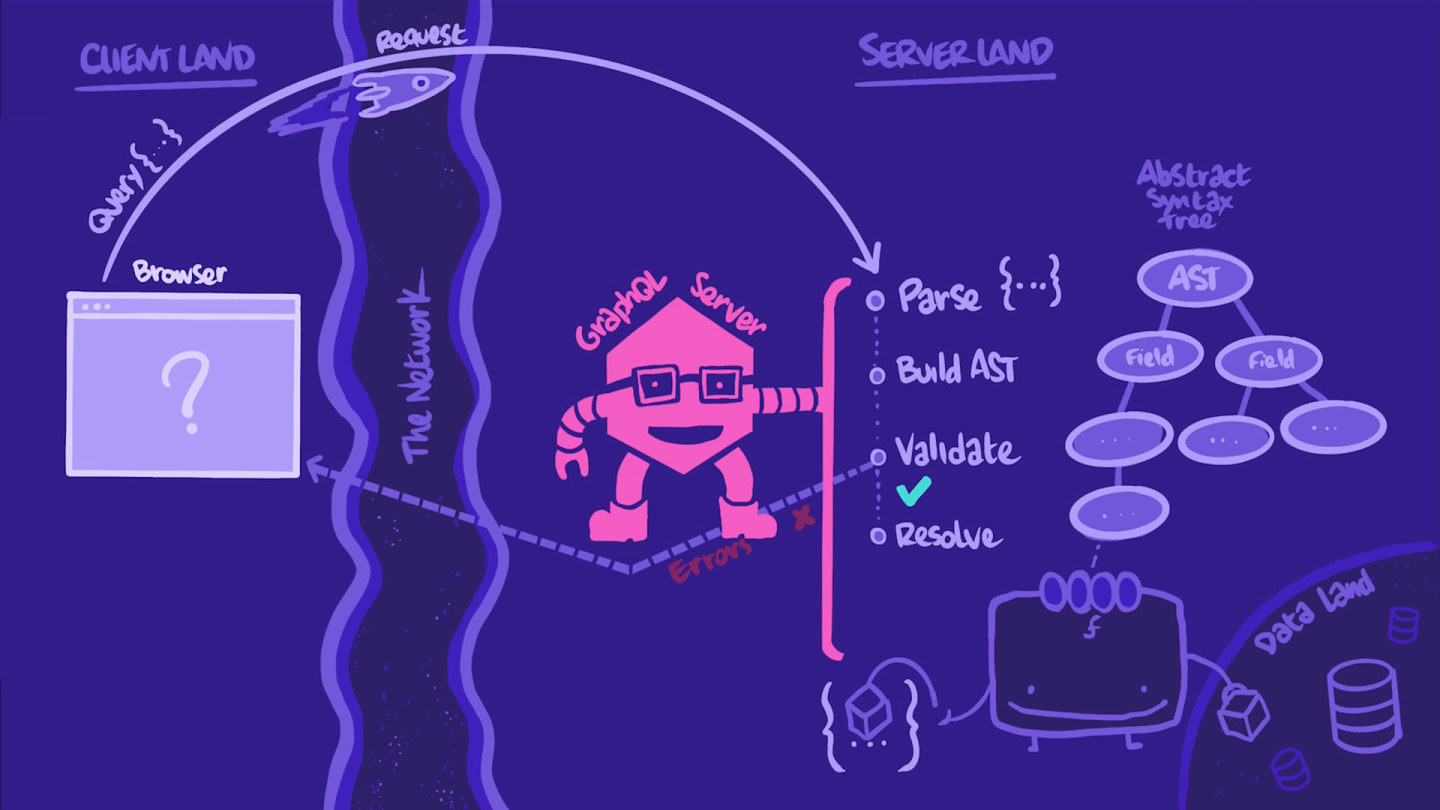
As all of the operation's fields are resolved, the data is assembled into a nicely ordered JSON object with the exact same shape as the query.
The server assigns the object to the HTTP response body's data key, and it's time for the return trip, back to our app.
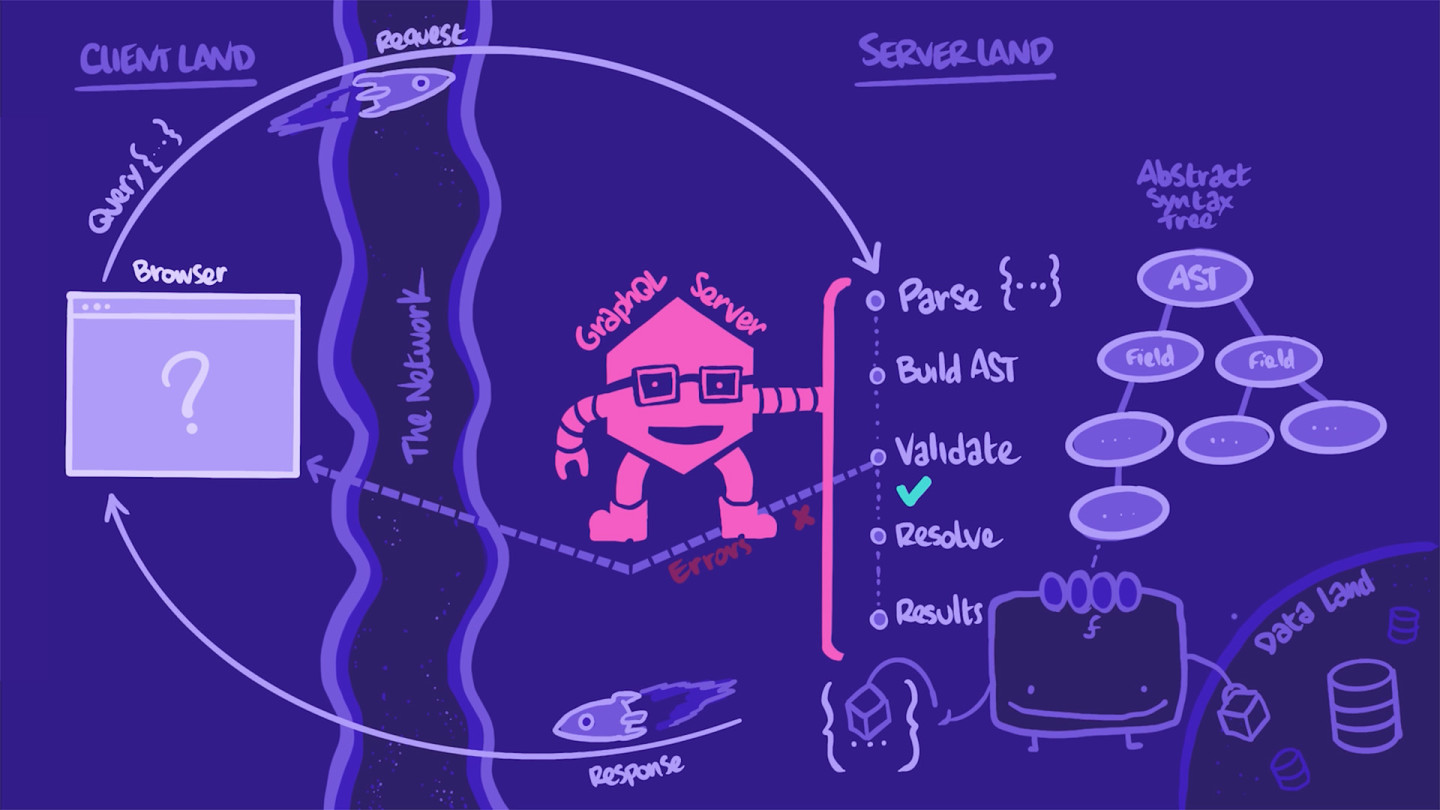
Back to client-land
Our client receives the response with exactly the data it needs, passes that data to the right components to render them, and voilà, our data is brought to life in a UI.
Now that we have a birds-eye view of the full journey from client, to server, and back, we'll take some time to zoom into the document that outlines all of our server's data capabilities: the GraphQL schema.
The GraphQL schema
The GraphQL server is where all the magic happens, but the schema tells us what's actually on the menu.
The GraphQL schema is a collection of types and fields that make up the comprehensive picture of everything we can do with the data in a GraphQL server. No actual data lives here; just the basic skeleton of the shapes that the live data will conform to. (Think of a blueprint!)
The schema has its own language called schema definition language, or SDL. We'll take a closer look at SDL syntax, and how to build the types and fields in our schema, in the next lesson.
Schema entry points
A GraphQL operation (the thing that the client sends to the GraphQL server) can either be a query, a mutation, or a subscription. A query reads data, a mutation changes data and a subscription listens for live, streaming data.
All three operations map to a corresponding type in the schema: Query, Mutation and Subscription.
The Query is like our front door to a GraphQL server. It defines a number of fields, each of which represents a path we can "follow" to get some data from our GraphQL server. Each field has its own name, and specifies the kind of data it returns. This makes it really easy to pick and choose different fields, and get all the data we want at once!
We can think of the fields within the Query type as the list of things we can ask for from our GraphQL API. Similarly, the Mutation type is the list of things we can do with our GraphQL API, as we'll see in a later lesson.
Schema-first design
To build our GraphQL server, we'll use a "schema-first" design. That means we'll implement the project based on exactly which data our downstream consumers (like client applications running on mobile and desktop) will need. Schema-first design typically involves three major steps:
- Defining the schema: We identify which data our feature requires, and then we structure our schema to provide that data as intuitively as possible.
- Backend implementation: We build out our GraphQL API using TypeScript and fetch the required data from whichever data sources contain it. We'll start with hardcoded mocked data to learn the concepts, then hook our server up to a live REST data source.
- Consuming data: Clients are able to consume data from our GraphQL API.
One of the benefits of schema-first design is that it reduces total development time by allowing frontend and backend teams to work in parallel. The frontend team can start working with mocked data as soon as the schema is defined, while the backend team develops the API based on that same schema. This isn't the only way to design a GraphQL API, but we believe it's an efficient one, so we'll use it throughout this course.
Resolving schema fields with resolvers
As we mentioned in the Journey of a GraphQL Query, for every type and field in the GraphQL schema, we can define a resolver function. A resolver retrieves the data for a specific field. These functions have access to various data sources: databases, REST APIs, even text files or JSON!
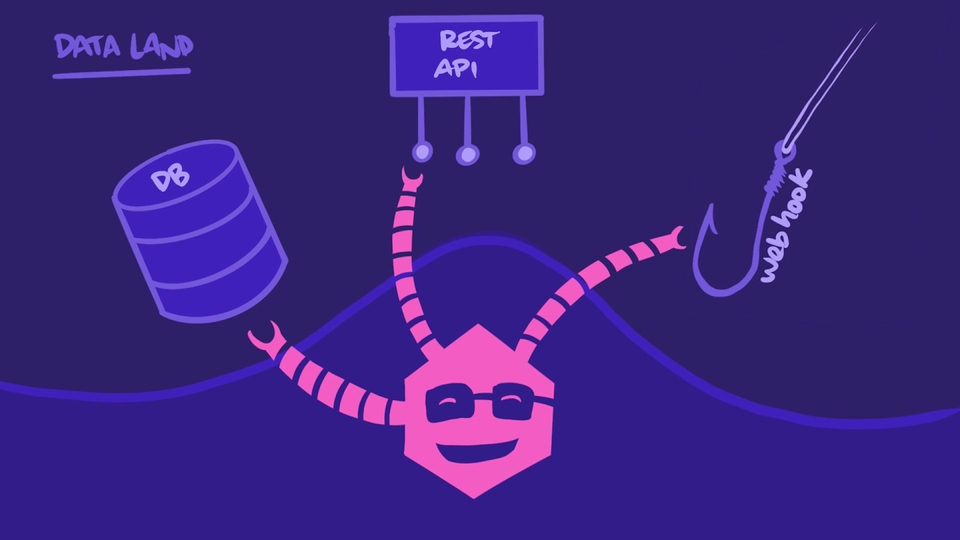
Resolvers let us define the precise logic needed to retrieve data for a field, but we don't necessarily need to define a resolver by hand for EVERY field in our schema. We'll see how and when to define resolver functions in an upcoming lesson.
💾 Data!
Throughout the course, we'll build the GraphQL API that serves (and updates) data for intergalactic listings and their features.
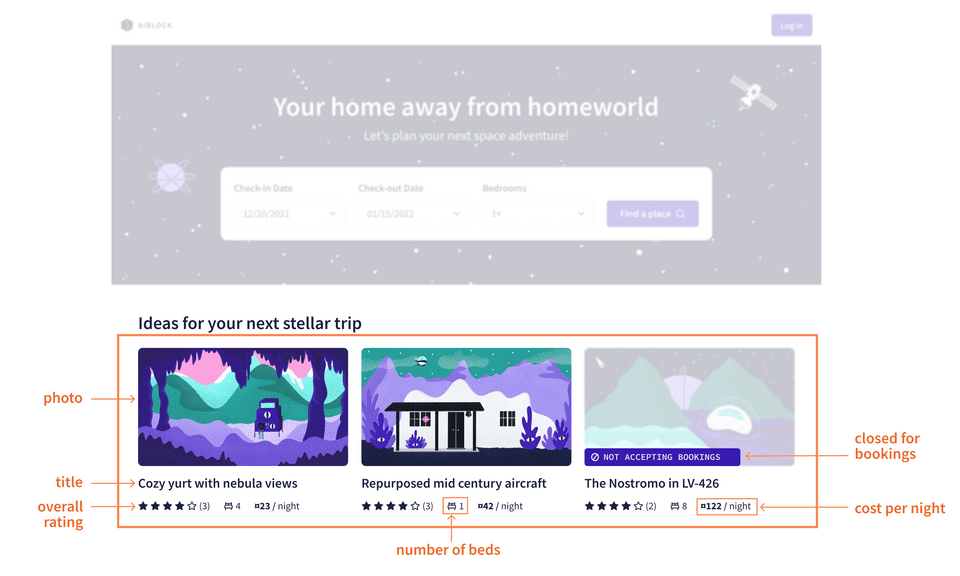
This mockup shows a row of featured listings. For each listing, we can start to see which pieces of data we need: photo, location type, overall rating, number of beds, title, cost per night, and whether it's closed for bookings.
To create a view for a specific listing, we'll need a couple additional fields for each listing: its description, and the amenities it has to offer.
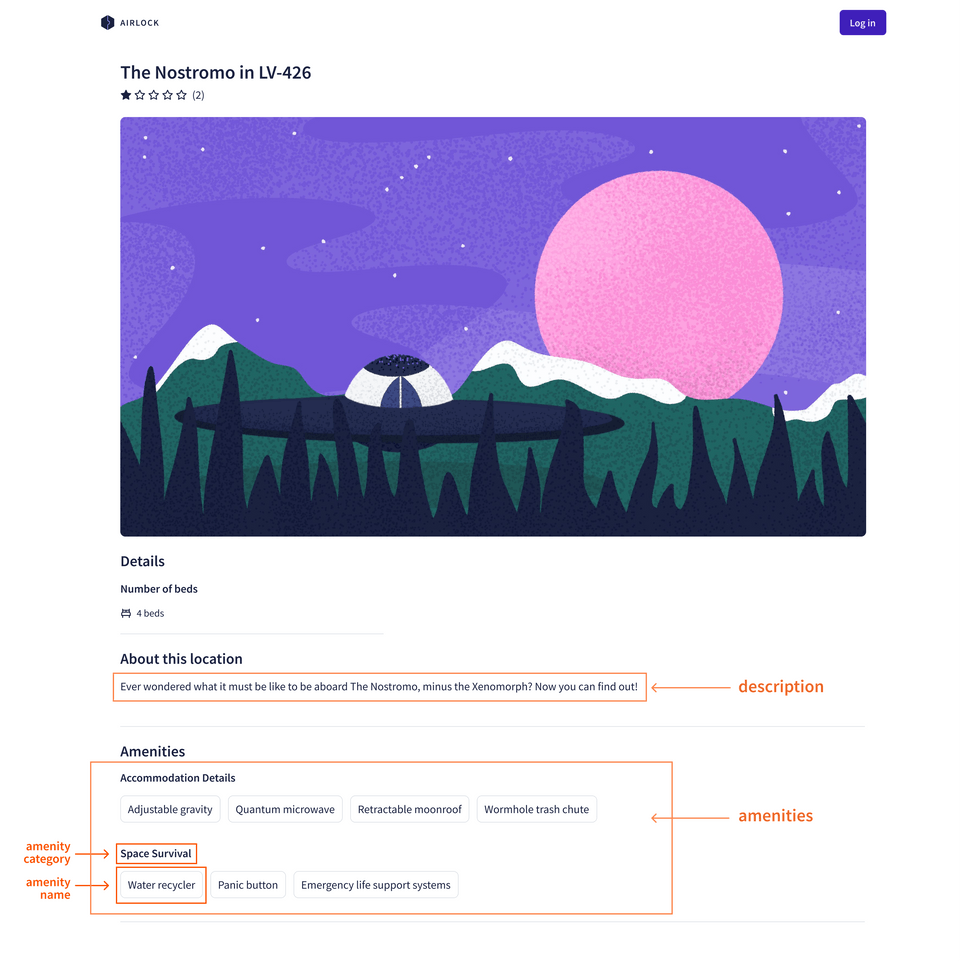
To represent these different pieces in GraphQL, we can think about our data as a collection of objects (such as listings and amenities) and relationships between objects (such as each listing having at least one amenity).
Now, if we think of each object as a node and each relationship as an edge between two nodes, we can envision our entire data model as a collection of nodes and edges. This is called our application's graph.
To define the objects in our graph, we'll use a special syntax called Schema Definition Language. Let's talk more about SDL in the next lesson.
Practice
Drag items from this box to the blanks above
connection
query
changes
subscription
screenshots
question
Key takeaways
- There are three types of GraphQL operations: queries, mutations and subscriptions. A query reads data, a mutation changes data and a subscription listens for live, streaming data.
- The GraphQL schema is a collection of types and fields that make up the comprehensive picture of everything we can do with the data in a GraphQL server. It is written in schema definition language (SDL).
- A resolver function retrieves the data for a specific field in our schema. These functions have access to various data sources: databases, REST APIs, even text files or JSON. These data sources don't need to live within the GraphQL server.
Up next
This course is all about building a GraphQL server, so let's get into it! Get ready, it's time to dive into SDL.
Share your questions and comments about this lesson
Your feedback helps us improve! If you're stuck or confused, let us know and we'll help you out. All comments are public and must follow the Apollo Code of Conduct. Note that comments that have been resolved or addressed may be removed.
You'll need a GitHub account to post below. Don't have one? Post in our Odyssey forum instead.