Overview
It's time to jump into the data source we'll be using throughout this course.
In this lesson, we will:
- Explore the listings REST API
- Create a class that can manage our requests to different REST endpoints
Exploring real data
The data that our resolvers retrieve can come from all kinds of places: a database, a third-party API, webhooks, and so on. These are called data sources. The beauty of GraphQL is that you can mix any number of data sources to create an API that serves the needs of your client applications and graph consumers.
For the rest of the course, we're going to be using a REST API that provides listings data. We'll access it at the following URL.
https://rt-airlock-services-listing.herokuapp.com/
Unfortunately, our data source is missing documentation and contains some fields that are no longer actively used. We'll use GraphQL to make an API that's a lot more accessible and intuitive for our downstream consumers.
The next question we need to answer is how our data is structured in our REST API. This impacts how we retrieve and transform that data to match the fields in our schema.
Our goal is to retrieve data for featured listings, and there's an endpoint for exactly that: GET /featured-listings. Let's access the /featured-listings response by opening a new browser tab and navigating to the following URL.
https://rt-airlock-services-listing.herokuapp.com/featured-listings
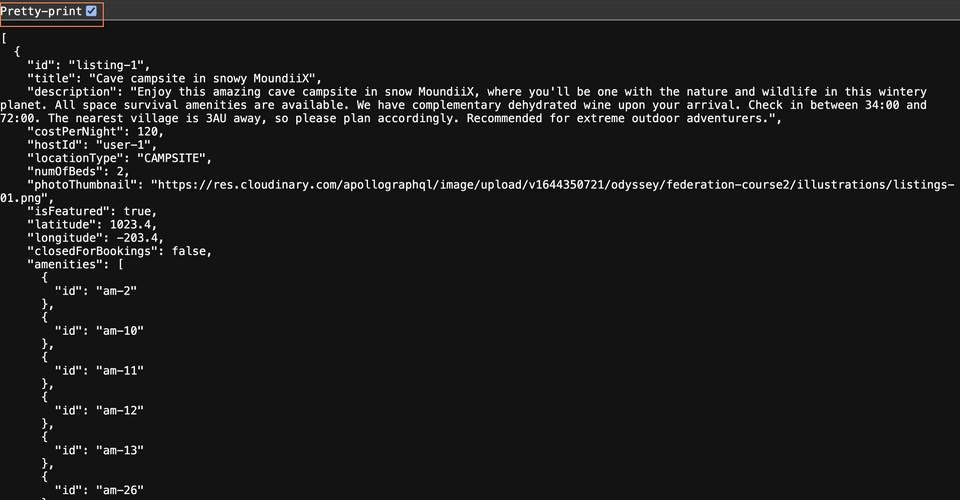
When the page loads, we can inspect the shape of the response we get back.
This endpoint returns an array containing three objects with a number of different properties.

Note: Seeing some messy JSON? Click the "Pretty print" checkbox at the top of the screen!
Let's compare these properties with the fields for the Listing type we defined in our GraphQL schema:
type Listing {id: ID!title: String!numOfBeds: IntcostPerNight: FloatclosedForBookings: Boolean}
Each object in the response array includes all of these fields, along with a bunch of other properties that we don't need for now—hostId, latitude, and longitude, to name a few!
{"id": "listing-1","title": "Cave campsite in snowy MoundiiX","description": "Enjoy this amazing cave campsite in snow MoundiiX, where you'll be one with the nature and wildlife in this wintery planet. All space survival amenities are available. We have complementary dehydrated wine upon your arrival. Check in between 34:00 and 72:00. The nearest village is 3AU away, so please plan accordingly. Recommended for extreme outdoor adventurers.","costPerNight": 120,"hostId": "user-1","locationType": "CAMPSITE","numOfBeds": 2,"photoThumbnail": "https://res.cloudinary.com/apollographql/image/upload/v1644350721/odyssey/federation-course2/illustrations/listings-01.png","isFeatured": true,"latitude": 1023.4,"longitude": -203.4,"closedForBookings": false,"amenities": [{"id": "am-2"} /* additional objects */]},
It's okay that the response contains fields that we don't need. Our resolvers will take care of picking out the data properties that match what a query asks for.
Setting up our data source
We know where our data is, and we understand how it's structured. Awesome. Now, we need a way to request everything it has to offer!
Because it's a very common task to fetch data from REST when building a GraphQL API, Apollo Server provides a dedicated DataSource class for just that: the RESTDataSource.
Let's add this RESTDataSource class to our project.
In the terminal, in the root of our project, run:
npm install @apollo/datasource-rest
Now, we should start by creating a file that can hold all of the logic specific to this listings service—we'll call it listing-api.ts, and we'll store it in a new folder called datasources.
📂 src┣ 📂 datasources┃ ┗ 📄 listing-api.ts┣ 📄 graphql.d.ts┣ 📄 helpers.ts┣ 📄 index.ts┗ 📄 schema.graphql
First, we import the RESTDataSource class from the @apollo/datasource-rest package.
import { RESTDataSource } from "@apollo/datasource-rest";
We'll declare a class called ListingAPI that extends RESTDataSource. While we're here, let's export it before we forget!
export class ListingAPI extends RESTDataSource {// ...}
Next, let's assign our REST API's baseURL. This property is used as the prefix to all the calls.
export class ListingAPI extends RESTDataSource {baseURL = "https://rt-airlock-services-listing.herokuapp.com/";}
Note: Be sure that your ListingAPI class' baseURL value ends with a /. This will allow our helper class to make requests and append new paths to the baseURL without any errors.
Data source methods
We need to give our class a method that can reach out to the REST API endpoint that returns listing data. Let's call it getFeaturedListings.
getFeaturedListings() {// TODO}
The RESTDataSource class provides helper methods for HTTP requests. In our case, we want to perform a GET request to the featured-listings endpoint.
getFeaturedListings() {this.get("featured-listings");}
The this.get method is a generic function that lets us pass it a hand-crafted return type. From exploring our JSON response, we know that we get back an array, which contains several objects. We'll define the return type as an array of any types for now, but we'll improve on this later.
getFeaturedListings() {this.get<any[]>("featured-listings");}
Since our response from this endpoint is an array of objects, we can return it directly.
getFeaturedListings() {return this.get<any[]>("featured-listings");}
Fantastic! Our file is complete for now.
Practice
Key takeaways
- Bringing a new data source into our GraphQL API starts with assessing the shape of its responses, and determining how best to map them to our schema fields.
- We can extend the
RESTDataSourceclass to introduce a REST API as a data source to our GraphQL server.
Up next
Our data source is ready to use! But how do we actually use the ListingAPI class in our GraphQL server?
In the next lesson, we'll explore resolver functions, and see just how we can populate data for fields in our GraphQL schema.
Share your questions and comments about this lesson
Your feedback helps us improve! If you're stuck or confused, let us know and we'll help you out. All comments are public and must follow the Apollo Code of Conduct. Note that comments that have been resolved or addressed may be removed.
You'll need a GitHub account to post below. Don't have one? Post in our Odyssey forum instead.