Overview
Let's put together what we've learned about how to implement auth in a supergraph. In this lesson, we will:
- Configure the GraphOS Router to pass HTTP headers to subgraphs
- Set up the subgraph to receive the headers and authenticate the user
- Test out a query that needs authentication and authorization using GraphOS Studio

✅ Service check
Before moving on, let's make sure all of our processes are still running!
- One terminal should be running
npm start, to start the monolith subgraph server on port4001. - Another should be running
npm run launch, to start our services in themonolithdirectory on ports4010and4011.
✏️ Downloading the router
Open a new terminal window and navigate to the
routerdirectory.Download the GraphOS Router by running the following command in the terminal:
routercurl -sSL https://router.apollo.dev/download/nix/v1.46.0 | shNote: Visit the official documentation to explore alternate methods of downloading the Router.
Now when we check the contents of our
routerdirectory, we'll see that we have a new file also calledrouter!📦 router┣ 📄 router┣ 📄 router-config.yaml┗ 📄 supergraph-config.yamlThere's one last change we should make. We initially stored the environment variables for our graph in our
.envfile in themonolithdirectory so that we could easily refer back to them. We'll continue to reference the variables stored in.envas we work with the router, so let's move that file from themonolithdirectory into therouterdirectory.📦 router┣ 📄 .env┣ 📄 router┣ 📄 router-config.yaml┗ 📄 supergraph-config.yaml
The router's config file
Before we start up the router, let's investigate its config file. Inside of router-config.yaml, we'll find that there's already one configuration option specified:
include_subgraph_errors:all: true # Propagate errors from all subgraphs
By default, subgraph errors are omitted from router logs for security reasons. The setting we're referencing in the configuration file, include_subgraph_errors, is a setting that will allow the router to share the details of any errors that occur as it communicates with subgraphs. By setting the all key to true, we're telling the router that we want to know about errors that occur in all of our subgraphs.
This is great for development purposes, because it will help us troubleshoot anything that goes wrong along the way!

✏️ Adding Authorization headers
Note: There are other methods of implementing authentication in a supergraph, such as using authorization directives in the schema, using a coprocessor or using a JWT Authentication plugin. In this course, we'll be focusing on authentication in a subgraph using header propagation. You can combine the strategies to handle a number of authentication requirements and practice "defense-in-depth". For more information on these approaches, check out this Apollo technote.
Let's add another configuration option to our router's router-config.yaml file.
We want to tell the router to send the Authorization header to its subgraphs with every request.
headers:all:request:- propagate:named: "Authorization"
Let's break down what these new lines do.
The
headerskey is where we set all of our rules for HTTP headers.allindicates that the rules nested underneath will apply to all the subgraphs. We could specify which ones using thesubgraphskey, but we know that for Airlock we'll need to pass it to all of them.requestspecifies that the included headers should apply to requests the router receives.Finally, we want to pass the
Authorizationheader to all the subgraphs, so we'll use thepropagatekey, then indicate the name of the header withnamed: 'Authorization'.
Note: You can consult the Apollo documentation to learn more about the other ways of specifying which HTTP headers to propagate.
With our router all set up to pass these authentication headers to its subgraphs, let's make sure the subgraph is ready to receive these headers and pass them along to its own resolvers!
Setting up the subgraph for auth
The good news is that the monolith subgraph is already set up for auth!
Remember back when the monolith subgraph was a standalone GraphQL server? Well, it was already taking in the Authorization header, retrieving the user token and authenticating it using the accounts service!
Let's see this logic in the code.
Open up the monolith/index.js file, our monolith subgraph server. Scrolling down to where we started up the server, we can find the context property and review that logic:
context: async ({ req }) => {const token = req.headers.authorization || "";const userId = token.split(" ")[1]; // get the user name after 'Bearer 'let userInfo = {};if (userId) {const { data } = await axios.get(`http://localhost:4011/login/${userId}`).catch((error) => {throw AuthenticationError();});userInfo = { userId: data.id, userRole: data.role };}const { cache } = server;return {...userInfo,dataSources: {bookingsDb: new BookingsDataSource(),reviewsDb: new ReviewsDataSource(),listingsAPI: new ListingsAPI({cache}),accountsAPI: new AccountsAPI({cache}),paymentsAPI: new PaymentsAPI({cache}),},};},
With this logic already in place, we don't have to do any additional work in our index.js file!
Running the router with config
Let's get our router running.
In a new terminal, navigate to the
routerdirectory.To start the router, we'll type in our
APOLLO_KEYandAPOLLO_GRAPH_REF. (Remember, you can find these variables inside of your.envfile!) Then, start the router with./router, and finally add the--configflag with the path to therouter-config.yamlfile.MacOS / Linux / WSLAPOLLO_KEY=<APOLLO_KEY> APOLLO_GRAPH_REF=<APOLLO_GRAPH_REF> ./router --config router-config.yamlWindows powershell$env:APOLLO_KEY="<APOLLO_KEY>"$env:APOLLO_GRAPH_REF="<APOLLO_GRAPH_REF>"./router --config router-config.yamlWe should see output messages in the terminal, with our router running at
127.0.0.1:4000.
Remember port 4000 was where the original monolith GraphQL server was running? Now we've successfully replaced it with the router! Clients don't have to do anything extra to change their endpoints, they can keep querying as usual.
👩🏽🔬 Testing the Authorization headers
Let's give it a try! We can head back over to the Explorer in Studio to test out a query for the router.
We'll try out a query that requires an authenticated and authorized user: retrieving a host's listings. This query needs you to be logged in as a host.
Using Explorer, let's build a query to retrieve a host's listings. For each listing, we'll ask for the title, costPerNight, description, photoThumbnail, numOfBeds, and locationType.
query GetHostListings {hostListings {titlecostPerNightdescriptionphotoThumbnailnumOfBedslocationType}}
Let's run the query, and… uh oh! We get back an AuthenticationError with no logged-in user 😱
After a brief moment of panic, let's think about what we're missing.
We've just set up the server-side handling of authorization headers, but we haven't actually sent those headers with our request! So our server is trying to authenticate the user sending the request, but it can't find them and it returns the appropriate error.
Let's go ahead and add those headers. In the bottom panel of the Explorer, open the Headers tab.
Click New header and set the header key as Authorization. Set the value as Bearer user-1. We know that user-1 is a host!
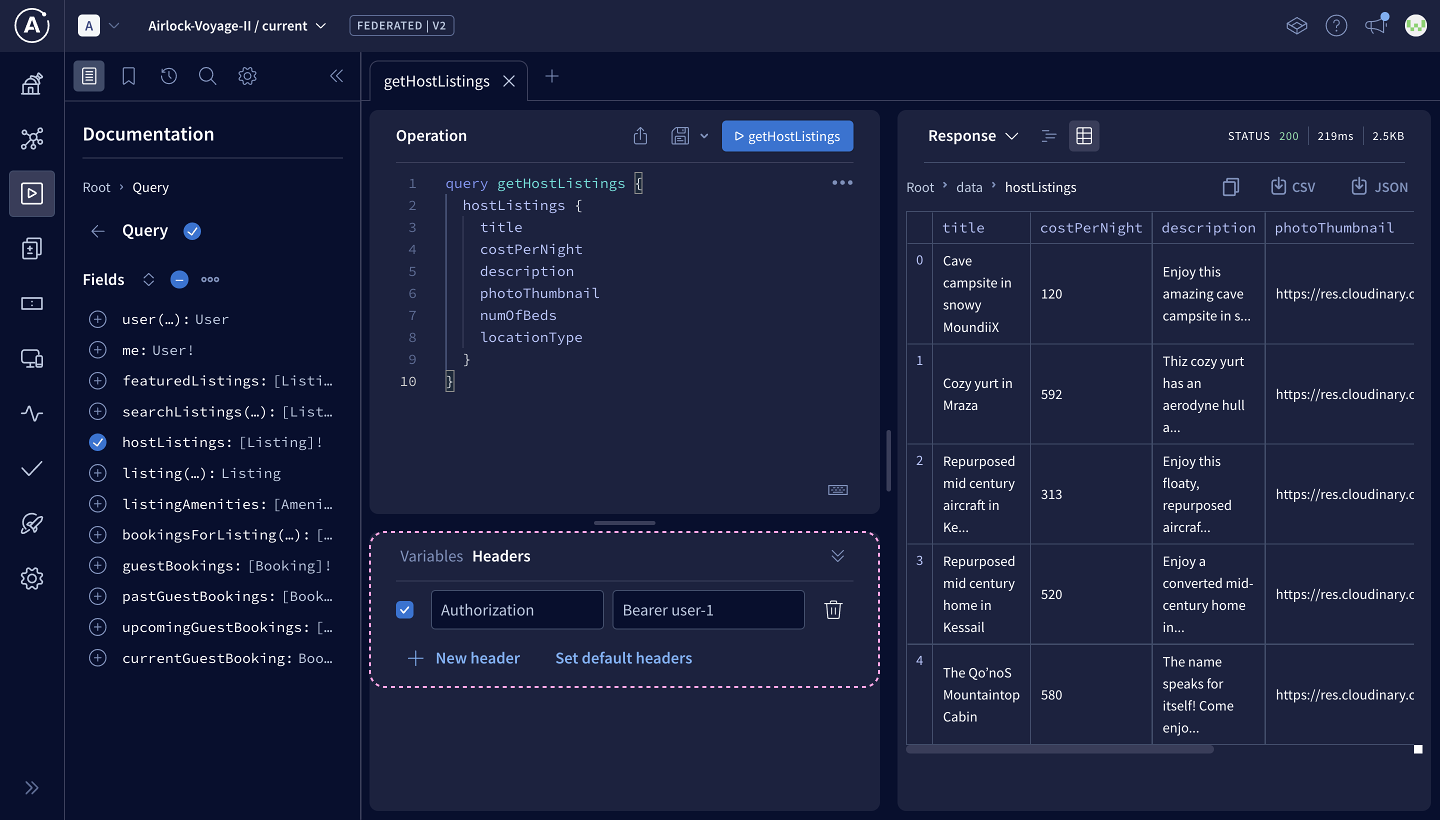
Authorization: Bearer user-1
Let's run the query again! We get the list we're asking for with all the fields we need.
We get a ForbiddenError that says only hosts have access to listings. We're logged in as a guest so that's great, our server is working as it's supposed to!

Practice
headers:all:request:- propagate:named: "airlock-cookie"
config.yaml file, what does the propagate key tell the router to do?Key takeaways
- To pass down authorization headers from the router to its subgraphs, we need to set up the router's config file.
- In the config file, we can set the
headersproperty and use thepropagateproperty.
- In the config file, we can set the
- A subgraph can access the authorization (and other request) headers from the router through its
ApolloServerconstructorcontextproperty. - We can use Apollo Explorer's Headers panel to set authorization headers for our GraphQL request.
Up next
We've checked off another task in our migration plan, and we're ready to move on to split this subgraph even further.
Share your questions and comments about this lesson
Your feedback helps us improve! If you're stuck or confused, let us know and we'll help you out. All comments are public and must follow the Apollo Code of Conduct. Note that comments that have been resolved or addressed may be removed.
You'll need a GitHub account to post below. Don't have one? Post in our Odyssey forum instead.