Creating and Using Contracts
Learn how to create, use, and edit contracts in GraphOS
This feature is only available with a GraphOS Enterprise plan.
You can test it out by signing up for a free Enterprise trial.
ⓘ NOTE
The GraphOS Studio steps below require an organization member with the Org Admin or Graph Admin role. Learn about member roles.
Create contracts
Prerequisites
Update your router and subgraphs
Before you create any contracts:
If you're using Apollo Server:
- For Federation 2 contract variants, update your Apollo Server subgraphs to v2.0.0 or later of the
@apollo/subgraphlibrary. - For Federation 1 contract variants, update
@apollo/subgraphto v0.1.1 or later.
- For Federation 2 contract variants, update your Apollo Server subgraphs to v2.0.0 or later of the
ⓘ NOTE
@apollo/subgraph replaced @apollo/federation for Apollo Server instances acting as subgraphs. Symbol names are unchanged.
If you're using the
@apollo/gatewaylibrary instead of GraphOS Router:- For Federation 2 contract variants, update your gateway's
@apollo/gatewaylibrary to v2.0.2 or later. - For Federation 1 contract variants, update your gateway's
@apollo/gatewaylibrary to v0.34.0 or later.
- For Federation 2 contract variants, update your gateway's
ⓘ NOTE
Apollo recommends the router over @apollo/gateway because it significantly improves performance and security.
If you have a federated graph currently using @apollo/gateway, you can move to the router without changing any other part of your graph. See the migration guide.
Older versions of the above libraries and tools don't fully support the required @tag directive.
(Fed1 only) Enable variant support for @tag
ⓘ NOTE
This step is required for Federation 1 supergraphs only. If you have a Federation 2 supergraph, proceed to the next step.
A contract uses one of your graph's existing variants (called the source variant) to generate its contract schema. If your source variant uses Federation 1, you need to enable its support for the @tag directive in GraphOS Studio:
- Open the Settings page for the variant you want to use as your source variant, then select the This Variant tab.
- In the Build Configuration section, click Edit Configuration and enable support for
@tag.
1. Add @tags to subgraph schemas
With contracts, you apply the @tag directive to types and fields in your subgraph schemas to indicate whether to include or exclude them from your contract schema.
Before you can add @tags, you need to define the directive in your subgraph schema. The way you do this depends on which federation version you're using:
For example, let's take a look at this Federation 2 subgraph schema:
extend schema@link(url: "https://specs.apollo.dev/federation/v2.0"import: ["@key", "@tag"])type Query {topProducts: [Product!]! @tag(name: "partner")}# All fields of the Product object type automatically inherit# the "partner" tag so we can avoid tagging them individuallytype Product @key(fields: "upc") @tag(name: "partner") {upc: ID!name: String!description: String!internalId: ID! @tag(name: "internal")percentageMatch: Float! @tag(name: "experimental")}
This schema applies the @tag directive to the following locations:
- The
Query.topProductsfield (which returns a list ofProducts) - The
Productobject type - Two fields of
Product(internalIdandpercentageMatch)
Each @tag has a string name. You tag types and fields with the same name if they should be included or excluded as a group by a particular contract.
💡 TIP
For in-depth details on valid @tag usage, see Rules for @tags and contracts.
Whenever GraphOS composes your source variant's supergraph schema, that schema retains all the @tags from your subgraph schemas. Composition removes some other directives by default. Learn more.
2. Publish updated subgraph schemas
After you've added tags, update your source variant by publishing your updated subgraph schemas to GraphOS.
💡 TIP
After publishing, if Studio doesn't reflect the @tags you've added in your subgraph schemas, ensure you've updated all required libraries and tools. If you obtain your subgraph schemas via introspection, older subgraph libraries might strip the @tag directive.
3. Create a contract
Open your source variant's Settings page and select the This Variant tab. Open Contracts in the left navigation.
Click Create Contract to open the contact creation dialog.
In the first step of the dialog, provide the following:
- A name for your new contract variant
- The source variant to use
ⓘ NOTE
You can't change these values after the contract is created.
Click Continue.
Specify tag-based filters for your contract.
The dialog detects all tag names used in your source variant's schema and populates the Excluded Tags and Included Tags dropdown lists with those names. You can add any number of tag names to each list.
You can also add tag names not yet present in your source variant's schema. If you later add tags with that name, the contract honors them.
💡 TIP
In Apollo Federation 2, if you want to exclude a type or field from your source variant's API schema and all its contract schemas, you can use the @inaccessible directive instead of @tag. For details, see Using @inaccessible.
When you're finished adding tag names, click Generate Preview. Studio attempts to generate a contract schema based on the filters you provided and displays the result. After you generate the preview, click Review to continue to the next step.
Review all the details of your contract. If everything looks right, click Create. This kicks off the generation of your contract variant and its initial contract schema as a launch.
ⓘ NOTE
GraphOS might encounter an error while generating your contract schema. For descriptions of these errors, see Errors.
Using contract variants
You can use your contract variants to provide contract routers or contract documentation to your users. For example, you can complete the managed federation setup for a new router instance that uses your contract variant.
Automatic updates
Apollo automatically updates your contract schema whenever any of the following occurs:
- GraphOS successfully composes an updated supergraph schema for the contract's source variant.
- You edit your contract.
These automatic updates ensure that your contract schema reflects your source variant's latest version and that the correct types and fields are included and excluded.
Your managed contract routers automatically fetched updates to your contract schema.
Edit contracts
ⓘ NOTE
You can't change an existing contract's name or source variant. Instead, you can create a new contract and delete the existing contract variant if you no longer need it.
After you create a contract, you can edit its lists of included and excluded tags:
- From the Contracts list in your graph's Settings page, click the ••• button on the right of the contract you want to edit. Then click Edit Contract. This opens a dialog similar to the one you used to create the contract. Make any required changes.
- If you change the contract's included or excluded tags, GraphOS automatically runs contract checks to determine whether those changes will affect any clients using your contract variant. The result of these checks appears in the Review Schema step of the contract edit dialog.
- The dialog shows Contract Updated once the update is complete.
Run contract checks
If you run schema checks in GraphOS Studio (which we recommend for all graphs), those checks include contract checks for any variant that acts as a source variant for contracts. Contract checks help your team identify when proposed changes to a source variant will negatively affect one or more downstream contracts.
ⓘ NOTE
To run contract checks via rover subgraph check, you must update the Rover CLI to v0.8.2 or later.
- If you use Rover v0.8.0 or v0.8.1, contract checks run, but Rover ignores any contract check failures in blocking downstream variants you've set.
- If you use a version prior to v0.8.0,
rover subgraph checkdoes not run contract checks at all.
When you run schema checks on a source variant, contract checks execute alongside the other checks for that variant (composition checks and operation checks).
Contract checks rely on the supergraph schema generated by composition, so they don't execute if composition checks fail.
Contract checks do the following for each of a source variant's associated contracts:
- Use the source variant's proposed supergraph schema (validated by composition checks) to generate and validate an updated contract schema.
- Run operation checks against the updated contract schema.
On your graph's Checks page in Studio, contract checks appear as Downstream:
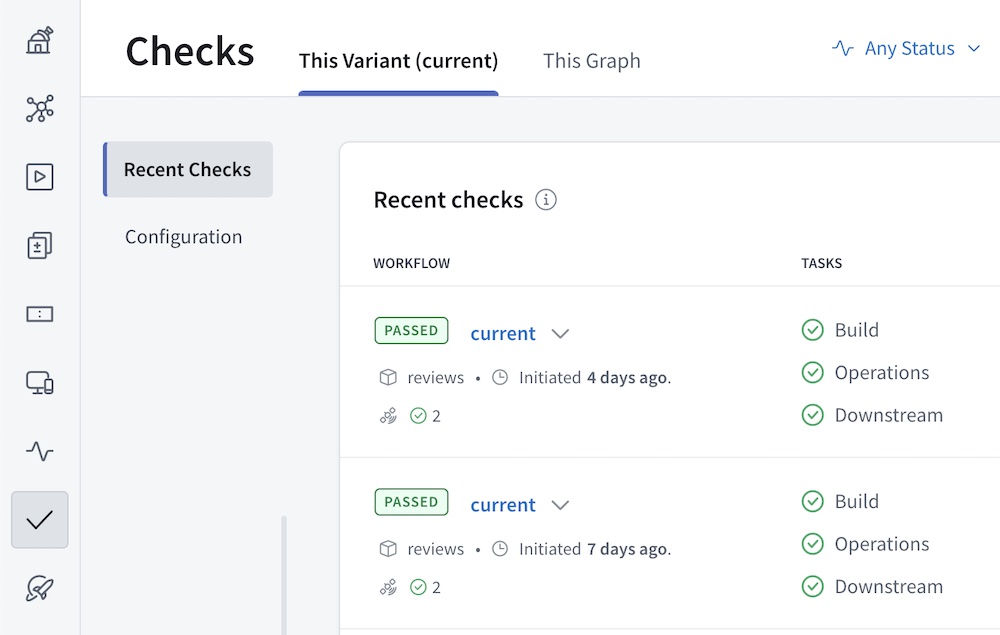
Click the Downstream item in the Tasks column to view a summary of all contract checks that ran. Click a particular check to view more details.
Failing contract checks
Unlike other types of checks, failing contract checks don't cause their associated schema checks workflow to fail by default. This means that the rover subgraph check command doesn't return an error state that would prevent a CI task from merging or deploying changes to the source variant.
If you want failing contract checks to fail your entire checks workflow, you can set the blocking downstream variants configuration for your source variant. If contract checks fail for any of these specified contract variants, the source variant's checks workflow does fail.
To set blocking downstream variants:
- Open your source variant's Checks page and select the This Variant tab.
- Click Configuration and scroll to the Blocking Downstream Variants section.
- Select each contract variant that should be a blocking downstream variant.
From now on, whenever schema checks run for your source variant, those checks fail if contract checks fail for any blocking downstream variant.