Get started with Apollo Server
This tutorial helps you:
- Obtain a basic understanding of GraphQL principles
- Define a GraphQL schema that represents the structure of your data set
- Run an instance of Apollo Server that lets you execute queries against your schema
This tutorial assumes that you are familiar with the command line and JavaScript and have installed a recent Node.js (v14.16.0+) version. Additionally, for those interested, this tutorial includes an optional section describing how to set up Apollo Server with TypeScript.
Step 1: Create a new project
- From your preferred development directory, create a directory for a new project and
cdinto it:
mkdir graphql-server-examplecd graphql-server-example
- Initialize a new Node.js project with
npm(or another package manager you prefer, such as Yarn):
npm init --yes && npm pkg set type="module"
This getting started guide sets up a project using ES Modules, which simplifies our examples and allows us to use top-level await.
Your project directory now contains a package.json file.
Step 2: Install dependencies
Applications that run Apollo Server require two top-level dependencies:
graphql(also known asgraphql-js) is the library that implements the core GraphQL parsing and execution algorithms.@apollo/serveris the main library for Apollo Server itself. Apollo Server knows how to turn HTTP requests and responses into GraphQL operations and run them in an extensible context with support for plugins and other features.
Run the following command to install both of these packages and save them in
your project's node_modules directory:
npm install @apollo/server graphql
Follow the instructions below to set up with either TypeScript or JavaScript:
Step 3: Define your GraphQL schema
ⓘ NOTE
The code blocks below use TypeScript by default. You can use the dropdown menu above each code block to switch to JavaScript.
If you're using JavaScript, use .js and .jsx file extensions wherever .ts and .tsx appear.
Every GraphQL server (including Apollo Server) uses a schema to define the structure of data that clients can query. In this example, we'll create a server for querying a collection of books by title and author.
Open index.ts in your preferred code editor and paste the following into it:
import { ApolloServer } from '@apollo/server';import { startStandaloneServer } from '@apollo/server/standalone';// A schema is a collection of type definitions (hence "typeDefs")// that together define the "shape" of queries that are executed against// your data.const typeDefs = `#graphql# Comments in GraphQL strings (such as this one) start with the hash (#) symbol.# This "Book" type defines the queryable fields for every book in our data source.type Book {title: Stringauthor: String}# The "Query" type is special: it lists all of the available queries that# clients can execute, along with the return type for each. In this# case, the "books" query returns an array of zero or more Books (defined above).type Query {books: [Book]}`;
import { ApolloServer } from '@apollo/server';import { startStandaloneServer } from '@apollo/server/standalone';// A schema is a collection of type definitions (hence "typeDefs")// that together define the "shape" of queries that are executed against// your data.const typeDefs = `#graphql# Comments in GraphQL strings (such as this one) start with the hash (#) symbol.# This "Book" type defines the queryable fields for every book in our data source.type Book {title: Stringauthor: String}# The "Query" type is special: it lists all of the available queries that# clients can execute, along with the return type for each. In this# case, the "books" query returns an array of zero or more Books (defined above).type Query {books: [Book]}`;
Adding #graphql to the beginning of a template literal provides GraphQL syntax highlighting in supporting IDEs.
This snippet defines a simple, valid GraphQL schema. Clients will be able to execute a query named books, and our server will return an array of zero or more Books.
Step 4: Define your data set
Now that we've defined the structure of our data, we can define the data itself.
Apollo Server can fetch data from any source you connect to (including a database, a REST API, a static object storage service, or even another GraphQL server). For the purposes of this tutorial, we'll hardcode our example data.
Add the following to the bottom of your index.ts file:
const books = [{title: 'The Awakening',author: 'Kate Chopin',},{title: 'City of Glass',author: 'Paul Auster',},];
const books = [{title: 'The Awakening',author: 'Kate Chopin',},{title: 'City of Glass',author: 'Paul Auster',},];
This snippet defines a simple data set that clients can query. Notice that the two objects in the array each match the structure of the Book type we defined in our schema.
Step 5: Define a resolver
We've defined our data set, but Apollo Server doesn't know that it should use that data set when it's executing a query. To fix this, we create a resolver.
Resolvers tell Apollo Server how to fetch the data associated with a particular type. Because our Book array is hardcoded, the corresponding resolver is straightforward.
Add the following to the bottom of your index.ts file:
// Resolvers define how to fetch the types defined in your schema.// This resolver retrieves books from the "books" array above.const resolvers = {Query: {books: () => books,},};
// Resolvers define how to fetch the types defined in your schema.// This resolver retrieves books from the "books" array above.const resolvers = {Query: {books: () => books,},};
Step 6: Create an instance of ApolloServer
We've defined our schema, data set, and resolver. Now we need to provide this information to Apollo Server when we initialize it.
Add the following to the bottom of your index.ts file:
// The ApolloServer constructor requires two parameters: your schema// definition and your set of resolvers.const server = new ApolloServer({typeDefs,resolvers,});// Passing an ApolloServer instance to the `startStandaloneServer` function:// 1. creates an Express app// 2. installs your ApolloServer instance as middleware// 3. prepares your app to handle incoming requestsconst { url } = await startStandaloneServer(server, {listen: { port: 4000 },});console.log(`🚀 Server ready at: ${url}`);
// The ApolloServer constructor requires two parameters: your schema// definition and your set of resolvers.const server = new ApolloServer({typeDefs,resolvers,});// Passing an ApolloServer instance to the `startStandaloneServer` function:// 1. creates an Express app// 2. installs your ApolloServer instance as middleware// 3. prepares your app to handle incoming requestsconst { url } = await startStandaloneServer(server, {listen: { port: 4000 },});console.log(`🚀 Server ready at: ${url}`);
This tutorial uses Apollo Server's standalone web server. If you'd like to integrate Apollo Server with your favorite web framework such as Express, see our web framework integrations.
Step 7: Start the server
We're ready to start our server! Run the following from your project's root directory:
npm start
You should now see the following output at the bottom of your terminal:
🚀 Server ready at: http://localhost:4000/
We're up and running!
Step 8: Execute your first query
We can now execute GraphQL queries on our server. To execute our first query, we can use Apollo Sandbox.
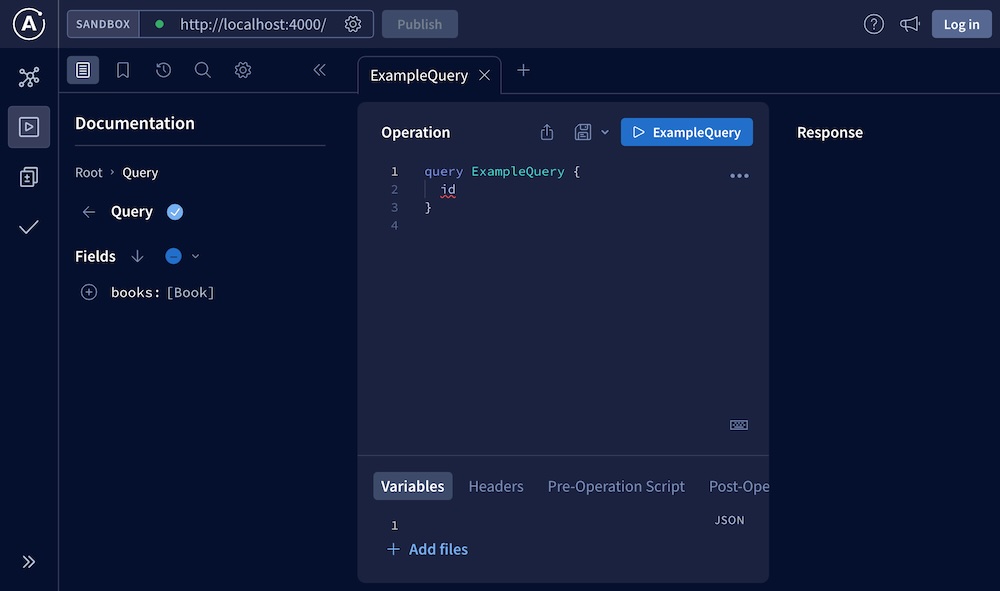
Visit http://localhost:4000 in your browser, which will open the Apollo Sandbox:

The Sandbox UI includes:
- An Operations panel for writing and executing queries (in the middle)
- A Response panel for viewing query results (on the right)
- Tabs for schema exploration, search, and settings (on the left)
- A URL bar for connecting to other GraphQL servers (in the upper left)
Our server supports a single query named books. Let's execute it!
Here's a GraphQL query string for executing the books query:
query GetBooks {books {titleauthor}}
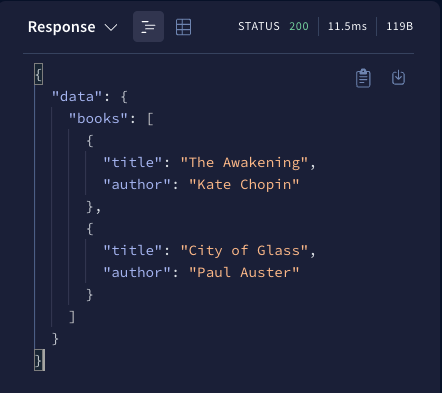
Paste this string into the Operations panel and click the blue button in the upper right. The results (from our hardcoded data set) appear in the Response panel:

Note: If Apollo Sandbox can't find your schema, ensure you have introspection enabled by passing introspection: true to the ApolloServer constructor. We recommend disabling introspection when using Apollo Server in a production environment.
One of the most important concepts of GraphQL is that clients can choose to query only for the fields they need. Delete author from the query string and execute it again. The response updates to include only the title field for each book!
Complete example
You can view and fork the complete example on CodeSandbox:
Edit in CodeSandboxNext steps
This example application is a great starting point for working with Apollo Server. Check out the following resources to learn more about the basics of schemas, resolvers, and generating types:
Want to learn how to modularize and scale a GraphQL API? Check out the Apollo Federation Docs to learn how a federated architecture can create a unified supergraph that combines multiple GraphQL APIs.
If you want to use Apollo Server with a specific web framework, see our list of integrations. If we don't have an Apollo Server integration for your favorite framework, you can help our community by building one!